New Member - Please check my rear remote install.

   / New Member - Please check my rear remote install. #21  
L355SS

Are you sure you put tee's in the pressure line?

If you did that, the fluid would find the path with the least resistance, so when you tried to operate one function, the fluid would go the other route.

However if the other route did have a blockage of some kind, QD, etc, then the first circuit would build up pressure.


Can you give us a detailed explanation of your hookup?

JJ
Maybe??
The last post was my recollection of what I had done but after looking closely I find it to be way different. Evidently my Alzheimers has progressed beyond expectations.
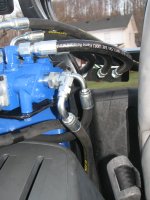
Loader valve IN port hose from Engine block (there are two ports on this little aluminum looking block (assuming this is pressure and return ports?)
PB port hose on loader valve to IN of remote valve
Remote valve OUT and Loader valve OUT to Tee and plumbed to fitting on side of Hydrostat?
PB port on remote valve to Engine block (return? fluid)

Dennis
 
   / New Member - Please check my rear remote install.
  • Thread Starter
#22  
I am not trying to confuse you, however i can understand if my confusion is rubbing off. The prince valve in the picture you attached is the OEM FEL valve.
I am glad to hear you say that is a relief valve port, as i could not figure out what it was. I had thought it might be a pb port.

I am installing a separate 3 stack valve for use with rear remotes, and i have not installed any of the hoses for it. It is merely mounted to the tractor awaiting hookup.

Below the pictures will show the changes I have made since I read some of your other post. I plan on replacing the black cover with the aluminum block. I reinstalled the PB port and will connect a hose to it and send it to the aluminum hyd. block pictured. The "pressure in" I plan on also hooking up at the aluminum hyd block (center most connection) and connecting to the "in" port of the stack valve. The "out" as I now understand needs to return to tank. So i was thinking instead of cutting the piping on my tractor i would replace the yellow fill cap with a sae 12 oring to 1/2 Jic fitting.

Please correct me if I am wrong in my assumptions or plans.

Andy


new hyd block will replace oem cover.jpgnew alum. hyd block.JPGnew return to tank fitting .JPGNew valve with pb port.JPG
 
   / New Member - Please check my rear remote install. #23  
What is the purpose of the hyd block with the two ports and fittings.

If I were to add the blue remote valve, I would find the line where the PB line goes into the side of the tractor for the 3pt, and insert the remote valve in series with the PB flow.

The blue valve needs a PB adapter to feed the 3pt IN port on the side of the tractor.

Do you not have a hyd block where the pump flow goes into it and the output goes to the loader valve? First post, third picture.

It also has the tractor relief on it.
 
   / New Member - Please check my rear remote install. #24  
Andy,
you are almost done. The Woods hydraulic block actually lets you insert your PRINCE valve into the high pressure circuit just before the TPH; all that is left is to connect the out/tank port of the PRINCE valve into the tank/reservoir. You indicate that you might just dump the low pressure fluid from Prince valve into the tank filler neck. There is at least one disadvantage: the fluid will discharge into open space which will cause aeration. Most systems have the discharge fluid entering underneath the surface of the fluid to prevent that. I believe it will worth the effort to identify all the tank lines and determine which one is most easily teed into. Tee connectors are available that are a little like compression fittings for copper tubing, but designed for steel pipe at hydraulic pressures; unlike the copper fittings, these ferrules have sharp edges that bite into the pipe. I use them often and although I always think them a little shakey, they have always worked. Several sponsors have them and they are not expensive. You just cut out a short section of pipe, tighten the collar nuts, and then connect the out hose from the Prince valve to the third port of the tee.

We look forward to pictures.
 
   / New Member - Please check my rear remote install.
  • Thread Starter
#25  
Thanks Farmerford, thought I was in left field there for a while. I now understand the importance of returning the fluid to tank below the fluid level. I wanted to avoid cutting the oem pipes but looks like thats what I need to do. So, I have identified the #8 port on the diagram below as the "path to the reservoir". The picture below shows the bottom pipe that I will cut. I will cut the pipe and install a tee. Am I correct that these are called flareless bite type tees?

HydraulicDiverter-01.jpg
manifold under tractor .JPG

J_J I had purchased the two port block thinking that if it was sufficient for a BH attachment , then it would be good enough for a my remotes. I now think that it is as long as I use a third "out" port. If not I would run the risk of blowing out the low pressure port if/when 3pt hitch exceeded 500PSI.

I understand now how you where explaining to use the Manifold Block Power Beyond. I do want to limit the amount of alteration to original equipment and I have already committed a fair amount of money to using the rear remote block. If I were not so far along, your method would probably be my preferred method. Thanks for the info and guidance.

I will definitely post pictures when I get things hooked up.
 
   / New Member - Please check my rear remote install. #26  
Andy:

Looks like you have it under control. Yes, the fittings are called among other things flareless bite type. The only caution I have is to cut the metal line in a straight section so that there is adequate straight tubing to enter each end of the tee fitting and if possible cut in the middle of the line rather than at one end near a fitting since if the line is under strain because it does not line up exactly with the fixed ports on each end it is easeir to bend it a little to line it up with the tee.

We look forward to pictures of the finished project.
 
   / New Member - Please check my rear remote install.
  • Thread Starter
#27  
IMG_0301.JPGDecided to take off the return to tank line from the FEL and use a run tee to connect the new valve return line.

IMG_0305.JPG Installed the new block and hoses

IMG_0303.JPG Helper for Quality Control

IMG_0307.JPG New top link and QD's


Thanks for the help

My buddy and I can now start building the log splitter.
 

Attachments

  • IMG_0304.jpg
    IMG_0304.jpg
    764.4 KB · Views: 114
 
Top