Kubota L3200 TnT & 3rd function install (work in progress)

   / Kubota L3200 TnT & 3rd function install (work in progress)
  • Thread Starter
#22  
I'm assuming the camera on my phone doesn't like really cold temps as those weird rainbow artifacts are back.
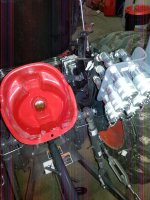
IMG_20131205_184848.jpg

You can see the big funnel with that screen that took 5+ minutes to drain every time I filled it up. Took a while to fill the hydraulics & made me really appreciate getting SUDT2. I still hate & can't quite read the site glass on the side of the tractor for hydraulic level. I assume it's a bit low as I filled it up with 95% of what I drained out & haven't opened up the 2.5 gal of extra SUDT2 I picked up.
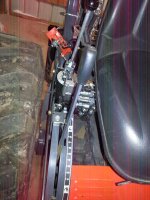
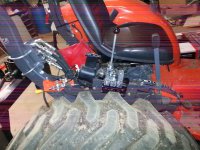
IMG_20131205_184917.jpg IMG_20131205_184803.jpg

I put most of the fender back on after the photos. I'll probably end up bending the joystick handle at some point so it almost ends up touching the fender when it limits out to the right & moves farther away from my leg. It works for now though. I think a longer handle for the 3rd function is coming with my cylinders. That will need a fair bit of cutting and/or bending to get out from under the seat, but that was expected & just futureproofing (I don't have anything to use that valve yet).
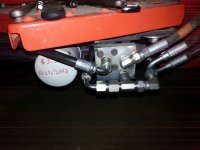
IMG_20131205_184905.jpg

I'm reasonably happy with the little T manifold for the tank lines. It sticks out a little, but not much more than stock. I zip tied the in/out/tank lines to some of the steel piping running under the floor boards. It should keep it supported & out of the way. For anybody copying my designs, use #8 JIC fittings for everything, my notes are wrong. I would also add about 2" to 5 of the work port lines & 3" to the 6th. The frame mount for the fender under the seatbelt is a pain in the ***, especially with it being at a 45 degree angle. If you go a little longer on the work hoses though, there is nothing close under the frame to get in the way. When I reordered the in/out/tank hoses with the right fittings I got them as 46" (straight-straight) 44", 40" (straight-90). Glad I did. They might have been an inch or 2 long, but there was plenty of room for the slack & it made install easier. If somebody without welding skill wanted to do this, you shouldn't have to many problems. You could just mount the valve straight to the fender rather than the frame (Kubota did that for the PTO lever).

Getting the metal plug covers turned out to be a pain in the ***. You have to pull the QD connectors to put the keeper strap on. The hydraulic wrenches (mentioned in Number9L's post) were invaluable on every other hose & fitting, but unfortunately to small for the ag connectors & bulkhead fittings. I made do with some crescent wrenches, but those tight big fittings are a pain.

FitRite has been great help so far, given the confusion on #6 vs #8 JIC connectors & my general ignorance of hydraulics.
 
   / Kubota L3200 TnT & 3rd function install (work in progress) #23  
Very Slick install Fallon. :thumbsup:

James K0UA
 
   / Kubota L3200 TnT & 3rd function install (work in progress) #24  
I am sorry that you are only reasonably happy with the T manifold. :( I am VERY happy with YOUR design :cool: and how it turned out. ;)


Looks like UPS is dropping the ball again. :mur: I don't think your set is getting to you today.
 
   / Kubota L3200 TnT & 3rd function install (work in progress)
  • Thread Starter
#25  
Ya, saw the 3 exception notices this morning. They were last seen about 30 miles away at 8am, so they might make it today, who knows. We got 6" of snow on Wednesday & it wasn't enough to wory about plowing, 30% & 40% chance this weekend. Probably not enough to mess with unless I just want to go play with my tractor & new toys. 10 degree temperatures negate my motivation to go out & play.

The design turned out how I had planned it & I'm not sure how I could do it any better without custom bent steel pipe or tapping into the pipe on the back side of the block. The fittings stick out past the edge of the platform just over an inch & would be vulnerable if I dropped something or brush whipped up from behind the front tire. All the hard fittings wouldn't have much give to them & could generate a decent amount of leverage where it goes into the block. The OEM hoses stuck out a little ways too, so it's not like Kubota did much better at protecting things.

The real test will be cylinder leak down once I get the last parts & get them installed. Humm... wonder how much our current arctic temperatures would skew results compared to normal 50-60+ temps. I'd imagine cold thick hydro juice would decrease any potential leak down.
 
   / Kubota L3200 TnT & 3rd function install (work in progress)
  • Thread Starter
#26  
Ugg, no packages until Monday. Dam UPS.
 
   / Kubota L3200 TnT & 3rd function install (work in progress)
  • Thread Starter
#27  
Got the fender all the way back on & bent the joystick this evening. May have some issues with clearance on the 3rd function, but that's to worry about another day. It should be all done except for swapping in the new cylinders & hooking up the 4 easy hoses here Monday evening.

Hydraulics were running pretty slow doing a couple quick chores with it, but I'm chalking that up to 0 degree weather for now.
 
   / Kubota L3200 TnT & 3rd function install (work in progress) #28  
I would insist on making a very solid steel shield to go over where the hoses exit the valve. Realize with your *** immediately next to the valve, any pinhole leak in the hydraulic hoses/lines/etc. is going to inject hydraulic fluid in a very bad spot.
 
   / Kubota L3200 TnT & 3rd function install (work in progress)
  • Thread Starter
#29  
UPS finally came through last night & I appear to have all the remaining parts. It was even above freezing for the first time in a week thismorning. Hope to have everything installed tonight.

Ishiboo... I've heard about the horror of hydraulic injection, but thankfully never come close to encountering it. It shouldn't be that hard to mount a small shield hanging off the side of the valve. Would Plexiglas be strong enough? Think I have some laying around I could heat form to make the appropriate brackets & coverage.
 
   / Kubota L3200 TnT & 3rd function install (work in progress)
  • Thread Starter
#30  
I got the cylinders all installed. They are a jumpy jerky pain getting them lined up, well the sidelink at least. Smoothed out nicely once I cycled the air out, but a pain to try & get those holes lined up at the start. The few minutes of operation looked pretty good, once the air was finally cycled out. I did notice the joystick having some minor issues. When it's back to engage the top float detent it can easily engage the side spool & the top detent will leave the sidelink drifting just a hair without touching the stick. I might just need to lube it up a bit or see if the joystick linkage is binding slightly. I didn't have enough time to check that out properly, much less do any leakdown testing. Hopefully this weekend.

Anybody know what that spare snap ring pin hanging from the end of the side link is for? One on each side just hanging there on the little welded on loop on the side (and the new sidelink cylinder). Looks like a spare for something.

IMG_20131210_181215.jpg

My quick hitch is great, but makes the already cramped back end even more so. I'm probably going to fiddle with remounting the QD manifold. Not sure if I'm just going to drop it down a little bit or build an adapter plate so I can rotate it to face towards the ground a little more. One of the toplink hoses gets a hair tighter than I'd like when the 3pt is all the way down & everything gets squished up top when it's up.

IMG_20131210_190458.jpg IMG_20131210_190449.jpg
Photos are with the 3pt about 75% of the way up just before things get really cramped.

I spent by far the longest time measuring & remeasuring hose lengths & fittings for those hoses, but never found something I was completely happy with, so I was expecting this a bit. There is just so much movement to account for in 3 different directions in a cramped space. Rotating the QD manifold down a bit should help clear that crossbar on the quick hitch. I might end up buying a couple more angle fittings or something depending on how things turn out. As Number9L already noted the handles on the quick hitch could already take out a tail light before the TnT, so I'll just have to continue being carefull not to mess up the hoses along with taking out a tail light with the 3pt all the way raised. Been meaning to weld on 2 brackets to keep those handles pointed towards the rear & away from the tail lights, but haven't had the time or motivation yet.

After moving the adjustable sidelink to the other side & calibrating it to level at half cylinder on the side link was pretty easy. I'm happy with the performance I saw so far. I just have to watch out for clearance at the top until I get stuff sorted out a little better.
 
 
Top