Iseki TU205F Universal joints

   / Iseki TU205F Universal joints #1  

svcguy

Gold Member
Joined
May 30, 2005
Messages
362
Location
West Kootenays, British Columbia
Tractor
Yanmar YM240D / Massey Ferguson 135 / New Holland TN75F / Pasquali 988 and 997 / Goldoni 20A, 226 and Maxter 70RS / Ferrari 76 and 85 / Holder A50 / Valpadana VMC 180 / Long 610 4WD
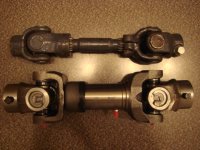
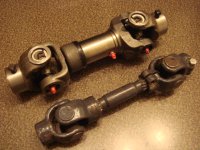
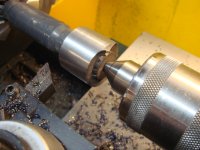
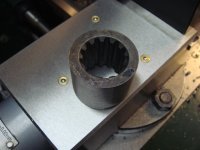
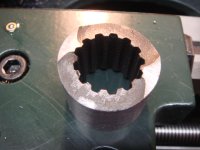
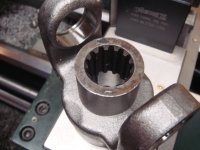
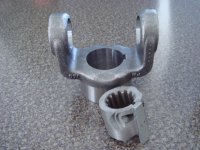
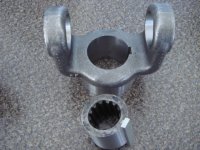
I have a TU205F. TU series have an external driveshaft from the engine to the transfer case / transmission and I have damaged the universals using the lower ranges on the tractor. I have been able to patch them back together, but this last failure is pretty serious. Two questions:

Has anyone successfully upgraded to a heavier universal on the TU series?

Has anyone found an affordable TU universal anywhere?

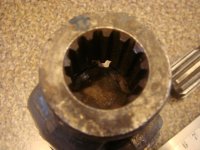
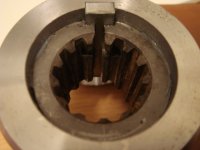
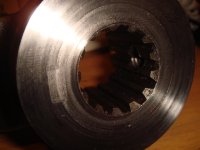
The universals are a 13 spline metric and pretty specific, but there may be a Japanese car or other tractor that uses a similar setup. Any information would be greatly appreciated.

Thanks,

Tom
 
   / Iseki TU205F Universal joints #2  
I think if I had one to copy, I could come up with a cheaper replacement than the OEM one from Japan.
 
   / Iseki TU205F Universal joints
  • Thread Starter
#3  
Hi Len, I could send one out if you think it could be matched up with something. I will write you at your business email. Thanks.
 
   / Iseki TU205F Universal joints
  • Thread Starter
#4  
A quick update on the TU205F driveline problem. I explored a number of possibilities on this and Len offered to look into replacing the universals and yolks or making new ones, as he had a number of suitable possibilities to experiment with. We talked about boring out the yolks for standard universals, but the problem was my yolks are shot. Yolks are not easily replaced.
The challenge is the 13 spline Japanese metric drive shaft. Apparently, there are a number of metric standards, European being the most common. The Japanese tend to use a fairly steep profile on splines and there was nothing that matched available that we could find. A number of machine shops took a look, but didn't have the broaches for that profile and a one off custom setup was going to be pretty costly. What I ended up deciding on was building a new driveline from standard industrial parts that are easily available. The problem of course are the two 13 spline stubs on the engine and transmission. Attached are photos of the old and new drivelines and the slide yolk that will be used as a donor for the internal splines. Notice I beefed up on size, as the original was all tweaked and twisted (which is why I couldn't use any of it). The final step will be cutting down the original yolks and turning the outside of the spline ends in the lathe. Then chucking the outboard yolks in the lathe, boring them to recieve the original splines with a .001 interference fit. I will drill and grub screw them in place and that will be the end of my woes.
 

Attachments

  • Driveline 001.jpg
    Driveline 001.jpg
    145.9 KB · Views: 357
  • Driveline 002.jpg
    Driveline 002.jpg
    145 KB · Views: 372
  • Iseki 002.jpg
    Iseki 002.jpg
    135.9 KB · Views: 315
   / Iseki TU205F Universal joints
  • Thread Starter
#5  
Prepared the first insert this evening for press fit. I used the slip joint for the first one. Cut the yolk ears off with a zip cutter (you can see from 003 where the yolk was cut), used a grinder to prepare it for roughing on the lathe. The slip section of the drive shaft was worn enough that it slipped nicely, but interestly enough, the other side was fairly tight. I tapped it on lightly with a mallet and chucked the shaft in the lathe with the tail stock to support it (001). Virtually no run out, so I turned down the outside diameter to 1.400

The next step will be to chuck the new outboard yolk in the lathe and drill out the centre to rough, then bore it to 1.399 for the insert. Once pressed in and set with Loc-tite, I will drill it and use a grub screw to anchor it.

The next yolk will be a bit more work, as I need to shrink a collar on the end before I take the bolt flanges off (to prevent damage from turning). Then I will turn it down for press fit too.

The attached pictures are in case anyone is interested in the process.
 

Attachments

  • Iseki_spline 001.jpg
    Iseki_spline 001.jpg
    149.9 KB · Views: 266
  • Iseki_spline 002.jpg
    Iseki_spline 002.jpg
    143.7 KB · Views: 172
  • Iseki_spline 003.jpg
    Iseki_spline 003.jpg
    156.3 KB · Views: 169
   / Iseki TU205F Universal joints
  • Thread Starter
#6  
Haven't had any time to work on this, but finally slipped out to the shop this morning for an hour. The two attached pictures show the boring setup on the lathe to turn the inside of the new yolk for a .001 interference fit and the finished yolk with the donor spline tapped into it. I will pick up some Loc-tite 609 this afternoon before pressing it in. I have also decided to cut a keyway into the donor to match the keyway in the yolk. Using a key will give much higher shear resistance than the original grub screw idea. I am also going to pre-drill the donor to line up with the set screw on the yolk. I can then use the set screws to anchor the new yolks to the engine and transmission stubs. As soon as I get a chance, I am going to begin on the next donor spline from one of the original compression yolks. So far, it's working out really well. The U-joints will now be standard 1310 joints available from any auto parts store.
 

Attachments

  • Iseki_spline 005.jpg
    Iseki_spline 005.jpg
    150.5 KB · Views: 265
  • Iseki_spline 004.jpg
    Iseki_spline 004.jpg
    145.3 KB · Views: 308
   / Iseki TU205F Universal joints
  • Thread Starter
#7  
Both the inserts are ready to press in now. I have cut keyways on both for shear strength, but interestingly, I needed a keyway on the original clamping yolk. Without the keyway, pressing that particular bushing in would simply compress it together. With the keyway, it gives it strength for pressing. Have some Loc-tite 609 and will press them in later this afternoon after I drill them. Also picked up some of the Loc-tite gel to fill in those areas of the clamping yolk that used to sport the bolt.
 

Attachments

  • Iseki_spline 006.jpg
    Iseki_spline 006.jpg
    154.4 KB · Views: 258
  • Iseki_spline 007.jpg
    Iseki_spline 007.jpg
    152.4 KB · Views: 366
   / Iseki TU205F Universal joints
  • Thread Starter
#8  
Finally got out and pressed the donor splines into the yolks this afternoon. Worked well, attached is the picture of the one that was cut from the clamping yolk. It's still a bit wet with Loc-tite and you can see the gray gel (also Loc-tite) in a few areas around the sleeve that was used to fill in the low spots from the original bolt. The last step will be turning the backs of the yolks off, as they are slightly too long.
 

Attachments

  • Iseki_spline.jpg
    Iseki_spline.jpg
    156.3 KB · Views: 198
   / Iseki TU205F Universal joints
  • Thread Starter
#9  
Well, this wraps up the one man dialogue on the Iseki driveline rebuild. The new driveline has worked out well. Final picture of the new front yolk with the donor spline faced off. You can see the shape of the keyway and donor, as I didn't worry much about the finish. Don't know if this has been helpful to anyone, but thought it might be nice to have in the threads for anyone faced with this type of problem in the future. Entire shaft was made from standard 1310 series driveline parts. I will need to modify the frame crossmember to accomodate the new shaft.

Just a reminder to everyone that if you have the time, service your driveshaft when it's still working well. The cost of both replacement or repair makes it well worthwhile.
 

Attachments

  • Iseki_spline 009.jpg
    Iseki_spline 009.jpg
    155.1 KB · Views: 175
   / Iseki TU205F Universal joints #10  
I,ve been Following the thread , & Waiting for You to finish before replying, I for One Much appreciate Your Posts, Pics & Details. Very Impresive Machine work. Thanks for Your time . Bob
 
 
Top