Bolens G154 / Iseki tx1300f

   / Bolens G154 / Iseki tx1300f
  • Thread Starter
#31  
Great photos. Thanks for posting all of this.

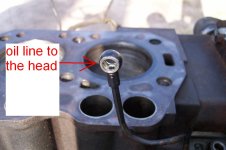
Could you measure the inner and outer diameter of the mating surface for the oil filter gasket? Also can you tell of the threads for the oil filter are metric or english?

For my TS1610, I see oil filter part numbers posted on this forum with much different gasket diameters than the one I am using. Also filters with 20mmx1.5mm threads verses the 3/4-16 threads on the filter I am using. Perhaps the gasket mating surface is large enough to accommodate the different filter part numbers with different gaskets.

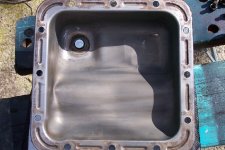
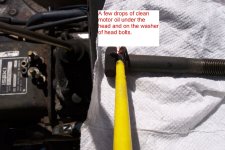
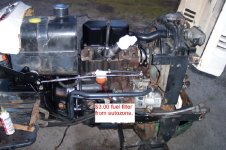
The measurement for the oil pump is 2.687" o.d.
and 2.25" . Also my thread is a 20mm X 1.5mm.
I just bought a Wix #51334 oil filter that is suppose
to be for my KE70 engine. But I just found in the
Iseki factory service manual that the oil filter should
have a bypass valve that opens at 14.2 psi if
filter becomes clogged. The 51334 filter has
a bypass set to 8-11 lbs. I have found a WIX
filter #51064 that is the same as 51334 as far as
physical sizes but the bypass valve is 16 lbs.
I will use the 51334 filter while I finish assembling
this engine but after I'm sure engine is ok I'll
be changing the oil again anyway and I will
be switching to the 51064. I feel that 8-11
psi bypass is to low for a diesel.
 
Last edited:
   / Bolens G154 / Iseki tx1300f
  • Thread Starter
#32  
Saturday I was able to do some more work to the tractor. I started by
putting rubber fuel line over rod bolts so they didn't damage the
crankshaft when I put pistons back in engine. I put my ring compressor
on the piston and pushed it into the cylinder. I did put assembly lube
on the rod bearings and installed rods onto the crankshaft. I finally
cleaned up the oil pan. It was full of black sludge but that sludge
probably kept the oil pan from rusting on the inside since
it had about a pint of water in it when I drained it. After I cleaned
the inside I sanded the outside which was rusty and blah.
After wiping it down with lacquer thinner and gave it several
coats of semi gloss black paint. After pan dried I installed it and
installed a new oil filter and filled the crankcase with fresh oil.
One of my big concerns was if the oil pump was going to work.
I pumped all of the oil passages with oil and put plugs back in and
installed the battery. I put motor oil in the cylinders and Cranked the engine
over with the starter. While I was cranking I keep spraying oil into the
cylinders and after about a minute or so I got oil pressure and oil came
out the oil line to the head and the rocker arms. I am so excited. next
up is I need to press two new valve guides into the head and assemble
the valves back into the head and install head onto the engine.
 

Attachments

  • 100_5418.JPG
    100_5418.JPG
    103 KB · Views: 285
  • 100_5416.JPG
    100_5416.JPG
    114.3 KB · Views: 256
  • 100_5417.JPG
    100_5417.JPG
    130.3 KB · Views: 346
  • 100_5421.JPG
    100_5421.JPG
    131.6 KB · Views: 201
  • 100_5420.JPG
    100_5420.JPG
    122.7 KB · Views: 298
  • 100_5419.JPG
    100_5419.JPG
    152.5 KB · Views: 369
  • 100_5422.JPG
    100_5422.JPG
    144.8 KB · Views: 326
  • 100_5423.JPG
    100_5423.JPG
    98.5 KB · Views: 205
  • 100_5425.JPG
    100_5425.JPG
    125.9 KB · Views: 390
  • 100_54243.JPG
    100_54243.JPG
    66.1 KB · Views: 325
  • 100_5428.JPG
    100_5428.JPG
    130.5 KB · Views: 227
  • 100_5426.JPG
    100_5426.JPG
    165 KB · Views: 331
   / Bolens G154 / Iseki tx1300f
  • Thread Starter
#33  
Thanks. I am working on this after I get home from work.
We work 10 hour days but I have been going in to work
by 5 AM so I can sand blast and paint parts for the Bolens.
I made a smaller Bolseki emblem which I like better.
I received some new parts in the mail the other day
so now I can start to reassemble. Monday I took the head
to work to replace a valve guide. I had to machine a tool
to press out the old guide and press in the new one. I
bought two new valve guides but after checking all
of the bores of the valve guides only one was worn
out. When I got home last night I was able to lap
the valve with the new valve guide so now all valves are
ready for valve seals and then springs . I did install
the new valve seals tonight and then the new valve
springs. The head is now ready to go back on tractor.
 

Attachments

  • 100_5438.JPG
    100_5438.JPG
    127.4 KB · Views: 240
  • 100_5429.JPG
    100_5429.JPG
    171.6 KB · Views: 287
  • 100_5431.JPG
    100_5431.JPG
    134.6 KB · Views: 270
  • 100_5435.JPG
    100_5435.JPG
    126.9 KB · Views: 243
  • 100_5436.JPG
    100_5436.JPG
    128.4 KB · Views: 313
  • 100_5437.JPG
    100_5437.JPG
    144.9 KB · Views: 326
   / Bolens G154 / Iseki tx1300f
  • Thread Starter
#34  
I had some time Thursday night so I put the alternator back together
and put it back on the tractor.
 

Attachments

  • 100_5445.JPG
    100_5445.JPG
    129.8 KB · Views: 308
  • 100_5447.JPG
    100_5447.JPG
    153 KB · Views: 240
  • 100_5446.JPG
    100_5446.JPG
    151.9 KB · Views: 236
   / Bolens G154 / Iseki tx1300f
  • Thread Starter
#35  
I was cleaning some of the items that will go back on the head
and I found the original owner had installed a block heater.
It was installed in the temp sending unit hole. But they used
a tee to use the heater and the temp sending unit. check the
pictures and you will see that the plumbing fittings had
clogged around where the temp sending unit was. For
now I'm going to just install the temp sending and hold off
on the block heater.
 

Attachments

  • 100_5444.JPG
    100_5444.JPG
    106.4 KB · Views: 258
  • 100_5439.JPG
    100_5439.JPG
    114.9 KB · Views: 353
  • 100_5441.JPG
    100_5441.JPG
    93.9 KB · Views: 286
   / Bolens G154 / Iseki tx1300f
  • Thread Starter
#36  
I installed the head and rocker arms yesterday. I put a few drops
of engine oil on the head bolt threads and under bolt heads
to help get a better torque reading when tightening bolts.
I pumped oil with my squeeze bottle into the rocker
arm shaft before installing rockers onto head. After I adjusted the valve lash
I removed the injector pump and cranked engine over to check oil
pressure to the rocker arms . After I was happy with oil flow I installed the valve cover, injector pump, injectors, injector lines, fuel filter and fuel lines.
 

Attachments

  • 100_5449.JPG
    100_5449.JPG
    166.6 KB · Views: 777
  • 100_5451.JPG
    100_5451.JPG
    139.7 KB · Views: 299
  • 100_5450.JPG
    100_5450.JPG
    173.2 KB · Views: 309
  • 100_5452.JPG
    100_5452.JPG
    124.7 KB · Views: 243
  • 100_5453.JPG
    100_5453.JPG
    139.9 KB · Views: 258
  • 100_5456.JPG
    100_5456.JPG
    108.8 KB · Views: 272
  • 100_5454.JPG
    100_5454.JPG
    154.1 KB · Views: 358
  • 100_5458.JPG
    100_5458.JPG
    153.6 KB · Views: 1,156
  • 100_5459.JPG
    100_5459.JPG
    166.1 KB · Views: 275
  • 100_5460.JPG
    100_5460.JPG
    137.8 KB · Views: 293
  • 100_5465.JPG
    100_5465.JPG
    168.6 KB · Views: 346
  • 100_5468.JPG
    100_5468.JPG
    133.3 KB · Views: 558
  • 100_5469.JPG
    100_5469.JPG
    131.3 KB · Views: 390
   / Bolens G154 / Iseki tx1300f #37  
I was cleaning some of the items that will go back on the head
and I found the original owner had installed a block heater.
It was installed in the temp sending unit hole. But they used
a tee to use the heater and the temp sending unit. check the
pictures and you will see that the plumbing fittings had
clogged around where the temp sending unit was. For
now I'm going to just install the temp sending and hold off
on the block heater.

You can get a 40 mm (freeze plug style) block heater off Amazon pretty cheap. I just installed a 400 watt one last night on a KE75 that I'm swapping out with a KE70 in a TX1300F. I put it in the freeze plug port that is slightly above and behind the starter. Took all of about 15 minutes to install the heater although I already had the starter removed. You need to pull the drain plug that is in front of the starter to drain the coolant to that level or deal with it coming out of the freeze plug port upon removal.

I would recommed testing the coolant high temp switch at this point if you still have it apart. If you have a candy thermometer or equivalent, just heat some vegetable oil (or motor oil) in a container on your stove to around 230°F. The switch should activate (close) right around that temp. Just monitor it with a continuity tester or rig up a test light and see what temp the light comes on. Obviously you will need to have a power supply and light for the second option running through the sensor.
 
   / Bolens G154 / Iseki tx1300f #38  
I installed the head and rocker arms yesterday. I put a few drops
of engine oil on the head bolt threads and under bolt heads
to help get a better torque reading when tightening bolts.
I pumped oil with my squeeze bottle into the rocker
arm shaft before installing rockers onto head. After I adjusted the valve lash
I removed the injector pump and cranked engine over to check oil
pressure to the rocker arms . After I was happy with oil flow I installed the valve cover, injector pump, injectors, injector lines, fuel filter and fuel lines.

The fuel filter you have looks great, but sometime down the road though you may want to install the replaceable element kind (it looks like the one you have is not element-replaceable) like in the attached picture although price-wise you can't beat what you have. This kind allows easier replacement, a shutoff, and bleeder screws. I've been getting them from Leonard Scheaffer for about $50/ea. The replacement filter elements can be had from Napa for about $10 (Napa P/N 3264). I can't find another source for the housings though but you should only need to buy this once. Be careful of the type of filter you install also as I've been told final filter elements for diesels have a finer filtering element than those for gasoline.

Incidentally, the KE70 shown is currently in the process of getting swapped out with a KE75. I suppose I should be documenting this as well, but it seems like its taking forever as-is and I'm lacking ambition to take the extra time to document. My biggest problem was splitting the engine from the donor machine. It didn't just come apart like its suppose to. I had to pull the plug from the clutch housing and remove all the clutch-to-flywheel bolts (a real PITA since there is barely enough room to get a wrench in there let alone swing it at all and then remove the bolts) and then separate the engine from the clutch housing. Since this was my first clutch ever, it was an unfortunate and unexpected problem. I ended up ruining the clutch disk using a puller, heat, and small sledge hammer to finally break the clutch from the transmission shaft. Yup, the throw-out bearing was gone too.

I'll try to get some pix when done with everything. I just need to clean and paint the KE75 and start going back together with it. I added a thermostat housing from another machine and this is causing some fit-up issues with injector lines. Not sure what I'll run into moving forward. You can also install a thermostat in the original hose fitting to the cylinder head but then you're back to removing the high-temp switch since there is not enough room for the thermostat and temp switch in the cylinder head void.

The KE70 runs, but is a dog on the low-end. It has terrible blow-by out the valve cover. I've concluded it is either 1.) pistons too out-of-round 2.) cracked liners that appear to have been installed by someone. Either way the fix will be expensive. It was cheaper and quicker to find a good running donor in this case and the extra power afforded by the 75 will be welcome. I went through the valve job and new rings thing on the KE70 with little difference. Surprisingly the compression readings were good which I posted elsewhere. I never did a "blow-down" test though.

New fuel filter.jpg
 
Last edited:
   / Bolens G154 / Iseki tx1300f
  • Thread Starter
#39  
   / Bolens G154 / Iseki tx1300f #40  
Congrats! :thumbsup:
 
 
Top