You are using an out of date browser. It may not display this or other websites correctly.
You should upgrade or use an alternative browser.
You should upgrade or use an alternative browser.
Bolens G154 / Iseki tx1300f
- Thread starter fxrs55
- Start date
/ Bolens G154 / Iseki tx1300f
#41
NHmitch
Platinum Member
YOu guys have made great progress with your tractors! I have really enjoyed reading about the progress that you have been making, and and is great to see these tractors restored, instead of parted out. When you are done, you should have a machine that will last another 30+ years. Again, great job!
NHmitch
Platinum Member
That is great how you are swapping the KE70 for the KE75. is there any difference in the size of the engine even though it is only a 2 HP difference? I know that the "newer" 3 cylinder engines are longer. Let us know how it comes out!
The fuel filter you have looks great, but sometime down the road though you may want to install the replaceable element kind (it looks like the one you have is not element-replaceable) like in the attached picture although price-wise you can't beat what you have. This kind allows easier replacement, a shutoff, and bleeder screws. I've been getting them from Leonard Scheaffer for about $50/ea. The replacement filter elements can be had from Napa for about $10 (Napa P/N 3264). I can't find another source for the housings though but you should only need to buy this once. Be careful of the type of filter you install also as I've been told final filter elements for diesels have a finer filtering element than those for gasoline.
Incidentally, the KE70 shown is currently in the process of getting swapped out with a KE75. I suppose I should be documenting this as well, but it seems like its taking forever as-is and I'm lacking ambition to take the extra time to document. My biggest problem was splitting the engine from the donor machine. It didn't just come apart like its suppose to. I had to pull the plug from the clutch housing and remove all the clutch-to-flywheel bolts (a real PITA since there is barely enough room to get a wrench in there let alone swing it at all and then remove the bolts) and then separate the engine from the clutch housing. Since this was my first clutch ever, it was an unfortunate and unexpected problem. I ended up ruining the clutch disk using a puller, heat, and small sledge hammer to finally break the clutch from the transmission shaft. Yup, the throw-out bearing was gone too.
I'll try to get some pix when done with everything. I just need to clean and paint the KE75 and start going back together with it. I added a thermostat housing from another machine and this is causing some fit-up issues with injector lines. Not sure what I'll run into moving forward. You can also install a thermostat in the original hose fitting to the cylinder head but then you're back to removing the high-temp switch since there is not enough room for the thermostat and temp switch in the cylinder head void.
The KE70 runs, but is a dog on the low-end. It has terrible blow-by out the valve cover. I've concluded it is either 1.) pistons too out-of-round 2.) cracked liners that appear to have been installed by someone. Either way the fix will be expensive. It was cheaper and quicker to find a good running donor in this case and the extra power afforded by the 75 will be welcome. I went through the valve job and new rings thing on the KE70 with little difference. Surprisingly the compression readings were good which I posted elsewhere. I never did a "blow-down" test though.
View attachment 312108
OP
fxrs55
Gold Member
- Joined
- Jan 21, 2013
- Messages
- 384
- Location
- New Jersey FOR NOW
- Tractor
- Sold. Craftsman gt6000, Craftsman gt6000 Hydro, Cub cadet LT1050. Bolens G154/Iseki TX1300F
Thanks, It was a big thrill to start her up for the first time.
On the video you can see that first try ended with a low
and under powered battery. I hooked up the charger to the battery
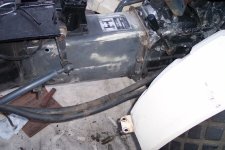
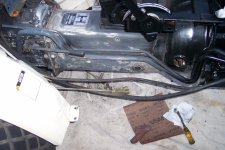
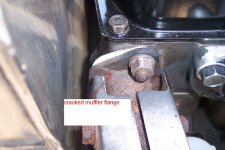
and 2nd try was a success. Today I removed the muffler because
one of the flanges is broke and leaking. Tractor has a clutch
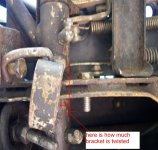
problem also. I found that the clutch pedal has a twist in the
bracket that attaches to the rod leading to the throw out bearing.
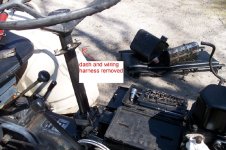
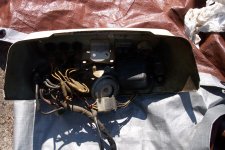
I removed the clutch pedal today to fix it. What a job
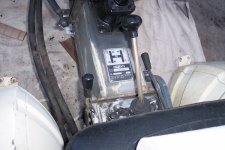
that is. I'm also not happy with the wiring harness so I removed
harness and dash to do some reworking.
On the video you can see that first try ended with a low
and under powered battery. I hooked up the charger to the battery
and 2nd try was a success. Today I removed the muffler because
one of the flanges is broke and leaking. Tractor has a clutch
problem also. I found that the clutch pedal has a twist in the
bracket that attaches to the rod leading to the throw out bearing.
I removed the clutch pedal today to fix it. What a job
that is. I'm also not happy with the wiring harness so I removed
harness and dash to do some reworking.
Attachments
Ilikeurtractor
Veteran Member
- Joined
- May 16, 2011
- Messages
- 1,069
- Tractor
- Iseki TX1300F/TX1500/ TX2160F/TS2220F/ Satoh S370D/S373D
That is great how you are swapping the KE70 for the KE75. is there any difference in the size of the engine even though it is only a 2 HP difference? I know that the "newer" 3 cylinder engines are longer. Let us know how it comes out!
As far as I can tell the block footprints/bolt patterns are identical. I would have settled for another KE70 but happened to come upon this one so thought I would give it a try. I don't anticipate any problems at this point. The weather isn't cooperating so it will be a few weeks before it's done. I'll post some pics when complete and maybe shoot a video of the KE70's blow-by (I actually haven't looked at the KE75's blow-by yet but by the way it runs I would expect very little). A diesel in good shape should have little to no blow-by out the valve cover port. This is always one of my first checks for any diesel engine and is a easy method to help gauge engine health.
OP
fxrs55
Gold Member
- Joined
- Jan 21, 2013
- Messages
- 384
- Location
- New Jersey FOR NOW
- Tractor
- Sold. Craftsman gt6000, Craftsman gt6000 Hydro, Cub cadet LT1050. Bolens G154/Iseki TX1300F
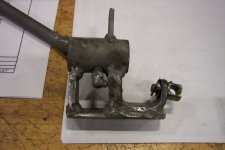
Here are a few pictures of the clutch pedal removal.
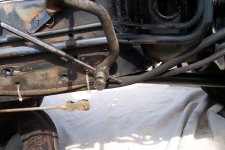
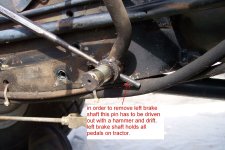
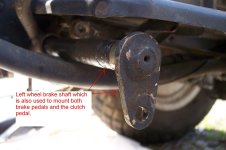
The right brake pedal is held onto the shaft with a snap ring.
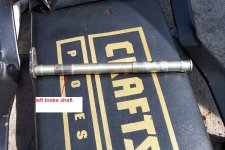
The right pedal uses the shaft as a pivot point. The left
brake pedal is held onto the shaft with a 6mm pin which has to be driven out with a drift punch and hammer. ( what a pain in the @##$#) In order to remove the clutch pedal you have to pull the left brake shaft out the left side of the tractor. You have to remove the right foot board to drive the pin out of the left brake pedal. I removed the left foot board because I am also going to do some painting to tractor
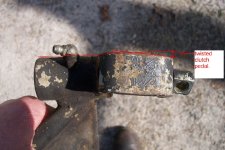
frame while I have these parts off. There is also a few pictures of the modifications I made to the clutch pedal to reinforce the area
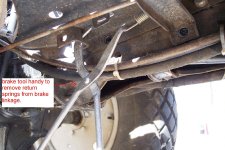
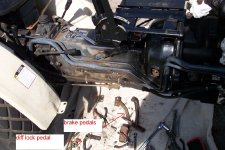
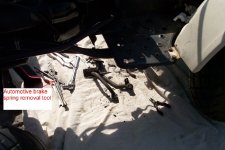
that twisted. there are several return springs attached
to all three pedals that could cause some pain if they were
to slip while you remove them. I found that an automotive
brake spring tool worked great in removing springs from tractor pedals.
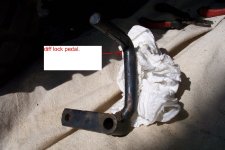
You have to also remove the diff lock pedal to remove right foot board.
The right brake pedal is held onto the shaft with a snap ring.
The right pedal uses the shaft as a pivot point. The left
brake pedal is held onto the shaft with a 6mm pin which has to be driven out with a drift punch and hammer. ( what a pain in the @##$#) In order to remove the clutch pedal you have to pull the left brake shaft out the left side of the tractor. You have to remove the right foot board to drive the pin out of the left brake pedal. I removed the left foot board because I am also going to do some painting to tractor
frame while I have these parts off. There is also a few pictures of the modifications I made to the clutch pedal to reinforce the area
that twisted. there are several return springs attached
to all three pedals that could cause some pain if they were
to slip while you remove them. I found that an automotive
brake spring tool worked great in removing springs from tractor pedals.
You have to also remove the diff lock pedal to remove right foot board.
Attachments
-
 100_5497.JPG153.8 KB · Views: 405
 -
 100_5500.JPG129.4 KB · Views: 276
 -
 100_5501.JPG142.5 KB · Views: 308
 -
 100_5504.JPG139.9 KB · Views: 370
 -
 100_5512.JPG143.2 KB · Views: 273
 -
 100_5506.JPG192.7 KB · Views: 251
 -
 100_5514.JPG154.5 KB · Views: 698
 -
 100_5516.JPG122.2 KB · Views: 288
 -
 100_5496.JPG135.6 KB · Views: 289
Last edited:
NHmitch
Platinum Member
Thanks, It was a big thrill to start her up for the first time.
On the video you can see that first try ended with a low
and under powered battery. I hooked up the charger to the battery
and 2nd try was a success. Today I removed the muffler because
one of the flanges is broke and leaking. Tractor has a clutch
problem also. I found that the clutch pedal has a twist in the
bracket that attaches to the rod leading to the throw out bearing.
I removed the clutch pedal today to fix it. What a job
that is. I'm also not happy with the wiring harness so I removed
harness and dash to do some reworking.
Mine has the same twist in the bracket, however after looking at the service manual and what you have done, I think that I need to straighten mine as well when I do my clutch here soon. My wiring was in a similar state, and I had to replace my voltage regulator (the black box behind the dash), and I replaced one of the red warning lights with a new Iseki OEM one that I bought from Sam's Bolens. I ordered replacement bulbs for the warning light. They are 12v 3.4w bulbs that I found on ebay: Suzuki GS1000 Speedometer Bulbs Stanley 12V GS1100 Tachometer Indicator Bulb | eBay
The tractor is looking great!
NHmitch
Platinum Member
As far as I can tell the block footprints/bolt patterns are identical. I would have settled for another KE70 but happened to come upon this one so thought I would give it a try. I don't anticipate any problems at this point. The weather isn't cooperating so it will be a few weeks before it's done. I'll post some pics when complete and maybe shoot a video of the KE70's blow-by (I actually haven't looked at the KE75's blow-by yet but by the way it runs I would expect very little). A diesel in good shape should have little to no blow-by out the valve cover port. This is always one of my first checks for any diesel engine and is a easy method to help gauge engine health.
Thats great that it will fit! How do you check for the blow-by?
Ilikeurtractor
Veteran Member
- Joined
- May 16, 2011
- Messages
- 1,069
- Tractor
- Iseki TX1300F/TX1500/ TX2160F/TS2220F/ Satoh S370D/S373D
Thats great that it will fit! How do you check for the blow-by?
Pull the rubber line from the intake pipe to the valve cover off at the valve cover. You should get little, if any, "puffing" coming from it. Heavy puffing indicates combustion gases getting by the pistons and into the crackcase which, of course, is tied to the space under the valve cover.
OP
fxrs55
Gold Member
- Joined
- Jan 21, 2013
- Messages
- 384
- Location
- New Jersey FOR NOW
- Tractor
- Sold. Craftsman gt6000, Craftsman gt6000 Hydro, Cub cadet LT1050. Bolens G154/Iseki TX1300F
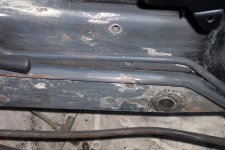
I just realized I didn't post the pictures of the clutch pedal
modifications I made to stop it from twisting
again. Here are also a few pictures of the frame
I've been sanding so I can do a repaint.
modifications I made to stop it from twisting
again. Here are also a few pictures of the frame
I've been sanding so I can do a repaint.