arrabil
Veteran Member
Howdy. In case this is of interest to anyone.... You know how you have to lift the PTO switch to mow in reverse? I was really sick of that so I defeated the Reverse PTO Cutoff on the X465/X475/X485/X575/X585 models.
I don't know if this is the same procedure on the X495/X595/X700s. I don't have a tech manual for them. The base model X700 is the same tractor as my X475 so theoretically it should be the same but I don't have any way to verify that.
Obviously, DO THIS AT YOUR OWN RISK. The safety cutoff is there for a reason as they don't believe you should mow in reverse.
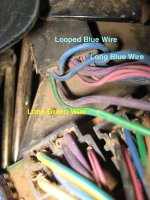
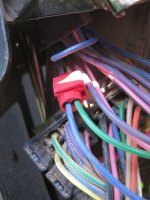
Anyway... there are two blue wires sticking out from under the PTO switch. Actually there are more blue wires but we're only interested in the long one that is paired with the looped one. We're also interested in the lone green wire. The green wire shares a spot with a purple wire but we don't care about any of the purple wires (there are also several).
You have to join either of the blue wires with the green wire. Technically, its the blue looped wire that gets connected to the green wire when the switch is lifted, but since both blue wires are joined together electrically anyway, I used the long one as it was easier to work with.
For completeness, the green wire is the one that actually energizes the relay to engage "mow-in-reverse" while the purple wire lights up the dash warning light. Again, since they are already joined together electrically, only one needs to be jumpered for both to work right.
The pictures will make this easy...
I don't know if this is the same procedure on the X495/X595/X700s. I don't have a tech manual for them. The base model X700 is the same tractor as my X475 so theoretically it should be the same but I don't have any way to verify that.
Obviously, DO THIS AT YOUR OWN RISK. The safety cutoff is there for a reason as they don't believe you should mow in reverse.
Anyway... there are two blue wires sticking out from under the PTO switch. Actually there are more blue wires but we're only interested in the long one that is paired with the looped one. We're also interested in the lone green wire. The green wire shares a spot with a purple wire but we don't care about any of the purple wires (there are also several).
You have to join either of the blue wires with the green wire. Technically, its the blue looped wire that gets connected to the green wire when the switch is lifted, but since both blue wires are joined together electrically anyway, I used the long one as it was easier to work with.
For completeness, the green wire is the one that actually energizes the relay to engage "mow-in-reverse" while the purple wire lights up the dash warning light. Again, since they are already joined together electrically, only one needs to be jumpered for both to work right.
The pictures will make this easy...
Attachments
Last edited: