WH401
Platinum Member
Yesterday morning I took the time to install the JD aux. forward lighting kit and warning light brush guards on my 3320. When I was searching on here to see about both kits, I never really saw a complete definitive thread on them, so I figured I'd show everyone my process and hopefully this can be used for future reference. My description, I would expect, is probably similar for all of the 3x20 series tractors, but it may be slight different for other series lines.
The part #'s are:
JD Auxiliary Forward Lighting Kit LVB25546 (Cost me $82.00)
JD Warning Light Brush Guard Kit LVB25016 (Cost me $42.00)
The tools I used were:
Wiring cutters, (heavy duty shears will work too)
1/2" deep 6-pt socket
3/8 ratchet
1/2" open ended box wrench
8" zip ties
4" zip ties
About 7' of 1/4" or 3/8" black wire loom, (I used 3/8" because it was readily available)
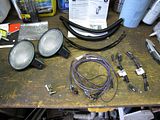
Here's a picture of both kits. The full contents of the light kit are in the first picture, and the second two are of the contents of the brush guard kit, both wrapped and unwrapped.


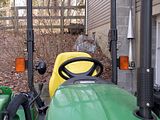
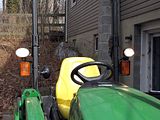
Here's a picture of the tractor in its current state. As you can see I already have one rear work light.
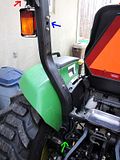
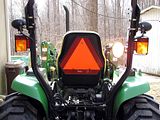
Now, first off your going to have to remove both of these bolts, (first picture, marked with black arrows), in order to slide the brush guard in between the warning light and the ROPS for proper mounting. You'll need the 1/2" socket and 3/8" ratchet in order to do this. When you remove the bolts be careful with the warning lights. The lights themselves aren't very heavy, but you need to remember that once you take the bolts out the lights are only being held up by their wiring, which it'd be a pain to have to replace it. Also, before you place the brush guards in for mounting, make sure you take each of the small bolts that the lights will mount to, (see the original picture for lighting kit, they're in the left bottom center of the picture), and go ahead and place them into their mounting holes in the guards (see second picture, marked with red arrows). If you don't do that now, than you'll have to take the guards back off as there isn't enough clearance to place the bolts otherwise.
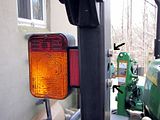
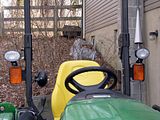
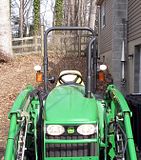
Now that you've gotten the guards on, let's take a look at the lights. If you go back to the original picture of the light kit, you'll notice the mounting hole in the bottom of the lights' mounting bracket. This is the mounting hole where the small bolts, (the ones you placed into the guards earlier because of clearance issues), will be utilized. There's just enough clearance in between the guard and the top of the warning light for you to fit the 1/2" box wrench in to hold on to the head of the mounting bolt. You can also go ahead and tighten the lights vertical and horizontal adjustment bolt, (angle the light so it's pointing downward at about a 30 degree angle so that the light can be freely turned side to side without having the lens interfere with anything else). Go ahead and place the light on the mounting bolt and only tighten it down enough so that it's still able to move side to side pretty freely. Now what I did was just guess-timate the left to right adjustment angle that I would want, but you'll probably still have to fine tune it more in the field. I simply did this just to make the lights stationary for the moment. After you get the lights mounted, it should look something like this.
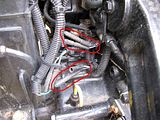
Now that we have the guards and the lights mounted, lets tackle the wiring. The, (first picture), is of the current use of the three sets of bullet connectors located behind the seat. The two sets that we will be using to power the lights are circled in red, (you'll notice one set is already being used by a yellow and green wire, which is for the warning lights). The top set is already being used for the previously installed rear work light, and the lower set is currently unused. In order to properly power all three of the installed work lights, we will need to unplug the top set from its current connection. If you don't have any lights on your tractor to begin with than you won't have to worry about unplugging anything, you'll only have to remove the caps in the ends of the plugs, (as seen in the lower set of plugs, you can see I have already removed one cap). It should also be noted that economy model tractors such as the E series or the 790 and such, may only have one set of these bullet connectors available, so you'll probably have to choose between installing forward or rear lights or perhaps one of each. The reason I say you'll actually be able to install two lights on one set of connectors is because of the "splitter" connectors that are supplied with the light kit, (shown in the original picture for the light kit, right side of the picture). Once everything is disconnected from those two sets of connectors, you'll then need to connect both of the supplied "splitter" connectors. After you've connected both "splitters", we'll then move on to running the power wires.
Now, in the instructions, Deere tells you to run the wires, (see first picture), in this order. Starting at the light, (red arrow), run the wire around and place it inside the hole in the ROPS, (blue arrow), let it run down the inside of the ROPS and pull it out through the opening at the bottom of the ROPS, (green arrow), and then connect it to the splitters. Personally, I had two reservations about this:
Alright, now that I have the wire's protected the way I wanted, I went ahead and connected them to the lights and started running them down the back sides of the ROPS, (first picture), and attaching them with either my own or provided wire ties as I went. When I got the wires to the bottom of the ROPS, I thought about how I wanted to run the right side wires over to the "splitter" connectors on the left side. Here, (second picture), shows how the dealer ran the wiring for the already installed rear work light, (it's the 1/4" black wire loom). I didn't want to run the wires for the forward lights in the same way because I felt they were too exposed to the movement of the 3-pt. Instead I decided to attach them to the lip running right above the 3-pt. I was going to use wire ties and in order to do that I had to drill two holes in the back of the plastic under the seat, (also shown in the second picture, marked with red arrows). After running the wires for both lights, this is the setup I came up with, (third picture). Once the wires have been mounted into place, you may go ahead and connect the ends of the wires to each set of "splitter" connectors, (also shown in the third picture towards the bottom left side).
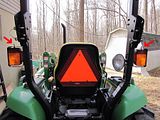
After making sure that all the connections were complete, that all the bolts were tight, and that all the wire ties were tight and clipped, this was the finished product.
Overall it took me about 2 - 2.5 hrs to install these kits. If not for the trip to Lowe's and my over meticulous-ness, the install would've probably only taken 30 - 45 minutes. The total cost of the install was about $150, as I had to have the kits shipped to me from my purchasing dealer, which is about an hrs drive away, (even if I drove it would've have been around that much in diesel costs). Overall I think it was definitely worth the price. I had intended to fabricate my own guards and light kit, but by the time I calculated up the time and money for the parts, it was only about $20 more for JD's stuff, so I just said, "the h*ll with it".
Unfortunately I haven't gotten to try them out at night yet, the weather last night wasn't very favorable. I plan to use them for my nights when I tend to cut grass later in the day because of the extreme heat. Later down the road I'll update this thread with some "night shots".
Enjoy
The part #'s are:
JD Auxiliary Forward Lighting Kit LVB25546 (Cost me $82.00)
JD Warning Light Brush Guard Kit LVB25016 (Cost me $42.00)
The tools I used were:
Wiring cutters, (heavy duty shears will work too)
1/2" deep 6-pt socket
3/8 ratchet
1/2" open ended box wrench
8" zip ties
4" zip ties
About 7' of 1/4" or 3/8" black wire loom, (I used 3/8" because it was readily available)
Here's a picture of both kits. The full contents of the light kit are in the first picture, and the second two are of the contents of the brush guard kit, both wrapped and unwrapped.


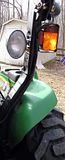
Here's a picture of the tractor in its current state. As you can see I already have one rear work light.

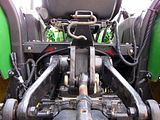
Now, first off your going to have to remove both of these bolts, (first picture, marked with black arrows), in order to slide the brush guard in between the warning light and the ROPS for proper mounting. You'll need the 1/2" socket and 3/8" ratchet in order to do this. When you remove the bolts be careful with the warning lights. The lights themselves aren't very heavy, but you need to remember that once you take the bolts out the lights are only being held up by their wiring, which it'd be a pain to have to replace it. Also, before you place the brush guards in for mounting, make sure you take each of the small bolts that the lights will mount to, (see the original picture for lighting kit, they're in the left bottom center of the picture), and go ahead and place them into their mounting holes in the guards (see second picture, marked with red arrows). If you don't do that now, than you'll have to take the guards back off as there isn't enough clearance to place the bolts otherwise.


Now that you've gotten the guards on, let's take a look at the lights. If you go back to the original picture of the light kit, you'll notice the mounting hole in the bottom of the lights' mounting bracket. This is the mounting hole where the small bolts, (the ones you placed into the guards earlier because of clearance issues), will be utilized. There's just enough clearance in between the guard and the top of the warning light for you to fit the 1/2" box wrench in to hold on to the head of the mounting bolt. You can also go ahead and tighten the lights vertical and horizontal adjustment bolt, (angle the light so it's pointing downward at about a 30 degree angle so that the light can be freely turned side to side without having the lens interfere with anything else). Go ahead and place the light on the mounting bolt and only tighten it down enough so that it's still able to move side to side pretty freely. Now what I did was just guess-timate the left to right adjustment angle that I would want, but you'll probably still have to fine tune it more in the field. I simply did this just to make the lights stationary for the moment. After you get the lights mounted, it should look something like this.

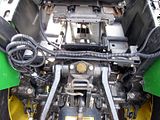
Now that we have the guards and the lights mounted, lets tackle the wiring. The, (first picture), is of the current use of the three sets of bullet connectors located behind the seat. The two sets that we will be using to power the lights are circled in red, (you'll notice one set is already being used by a yellow and green wire, which is for the warning lights). The top set is already being used for the previously installed rear work light, and the lower set is currently unused. In order to properly power all three of the installed work lights, we will need to unplug the top set from its current connection. If you don't have any lights on your tractor to begin with than you won't have to worry about unplugging anything, you'll only have to remove the caps in the ends of the plugs, (as seen in the lower set of plugs, you can see I have already removed one cap). It should also be noted that economy model tractors such as the E series or the 790 and such, may only have one set of these bullet connectors available, so you'll probably have to choose between installing forward or rear lights or perhaps one of each. The reason I say you'll actually be able to install two lights on one set of connectors is because of the "splitter" connectors that are supplied with the light kit, (shown in the original picture for the light kit, right side of the picture). Once everything is disconnected from those two sets of connectors, you'll then need to connect both of the supplied "splitter" connectors. After you've connected both "splitters", we'll then move on to running the power wires.

Now, in the instructions, Deere tells you to run the wires, (see first picture), in this order. Starting at the light, (red arrow), run the wire around and place it inside the hole in the ROPS, (blue arrow), let it run down the inside of the ROPS and pull it out through the opening at the bottom of the ROPS, (green arrow), and then connect it to the splitters. Personally, I had two reservations about this:
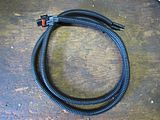
1. When the wires come to you in the kit, they are only attached together by the connections at either end. What I mean is, the wires aren't attached together in the same way two wires would be in the cord of a table lamp or any other electrical device. (See the original light kit picture if I'm confusing you, and I apologize.) So, what I did was I took 2" pieces of electrical tape and wrapped it around the wires at about 6" intervals, (see second picture). Now, after doing that, I came to my second issue.
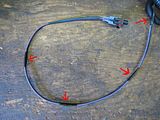
2. When the wires are placed inside of the ROPS, they're able to freely move around. This moving around will cause them to rub against something and likely rub off the little bit of insulation that they have to begin with. To fix this I went to Lowe's and bought two bags of 7' long strands of 3/8" black wire loom, (they were about $2.20 a bag), like what you would use in automotive applications. I ran the wires inside of the loom to produce these, (third picture), a more protective install.
) So, what I did was I took 2" pieces of electrical tape and wrapped it around the wires at about 6" intervals, (see second picture). Now, after doing that, I came to my second issue.2. When the wires are placed inside of the ROPS, they're able to freely move around. This moving around will cause them to rub against something and likely rub off the little bit of insulation that they have to begin with. To fix this I went to Lowe's and bought two bags of 7' long strands of 3/8" black wire loom, (they were about $2.20 a bag), like what you would use in automotive applications. I ran the wires inside of the loom to produce these, (third picture), a more protective install.


Alright, now that I have the wire's protected the way I wanted, I went ahead and connected them to the lights and started running them down the back sides of the ROPS, (first picture), and attaching them with either my own or provided wire ties as I went. When I got the wires to the bottom of the ROPS, I thought about how I wanted to run the right side wires over to the "splitter" connectors on the left side. Here, (second picture), shows how the dealer ran the wiring for the already installed rear work light, (it's the 1/4" black wire loom). I didn't want to run the wires for the forward lights in the same way because I felt they were too exposed to the movement of the 3-pt. Instead I decided to attach them to the lip running right above the 3-pt. I was going to use wire ties and in order to do that I had to drill two holes in the back of the plastic under the seat, (also shown in the second picture, marked with red arrows). After running the wires for both lights, this is the setup I came up with, (third picture). Once the wires have been mounted into place, you may go ahead and connect the ends of the wires to each set of "splitter" connectors, (also shown in the third picture towards the bottom left side).


After making sure that all the connections were complete, that all the bolts were tight, and that all the wire ties were tight and clipped, this was the finished product.


Overall it took me about 2 - 2.5 hrs to install these kits. If not for the trip to Lowe's and my over meticulous-ness, the install would've probably only taken 30 - 45 minutes. The total cost of the install was about $150, as I had to have the kits shipped to me from my purchasing dealer, which is about an hrs drive away, (even if I drove it would've have been around that much in diesel costs). Overall I think it was definitely worth the price. I had intended to fabricate my own guards and light kit, but by the time I calculated up the time and money for the parts, it was only about $20 more for JD's stuff, so I just said, "the h*ll with it".
Unfortunately I haven't gotten to try them out at night yet, the weather last night wasn't very favorable. I plan to use them for my nights when I tend to cut grass later in the day because of the extreme heat. Later down the road I'll update this thread with some "night shots".
Enjoy