OP
You are using an out of date browser. It may not display this or other websites correctly.
You should upgrade or use an alternative browser.
You should upgrade or use an alternative browser.
Electric Actuator for Spout Control (JD 2320)
- Thread starter lost in wisconsin
- Start date
/ Electric Actuator for Spout Control (JD 2320)
#11
boughtaJD
Bronze Member
Nice write-up. Now we need to see video in action once the snow flies:thumbsup:
jjmarotz
Gold Member
Nice setup.
Couple questions for you. How long have you used this? And how is it holding up so far? Reason I ask is I did the electric actuator mod last yr to my 59" and after a couple weeks the 1/4" bolts sheared off the chute. Too much vibration with the snow pounding on the chute. Can't use larger bolts due to the "ball and socket" type ends on my actuator. Thanks.
Couple questions for you. How long have you used this? And how is it holding up so far? Reason I ask is I did the electric actuator mod last yr to my 59" and after a couple weeks the 1/4" bolts sheared off the chute. Too much vibration with the snow pounding on the chute. Can't use larger bolts due to the "ball and socket" type ends on my actuator. Thanks.
OP
lost in wisconsin
Silver Member
jj...
I have used it since January of this year and we had about 5 ft since I installed it. I think I understand what you mean by ball and socket at the ends of the actuator. I did use 1/4" also and actually had to drill out the one end of the actuator to accept the 1/4, I think it was drilled for 3/16.
Anyway, I have had no issues. The only recommendation I might offer, is either getting a higher grade bolt (again not sure what you were using) since more store bought bolts are grade 2 or if you go back to post #4 of my thread, you will see I actually used 2 nylock nuts and lock washer to secure the actuator to the spout. I did it for spacing and clearance reasons but I have to imagine the load on bolt is less than fastening it the conventional way.
Let me know if there is any further information I could provide.
lost
North585
Bronze Member
Thanks for the great post lost. The instructions are excellent. It will help me with my project this fall for my 47".
Much appreciated.
Much appreciated.
beanerwi
New member
Lost in WI-- We tried the electric actuator on a couple 59 inch blowers we have had over the years and found that they freeze up after using in cold temps. We now run a couple hoses to the rear 3rd hydraulics and use an old boat ram from the lower unit on I/O's. Real cheap to find and has enough power to not freeze up. Have to be careful not to extend beyond reach of ram or you will shear bolts on chute.
OP
lost in wisconsin
Silver Member
beaner...
May I ask if your snowblowers were/are kept inside or outside. Just wondering if that might have anything to do with the life of an actuator.
thanks,
lost
May I ask if your snowblowers were/are kept inside or outside. Just wondering if that might have anything to do with the life of an actuator.
thanks,
lost
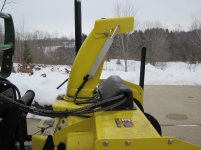
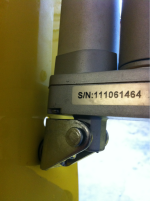
And finally...the finished mod. I estimate this took about 6-8 hours for me. It was well worth my time and effort.
lost
GREAT job and excellent explaination
psdx
Gold Member
North585 said:Thanks for the great post lost. The instructions are excellent. It will help me with my project this fall for my 47".
Much appreciated.
Did you add this to your 47" JD snowblower yet? I'm about to start.
psdx
Gold Member
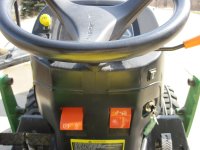
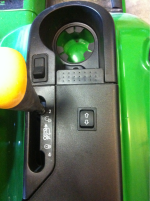
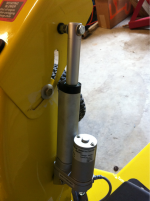
For anyone with the JD 47" snowblower that's interested, I found an actuator that gives you 99% of the spout travel available and uses the factory mounting holes for the manual spout control kit. The actuator I used has built-in limits that give 4" of travel which works out perfectly for using the factory holes.
Here's the materials I got from http://www.dcactuators.com/
Product ID: 302.130_6104T
Description: 4" Linear Actuator (Speed 1/2" per Sec.)"IP65 Rated" - Price: $114.00
Product ID: 302.660_8639T
Description: Mounting Bracket For (T) & (TP) Series Actuators - Price: $7.00
Product ID: 306.580_242
Description: Momentary Off DPDT Rocker Switch - Price: $5.25
I used the clevis bracket at the bottom and a bolt with a spacer and nylon washers at the top. The clevis bracket gives you just a little bit of offset. This gave me 100% of the up travel and about 99% of the down travel. The spout is slightly below horizontal when it stops so this works for me. I started with clevis brackets on both ends but this gave me too much travel or not quite enough depending on which way the bracket was oriented. Also - the clevis bracket needed to have a little material cut off the end to allow the actuator to work with the bracket flat like this - no big deal. I put nylon washers behind the moving parts to let things move freely and not scratch the paint all up. And I used a two-wire flat disconnect at the front of the tractor for removal of the snowblower in the spring.
....thought this list of materials might same someone some time.
BTW, the JD kit is $114 for the manual cable spout control, but each specific tractor application needs 2-3 brackets and some miscellaneous hardware. In my case, the other stuff added up to another $100 so this is much less expensive.
Attachments
Last edited: