Hi All,
I used this forum to contemplate replacing my drive shaft fan that got destroyed when I was clearing rough brush and Lantana on my property. Like everyone that has damaged their fan, I was scared about what people were saying about replacing it....cutting it in half, taking half the tractor apart, how hard it was etc. etc.
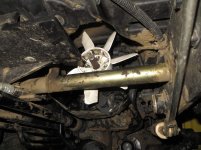
I replaced my fan (no blades remaining) with a new fan in half a day on my own. I didn't cut the fan in half, I didn't take the tractor apart or remove any panels it was easy as long a you have a little mechanical knowledge. I used to be a Fitter and Turner, now I am a Physio (Physical Therapist) so if I can do it most people can, as all you need is the right tools and lots of patience.
Here is what I did:- I am sorry it is so long, but it is worth it.
1. Items you need are a new fan, small light to see under the tractor, hammer, long pin punch (approx 1/4" or 5mm-6mm) the pin punch HAS TO BE LONG, external Circlip Pliers with tips bent at 90 degrees, sockets (to fit fan guard and fan bolts) with short extension and universal joint and rachet, lubricant spray and that is all you need. You may be able to borrow most of these tools from friends.
2. Park tractor on concrete slab (I actually had a tarp on the ground). Park brake on and engine off. Get under tractor from RIGHT hand side. If you look up under the back of the engine (behind small front wheels) you will see the back of the flywheel with the main drive shaft connection (Spline with pin and clip) just in front of the front universal joint. Spray this area with lubricant spray lightly (don't look up while spraying).
3. While the spray is working, Move underneath down at the fan end. Take off the lower fan guard (2 bolts with the ratchet, universal and extension).
4. Back to the front end: Use the circlip pliers to take off the circlip that sits in a groove covering the rolled pins that connect the shafts (Engine to main drive shaft). Let the clip hang off the spline on the engine end. You have to open the circlip a fair way and jiggle it a little to release it out of the groove.
5. Rotate the the shaft by using a screw driver in the driveshaft rear universal until the pin is facing down (the pin is not tapered so it doesn't matter what side you punch out) there are two rolled pins one inside the other. I just used a punch that was slightly smaller than the biggest pin (I didn't hit the small pin out of the large pin, I hit them out together as one).
6. Hit out the pin with a long pin punch and the hammer and slow down just before the pin falls out. Gently tap it out until if falls down on you or the floor. Keep the pin.
7. Use a bar or similar to now push the driveshaft back towards the rear of the tractor and you will find it comes off the splined shaft and falls down.
8. You can then pull the shaft towards the front then while jiggling the front universal joint around to give you enough clearance to move the shaft towards the engine. It should come out of the transmission leaving the fan on its own. The drive shaft is then fully disconnected.
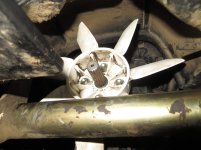
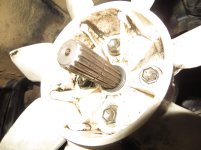
9. Use the correct size socket, extension and universal joint (if needed) with the ratchet and remove the four bolts holding the fan on (you will have to hold the fan to stop it spinning when undoing the bolts, the shouldn't be too tight).
10. Remove the fan (you will have to jiggle the drive shaft and fan around to get it off the shaft and out).
11. Manipulate the new fan up into position. You will have to take your time and bend the blades a little at a time to get it on the shaft facing the same way as the old fan (take your time and I promise you it will work). Please don't force the blades too much as they are flexible, but can break.
12. Install the four bolts using the same method as removal and hold the fan to tighten opposing bolts slowly until all are tight and firm.
13. Now you have to install the drive shaft. I sprayed a little lubricant spray on the splines before putting the shaft on.
14. Push on the drive shaft on the fan end FIRST. It takes a little manipulating as you are working in a confined space, but persevere.
15. Once fan end is connected, lift up the drive shaft and lower it until it meshes with the engine end spline (MAKE SURE THE PIN HOLES WILL LINE UP BEFORE PUSHING THE FRONT SPLINE ON, if not take it off and rotate the shaft a little and try again).
16. Once you are sure the pin holes are in line, use a pin punch to ensure longitudinal play is such that the pin holes are in line horizontally.
17. Put the pin back in (it may stay in a little easier if you file a slight taper on the end you put in first. Carefully start punching the pin in. It should go in OK, but it will be firm.
18. Hit the pin in with the pin punch and hammer until it is flush with the coupling and bottom of the circlip groove.
19. Turn the shaft now a few times to make sure everything is OK and you haven't forgotten anything.
20. NOW THE HARDEST PART...you have to use the circlip pliers to get the circlip back over the shaft and over the pin into the groove you took it out of.
It is very tricky. I used a screw driver while I had the clip open so I could push it on the shaft. The clip may flick off a few times and you may say a few interesting words, but if you persevere you will get it on. This took me the longest time, everything else was easy.
21. Once you get the clip on, spin the shaft and make sure it is definitely in the groove all the way around. If it is WOO HOO! Have a break before you put on the fan guard.
22. After you have a break and celebrate getting the circlip back on you have to replace the fan guard in the same way you took it off.
23. That's it. You have finished!
24. Double check underneath that all is well and get out from under the tractor and start the engine.
25. Have a look underneath with a light to make sure all is running well.
26. Now you know how to replace the fan without taking anything off or cutting the fan in half.
27. It is strongly recommended if you are going to go in the rough stuff put a skid plate underneath your tractor to protect the fan and transmission oil filter from branches and limbs pushing up and destroying the fan or spearing/puncturing the filter.
28. Good Luck. I hope that helps anyone who destroys their fan.


