You are using an out of date browser. It may not display this or other websites correctly.
You should upgrade or use an alternative browser.
You should upgrade or use an alternative browser.
Forks for FEL
- Thread starter Fritzy
- Start date
- Views: 6747
/ Forks for FEL
#1
BruceWard
Platinum Member
I made some cheap forks that I used for several months for recycled fence posts. Last weekend I decided to build something stronger so I spent Saturday cutting the steel and they are being welded together this week.
My first set of cheap forks were made from a 8.5 foot heavy duty road sign post cut in half with two pieces of 2 inch channel welded between the two forks. One piece of channel was at the back the other about a foot forward from the back. I drilled four holes through the forks and bucket and bolted them together with 1/2 inch bolts. The sign posts are V shaped and were used with the point of the V down. I cut the forward end of the forks with a 45 degree angle and welded short pieces of flat bar on to make tips. This set worked very well moving logs and even some rocks. But I managed to get a rock on one of the forks and bend it after a few months of use. The 1/2 bolts and nuts were in bad shape when I took them off.
For the next revision I added flat bar closing the top of the V on a new set. This set was much stronger. I found two problems with this design. The bolts despite having large washers started to stretch the bucket where they bolted in. And I had to weld 1/2" nuts inside the forks since I closed in the top and they were no longer accessible to tools. Two of the four bolts inside the forks were damaged in usage.
The next revision was to take the existing set of forks and change the mount to a clamp on style. I added 2" channel to the top of the fork reaching back over the bucket with forks extending underneath the bucket. I used two 3/4" bolts through the above bucket part of the fork to clamp them on. I had seen this design on forks for sale. The first time I tried to attack a pile of trees the forks fell off. I later discovered that a weld had cracked.
So I decided to build stronger forks and for the first time in a year of using forks to buy steel to do so. For the current project I bought 2.5" by 3/16th thick square tubing, cut to fit, drilled and welded 3 pieces in the bottom of the bucket making 3 truck receiver hitches. The 2.5" tubing goes from the back of the cutting edge to the back of the bucket including the angled section. I believe this will significantly strengthen the bucket. Then I cut 6 forks two 13" long and two 5" long from 2" by 1/4" thick square tubing. The short set of forks has two sets of holes drilled, one will have them flush in the bucket to block off the sockets while doing smooth work, the other allows them to stick out about 3 inches beyond the cutting edge to act as teeth. I cut the end of all of the forks at 45 degree angles and flat bar was welded on to make tips. I spent $122 on the steel, $20 on welding rods and $8 on cutting disks for the new set of forks.
I plan to test the new forks next weekend.
My Uncle who is a retired welder did all the welding.
These might be a good option for you if you dont want to build them Paynes Forks Light-Duty Forks — 1200-Lb. Capacity, Model# PF1200 | Accessories | Northern Tool + Equipment
The cheapest, easiest option I can think of would be to go to a metal supply store and buy two pieces of steel cut to length. For example the 2x2x1/4 thick steel tubing I bought was $5 a foot. Then buy 4 sets of 1/2" bolts, nuts and washers. Drill 1/2 holes through the steel and your bucket then bolt in. I think you could do this in a couple hours and for less than $60.
jimmer2880
Platinum Member
I bought an old, not functional floor pallet jack. I then quickly adapted it to fit my 3pt (It only took about an hour to strip off the rollers & weld on 2 pins and a place to hook the top link). I also have a bracket that I can remove my bucket & use 3pt equipment instead. Effectively, this gives me a set of forks for my little 18hp that fit both the rear 3pt & the loader arms. I have used them a great deal in both locations.
gwdixon
Elite Member
Buy a used pair of forks from a place that repairs forklifts for $75. Buy some flatstock and a couple of bolts. Weld them together.
redharley
Gold Member
I used 3" channel iron extended about40"out from bucket then behind bucket drill a hole add eye about 5/8 dia. at front of bucket weld a peice of flat steel the same thickness of bucket acroos top of channel iron the weld another pc on top of that that extends back over bucket about 4" so your fork will slip over bucket,weld another eye on at this point. Now all you need is a small1/4 cchain binder and a couple lenght's of chain.Now you have easy on an off forks. almost forgot channel side down cut end to taper reweld shut to make fork end. has worked well for me for years. cost about $60 if you got a welder or a buddy with one
Radly53
New member
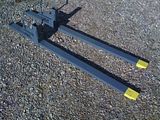
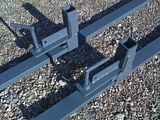
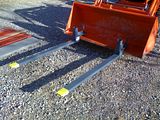
This is a set I built last fall. I used 3" chanel that extends all the way under the bucket with a raised lip, the clamps are thredded rod. Because of the lip onthe back end of the forks and the clamps they don't move around or twist. It's a nice set up for me.
[URL=http://s802.photobucket.com/albums/yy306/radly53/?action=view¤t=22934fb7.jpg] [/URL]
[URL=http://s802.photobucket.com/albums/yy306/radly53/?action=view¤t=f747fa96.jpg] [/URL]
[URL=http://s802.photobucket.com/albums/yy306/radly53/?action=view¤t=1be2e9b6.jpg] [/URL]
Stephen
Kubota B7800 2008
8' woods backhoe, woods brush hog, 5' snowblower, clamp on forks, HF quick hitch, grader scraper, and boom pole soon.
[URL=http://s802.photobucket.com/albums/yy306/radly53/?action=view¤t=22934fb7.jpg]
 [/URL]
[URL=http://s802.photobucket.com/albums/yy306/radly53/?action=view¤t=f747fa96.jpg]
 [/URL]
[URL=http://s802.photobucket.com/albums/yy306/radly53/?action=view¤t=1be2e9b6.jpg]
 [/URL]
Stephen
Kubota B7800 2008
8' woods backhoe, woods brush hog, 5' snowblower, clamp on forks, HF quick hitch, grader scraper, and boom pole soon.
niemeyjt
Silver Member
I made one from 60mm x 60mm x 6mm angle iron and a few bits of flat bar. The advantages of this are 1) cheap - just had to buy one length of agle iron and 2) light - lighter than the bucket - the more the forks weigh, the less extra you will be able to lift 3) it is quick to cut and weld.
Initially it was a single length across the forks, however I put a twist in it so I boxed it in between the arms with another piece of angle.
This is good for my KBF200, and I have had a 300Kg pallet on them - but your B3030 has twice lift, so I recon you will need much thicker angle iron - at least 8mm, if not 10mm. I would be wary about making it with much larger angle as it won't fit under some pallets.
I used angle grinder to shape a wedge on front of forks to assist loading. I am going to make a level indicator rod to use the existing mechanism to show forks are level at ground level as they can be hard to see.
Photo attached - albeit holding a dumpy bags by its straps to fill with wood.
J
Attachments
alchemysa
Veteran Member
These just slip into the bucket. Take seconds to fit, and the stress is distributed to the top and bottom of the bucket. Make 'em long enough to be seen easily from the seat. Don't make them too heavy like I did. When they are attached to the front of the bucket your lift capacity is greatly reduced so there's no need to over-engineer them or you'll just reduce your lift capacity even further.
Attachments
jimcolt
Gold Member
Here are my home made forks. 2 x 4 x 1/4" wall rect tubing, an 8" long piece of 5 x 5 x 1/2" wall square tube.....with the bucket slot cut with a plasma torch (Hypertherm Powermax45)......a few other pieces cut and welded. Material cost about $ 60 per set. I have actually sold a few sets of these!
Jim
Jim


