Tractor rebuild project

   / Tractor rebuild project #1  

jandpp

Member
Joined
Dec 22, 2009
Messages
29
Location
Northern Colorado
Tractor
Kubota B8200HST, Kubota L2900GST
I thought I would share a tractor project that I have been working on. I've been inspired by several other series of posts about tractor rebuilding and was thinking that that would be great learning experience for me.

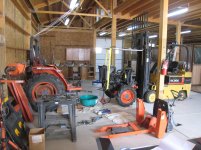
In Thanksgiving 2009, I purchased a Kubota B8200 HST to help build a horse pole barn for my wife. After breaking ground in December and working every spare moment, every weekend, all vacation, many, many evenings, the barn was completed in September 2010. During that time the 8200 was indispensable lifting, moving, and pulling. I got it from a local repair shop. The head mechanic had just rebuilt the engine and I bought it from him. It basically only had wiring to start it and fire the glow plugs. I replaced the wiring for the lights, flashers, and dash and also replaced the tach/hr meter cable and then the spinning sender unit on the front of the engine attached to the fuel cam. That all was fun so I've been looking for something a bit more challenging. Especially now since I have a nice large space in which to work since the barn is completed.

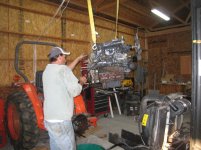
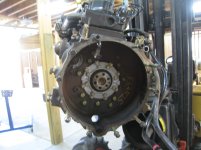
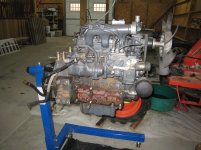
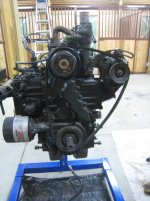
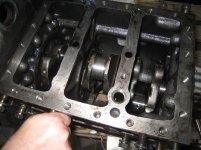
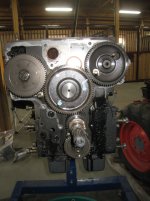
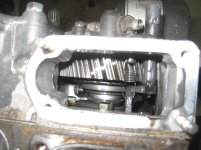
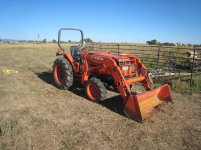
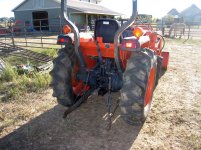
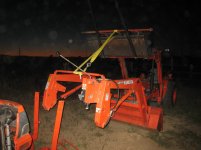
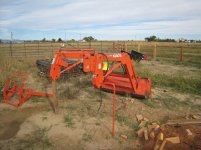
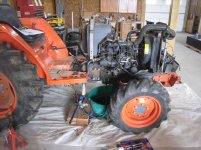
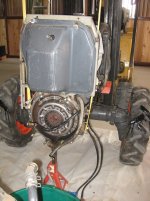
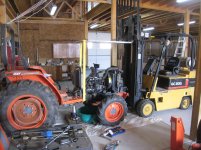
In October my wife found a Kubota L2900 GST with loader on craigslist. (I've got a great wife!) It had a seized engine. Everything else was supposed to be running just fine but it's kind of hard to tell when the engine doesn't turn over. The hr meter said 580 hrs. The starter engaged but wouldn't turn the engine. There were no leaks. The owner suspected a seized connecting rod bearing and he also gave me a set of new seals for the front axle. It was a great price and I bought it on impulse. Kind of high risk in that it was thousands of dollars and I've never done any real engine work. Worse case I'd have chalk it up as very expensive entertainment.
 

Attachments

  • IMG_7285.jpg
    IMG_7285.jpg
    740.7 KB · Views: 816
  • IMG_7286.jpg
    IMG_7286.jpg
    917.8 KB · Views: 650
   / Tractor rebuild project
  • Thread Starter
#2  
I found a nice engine stand on Craigslist, purchased the owner's manual and shop repair manual, downloaded the part diagrams from Messicks, bought 2 books on engine repair one engine rebuilding, the other about diesel engines, and augmented my tool set with some larger Craftsmen wrenches. I can't afford the Snap-on stuff and I really have a problem with cheesy tools from the likes of HF. Also scanned TBN for any info on L2900. Hmm, front seals seem to be a common problem.

After getting the tractor home the first task was to remove the loader. No engine function = no hydraulic function. This was one of the hardest parts of the entire project. The previous owner had one of the back pins out but not the other one. The loader was kind of skewed binding up the other pin like you wouldn't believe. I was pulling on it from all directions with my other tractor. There was no access to poke the pin out from behind and it took hours to remove. Finally figured out that if I spin the pin around and around by banging it a million times with a large hammer, it would finally spin out. I was very concerned that the loader had been twisted out of alignment by some nasty act like rolling the tractor. Figured I'd save that problem for another day.

I rolled the tractor in the workplace and began to plan the cracking adventure.
 

Attachments

  • IMG_7313.jpg
    IMG_7313.jpg
    449.2 KB · Views: 610
  • IMG_7337.jpg
    IMG_7337.jpg
    590.3 KB · Views: 451
   / Tractor rebuild project
  • Thread Starter
#3  
I examined the engine closely as I drained the fluids. The tractor overall is in good shape for it being 13 yrs old. The gray paint was still shiny on the sides of the engine. Interestingly, the paint is cracked on the bolts on the oil pan, valve cover, and a few other places. Hmm, I'm draining the antifreeze and oil and they look really fresh. Brown oil and green antifreeze. Whoa, what's this? An old head gasket tucked up underneath the gas tank. This is turning out to be a real mystery. According to the previous owner, there was a whole list of people who responded to the Craigslist ad. I was the second person who called and the second to see it. The first guy wanted to buy it but he didn't have a deposit ready. I didn't ask too many questions and just plunked down the money.
 
   / Tractor rebuild project
  • Thread Starter
#4  
Cracking the tractor wasn't too bad but I'd have never been about to figure it out without the shop manual. I had to remove the entire steering pedestal along with linkages, hydro lines, fuel talk and filter, electrical connections, etc. Worst part was the power steering couplings at the base of the steering pedestal.
 

Attachments

  • IMG_7431.jpg
    IMG_7431.jpg
    668.5 KB · Views: 1,820
  • IMG_7427.jpg
    IMG_7427.jpg
    682.2 KB · Views: 676
  • IMG_7417.jpg
    IMG_7417.jpg
    478.8 KB · Views: 536
  • IMG_7379.jpg
    IMG_7379.jpg
    579.3 KB · Views: 737
   / Tractor rebuild project
  • Thread Starter
#5  
After that, you support the back of the tractor with a jack, support the front with something else (a handy piece of equipment like the one seen in the picture below), remove the bolts that connect the clutch housing to the engine, and pull it apart. Very exciting. BTW, I'm taking a gazillion pictures along the way and writing reassembly notes in a notebook so that I have a chance a reassembly. At this point I'm thinking the probability is low!
 

Attachments

  • IMG_7438.jpg
    IMG_7438.jpg
    547.3 KB · Views: 534
  • IMG_7434.jpg
    IMG_7434.jpg
    538.2 KB · Views: 507
  • IMG_7440.jpg
    IMG_7440.jpg
    679.8 KB · Views: 520
  • IMG_7432.jpg
    IMG_7432.jpg
    701.8 KB · Views: 533
   / Tractor rebuild project
  • Thread Starter
#6  
Remove the pressure plate, clutch, and freewheel, and mounted the engine on my engine stand. Sure enough that sucker is seized. No amount of force is turning the crank. On the positive side, makes it easier to bust loose the freewheel bolts.

The hyrdo pump is much larger than on my B8200. I hope that translates into greater loader lift capability.

For those interested, this is a D1503 Kubota engine - 3 cylinder, 1.5 liter, 30 hp model. Non turbo. This is a popular engine series that includes a D1403, 1503, 1703, 1903 and 2203. Maybe a few more. Surplus Center has a new 1903 42 HP model for $3800 or even a turbo 2203 for $5k. Should I put one of those in there instead? :)
 

Attachments

  • IMG_7453.jpg
    IMG_7453.jpg
    574.5 KB · Views: 517
  • IMG_7460.jpg
    IMG_7460.jpg
    373.6 KB · Views: 400
  • IMG_7464.jpg
    IMG_7464.jpg
    556.9 KB · Views: 520
   / Tractor rebuild project
  • Thread Starter
#7  
I've encountered my first tool problem. There is a big nut holding the pulley on the front end of the crankshaft. Worse, the crank extends out well beyond the nut. Not only can one not use a regular flat wrench on the nut because it's recessed in the pulley, but one can't use a regular socket either because of the extended crank. Note that the end of the crank is splined and it is torn up. Nothing goes on the end here and I'm not the one who apparently grabbed it with vicegrips. No rental places had a deep 32mm socket so I had to order one online. Also bought a 3/4" socket handle to drive it.

This nut was a bear to get off. The book says to retighten it to 160 ft/lbs. It took both my neighbor and me to break it free one person to hold the wrench on, the other to twist it. The socket thickness is a bit too great to get good purchase on the nut inside the taped indentation in the pulley. But we got it. Even with that great force, the engine crank didn't budge. It's really frozen.
 

Attachments

  • IMG_7486.jpg
    IMG_7486.jpg
    429.5 KB · Views: 473
   / Tractor rebuild project #8  
Excelent work so far. It is never as difficult as it seems before you actually start. Cracking good...is someone else on her a Wallace and Gromit fan?
 
   / Tractor rebuild project
  • Thread Starter
#9  
Removed the head, push rods, lifters, oil pan, injector pump, oil pump, and camshaft. Pulled out pistons. Crank still wouldn't turn. Has to be some type of crank bearing problem

Just FYI if you are interested, the frontal picture shows the engine with the gear cover removed. The top left gear is the injector pump cam, the top right gear is the valve camshaft, the middle gear is the idler gear which connects the crank to the camshafts. The bottom geared thing is the oil pump.

The timing marks were very easy to see on the gears so it was pretty simple to ensure that cams were aligned with the crank.

Even though there is no spark, a diesel engine still has the notion of timing. In this case, timing refers to the time at which the fuel is injected into the cylinder. For these engines, timing is adjusted by adding or removing shims underneath the injector pump plate. This varies the distance between the fuel cam and the injector pump followers. Adding a shim delays or retards the fuel injection timing.
 

Attachments

  • IMG_7602.jpg
    IMG_7602.jpg
    623.7 KB · Views: 660
  • IMG_7594.jpg
    IMG_7594.jpg
    562.1 KB · Views: 833
  • IMG_7479.jpg
    IMG_7479.jpg
    449.7 KB · Views: 756
   / Tractor rebuild project
  • Thread Starter
#10  
Here is a few pics of the injector pump and fuel system.

The first shows the injector pump. It is the unit right above where it says STOP. You can kind of see the gasket like shim where it attaches to the block, right below the air bleed value.

The second pic shows the governor arm. It has two little springs that run internally and attach to the throttle assembly. Those little springs are tricky. The third pic shows the fuel cam gear inside the front gear cover. Note the 3rd little spring. This is the easier of the 3 to remove and reattach.
 

Attachments

  • IMG_7588.jpg
    IMG_7588.jpg
    555.6 KB · Views: 689
  • IMG_7591.jpg
    IMG_7591.jpg
    708.4 KB · Views: 504
  • IMG_7592.jpg
    IMG_7592.jpg
    397.3 KB · Views: 522
 
Top