3-Point Hitch L-series Jerky 3PH - Jeff's homebrew repair.

   / L-series Jerky 3PH - Jeff's homebrew repair. #1  

J252

New member
Joined
Feb 7, 2011
Messages
21
Location
Fraser Valley, BC
Tractor
Kubota L345DT, Kubota L3400DT
*** I will return to this thread and fill in this post with a great more details as I get the chance.***

For now, you can watch this Youtube video and read the extended description.

Kubota L3400 - 3PH Action @ 2000 RPM - YouTube

Quick summary:

L3400 with extremely jerky 3PH (violent) with old YR909-00100 PCV. We bought the tractor used this winter, and were quickly and thoroughly disgusted by this fundamental problem. I dismantled and studied the PCV system and made the mods early this spring. Have been using the tractor like this all summer and am very happy with the result.

1. Disassembled the PCV and chamfered the spool control edges by ~200 um. This increased PCV response and reduced the violent jumps from 1" down to less than 1/4".

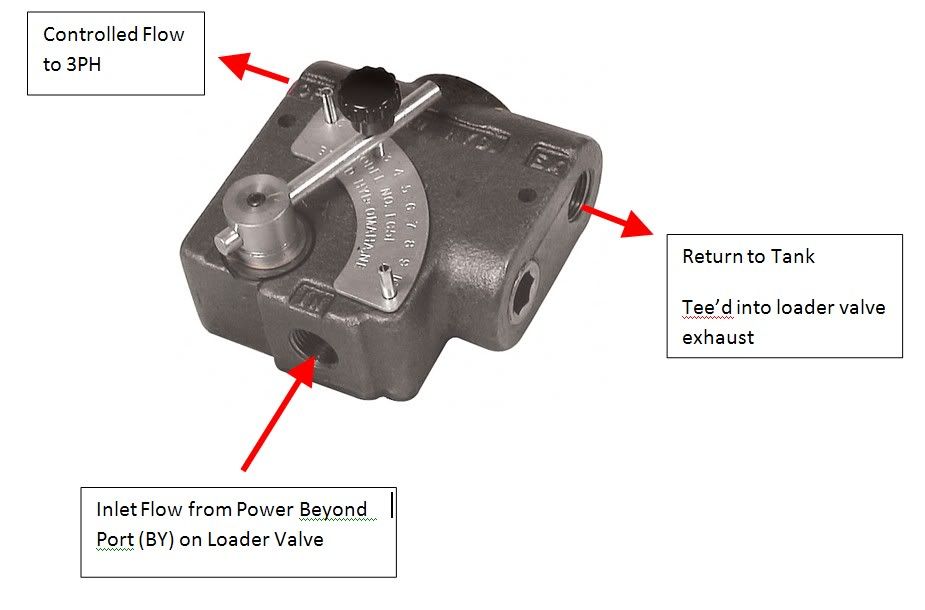
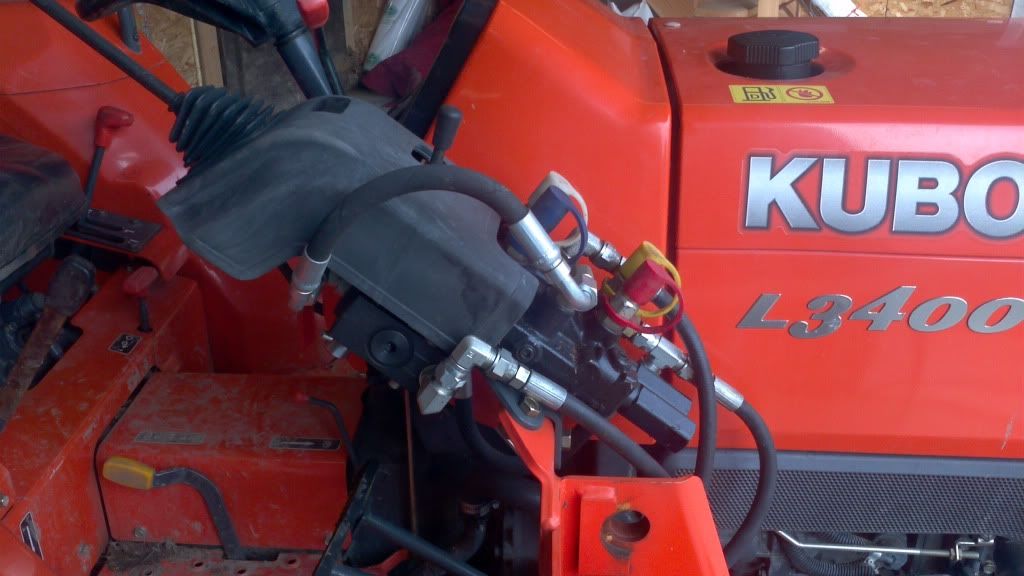
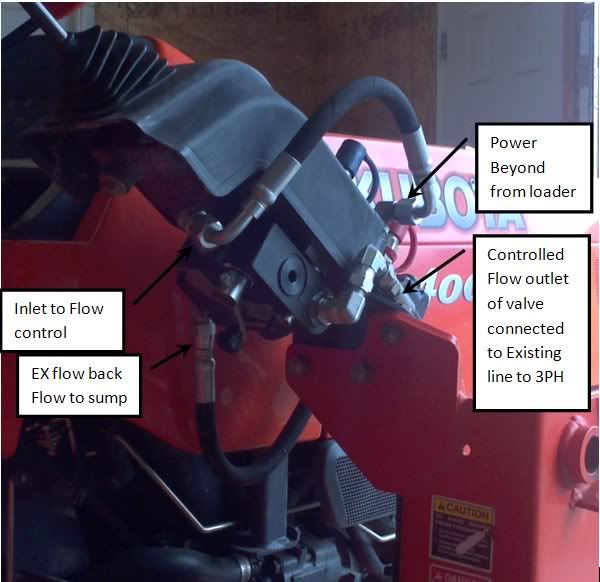
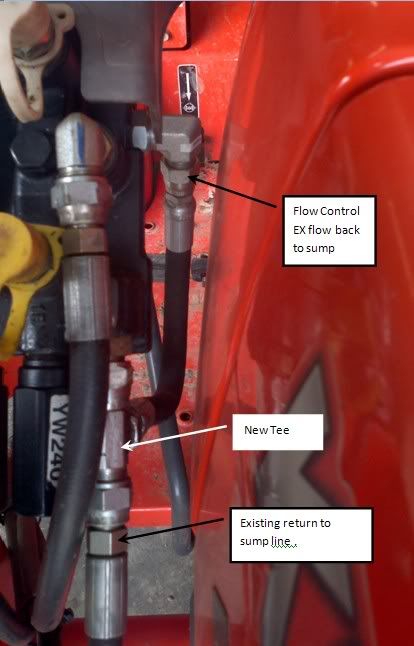
2. Added an external pressure compensated flow control valve ($~90 + lines and fittings). This reduced the flow to the 3PH system and took the violence out of the 3PH motion. It also reduced the lift speed though this is now adjustable. It did not affect the 3PH lift capacity or the FEL in any way.

I will fill in the blanks, and explain much more thoroughly later as well as show photo's and a part list of the install.

Cheers,
Jeff
 
Last edited:
   / L-series Jerky 3PH - Jeff's homebrew repair.
  • Thread Starter
#2  
Reserved for OP's upcoming pictures.
 
   / L-series Jerky 3PH - Jeff's homebrew repair.
  • Thread Starter
#3  
Reserved for OP's upcoming pictures #2.
 
   / L-series Jerky 3PH - Jeff's homebrew repair. #4  
subscribed.
 
   / L-series Jerky 3PH - Jeff's homebrew repair. #6  
me three
 
   / L-series Jerky 3PH - Jeff's homebrew repair. #8  
Brilliant!
 
   / L-series Jerky 3PH - Jeff's homebrew repair. #9  
Reserved for OP's upcoming pictures.
Looking forward to seeing what you did!!!

FYI... You only have 24 hours that you can edit the post... no problem with posting them later if you didn't get to it in time...
 
   / L-series Jerky 3PH - Jeff's homebrew repair.
  • Thread Starter
#10  
Mini Rant

The closed loop 3PH position control system on this tractor is just plain and simply badly designed. Its not just badly executed, its also fundamentally flawed. The YR909-00100 position control valve is effectively offering only ON-OFF closed loop control in the up direction. The way the spool valve and unloader poppet are designed, it is not really capable of providing much (if any) proportional response - its output flow is really pretty much either on or off.

Now ON-OFF control would be a legitimate (albeit simple) method of closed loop control, provided the system is relatively slow changing (high capacitance). Your home thermostat does a pretty good job with on-off control of holding your room near the set point - it is a nice slow changing system. Our 3PH system are not slow moving; the cylinder is too small or the flow rate is too high (whichever way you want to look at it). ON-OFF is not going to work under those conditions. I have a bit more ranting to do that I'll save for a later post.

I wanted to see what it would take to make the existing system work. Since I couldn't increase the size of the cylinder, I tried a few different ways of reducing the flow into the cylinder thereby slowing its response. Inline restrictions (after the PCV but before the cylinder) did work but introduced some new problems. The pressure compensated flow control valve was the cleanest way to get the job done.

***I'll discuss the YR909-00100 PCV and the mods I made to it in a later post****

For now, what I will say is that for those with YR909-00100 PCV's like mine, I expect just reducing the flow to the 3PH by using the flow control valve will smooth out the motion, but will not get away from the fact that the handle has to be moved 1" before the 3PH hitch responds with its discrete 1" lift. (The reason it is 1" is a result of the PCV spool to housing dimensional relation (either by design or tolerance)). For many that is not a big deal, and can live with it if the hitch is no longer jerking.

Maybe some of later L-series owners can speak to this, but I have heard that those, though still jerky, are better resolution and have smaller (1/4") jumps. In that case, just adding the flow control would be all you'd want to do anyhow.


Installing the pressure compensated flow control valve

To reduce the flow to the three point hitch system, I used a pressure compensated flow controller. This valve works as an adjustable flow divider, which divides the flow between the controlled flow (CF) port (leading to the 3PH system) and the exhaust port (back to sump). The pressure compensating spool inside ensure that the flow rates through the controlled flow port doesnt vary due to load changes. The valve I bought was a 16 GPM unit from my local Princess Auto (Princess Auto Flow Control Valve) though Surplus Center has a nice 8GPM Prince unit that is better sized for the flow rate of the system (Surplus Center - SAE 8 HYD FLOW CONTROL VALVE RD108-8) and probably better quality.


valve.jpg


Mounting


I mounted the valve on the underside of the loader control valve. It fits there like its meant to be.

2011-10-02_16-05-05_815.jpg


I used two of the 4 existing mounting holes on the loader valve and made a bracket to mount. The location is nicely out of the way, doesnt interfere with anything, and is still accessible (bracket dimensions in mm).

2011-10-03_202330.png


Plumbing

  1. 1. I removed the hose from the BY port on loader valve and turned the fitting 90 degree to the outside.
  2. 2. With a new hose, the BY (power beyond) on loader valve was routed to Flow control valve inlet (IN).
  3. 3. The hose to 3PH (formerly connected to loader BY port) was connected to CF port on flow control valve.
  4. 4. EX port on flow control valve gets teed into EX line on loader valve via a new hose and a tee. This flow goes back to tank (sump).

2011-10-05_014938__1.jpg


2011-10-05_015129__2.jpg
 
Last edited:
 
Top