Snow Kubota BX1850 snowblower actuator wiring

   / Kubota BX1850 snowblower actuator wiring #1  

philm427

New member
Joined
Feb 19, 2013
Messages
11
Location
Northeastern CT
Tractor
Kubota BX1850
Hi,

I'm in the process of remounting the chute deflection actuator on my BX2750D snowblower, which is front mounted on my BX1850. The original installation was pretty cobbled, failed, and I'd like to redo it clean and right.

Not being much on wiring, I'm wondering if anyone out there has any hints on how to go about this?

Thanks
 
   / Kubota BX1850 snowblower actuator wiring #2  
Many people will just run it straight thru a 6 terminal (double pole, double throw) momentary switch.

The correct way to do it is to run the current thru relays, controlled by a single pole momentary switch.

SPDT Relay Wiring Diagrams - Electric Windows
 
   / Kubota BX1850 snowblower actuator wiring #3  
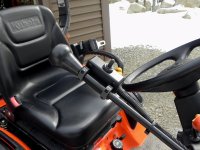
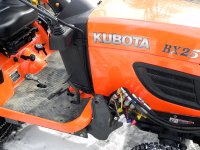
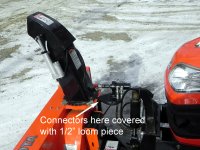
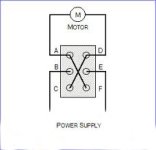
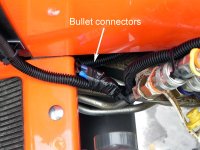
Phil, I just did finish my actuator project and following is how I addressed the wiring, but there are many ways this can be done, no right or wrong way, just what works for you. I drew my power directly from the battery. I bought an inline fuse holder from an auto supply store and connected it directly to the positive battery terminal using a 5 amp fuse. I brought this power line through the firewall on the right near the fuse box alongside an existing wire loom and terminated it near the hydraulic ports with bullet connectors (make positive the female end and negative the male). This power needs to get to the double pole double throw switch (ON momentary-OFF-ON momentary) you will use to operate the actuator. Members here have mounted this switch in many places; I chose to mount it on the joystick close to my hand so I could control all aspects of the blower with one hand. My switch is mounted in a 1"x2"x3" Radio Shack project box and it is connected to the joystick shaft with split shaft collars from Mcmaster-Carr which have flats on 2 sides. Mine were #9746T1 for 1/2" diameter. I drilled and tapped these collars in the center of one flat for 8-32 screws and then drilled holes in the project box to attach it to the collars. I drilled the box for the switch and proceeded to complete the wiring. Starting with power, I ran a line from the power bullet connectors up to the switch. These connect to the 2 center terminals of the 6 on the switch. I then made 2 short jumpers to run diagonally from corner to corner on the switch terminals and mounted them. Then I ran a line from the 2 terminals on one end of the switch to the actuator (doesn't matter which end). I terminated this line with bullet connectors near the actuator and added mating connectors to the actuator leads. Before adding these connectors I tested the actuator to determine which actuator wire went with which line wire so that switch "up" was actuator "up". If you get it wrong just swap wires. Wired like this there is no need for relays which are used to control high current devices with low current switches. My actuator has a full load current of 3 amps and my switch is rated for 20. I used some 16 gauge wire that I had but I'm pretty sure 18 would work fine. All wiring was put into 3/8" looms purchased at Home Depot. This arrangement allows me to unplug the power connection near the hydraulic ports, leaving the power feed line there permanently, and remove the rest of the wiring and switch each spring. Some might want to leave as much wiring as possible on the machine and use a completely different wiring scheme but this is a personal choice and this method suits me. I like to leave the tractor as stock as possible. I don't know why though because I plan to own it until I die. I might just go out and drill a hole in the ROPS. :laughing:

Bullet connectors near hydraulic ports -

Powerarrow.jpg

Switch on joystick -

ChuteDeflectorSwitchsm.jpg

Loom route -

loomside.jpg

Route to actuator -

loomfrontarrow.jpg

Switch wiring where motor is the actuator-

wiring.jpg
 
Last edited:
   / Kubota BX1850 snowblower actuator wiring
  • Thread Starter
#4  
That's a very clean installation and you've provided great information. The pictures answered a few of my questions as well regarding switch mounting ideas. I'll definitely go with your wiring suggestion, as it sounds very doable. I double checked my actuator and it's ok. Now I just need to gather up the hardware and wiring supplies I'll need and go to it.

Thanks for all of your help!

Phil
 
   / Kubota BX1850 snowblower actuator wiring #5  
You might consider using 2 pole trailer connectors with solder & heat shrink tubing for the disconnects, also no reason not to use the power outlet with a good quality plug if you plan on removing the harness in the spring.
 
Last edited:
   / Kubota BX1850 snowblower actuator wiring
  • Thread Starter
#6  
Just wondering, looking at the picture where the wire loom runs up the back of the chute, where did it fasten up near the deflector before routing to the actuator? Looks like it was drilled out and you used some sort of loop wiring router?
 
   / Kubota BX1850 snowblower actuator wiring #7  
Just wondering, looking at the picture where the wire loom runs up the back of the chute, where did it fasten up near the deflector before routing to the actuator? Looks like it was drilled out and you used some sort of loop wiring router?

I used mounting bases from Home Depot. I used these also on the side of the machine to run down to the hydraulics and on the quick-hitch. They have a sticky back and adhere extremely well. My idea on the chute was to get the loom up in the air away from the chute teeth.

Dean
 
   / Kubota BX1850 snowblower actuator wiring #8  
Dsmiley-

I really like the set up you have there. One question I have is not regarding the deflector but actually the chute rotation- the hydraulic motor does not look like a factory set up. (I know Kubota offers a hydraulic option) I'm I correct in saying that? Anyways, I like the set up you have and I'm sure it's much cheaper to build yourself than ordering the kit (they want like $800 extra!). Question 1: where did you find such a small hydraulic motor? Most of the ones I see are big and bulky. Question 2: It doesn't seem to me that there is anyway for the motor to stop itself from when you reach the maximum left and right turn. So if one was not careful, I can see the motor having enough power to damage the worm gear if you do not stop it in time. Would I be true in making that assumption? Now one could do a little fabrication, take the chute off and notch out the rest of the teeth so the chute could theoretically turn 360 degrees and not have to worry about damaging any gears. But of course you have to be careful to not shoot your face full of snow or rip your wire off for the deflector actuator. Either way I like what you did and if you could expand on what you did and what you purchased that would be awesome!

Thanks,

Paul
 
   / Kubota BX1850 snowblower actuator wiring #9  
Paul, I found that motor on ebay. I was looking for the smallest hydraulic motor I could find that I thought would do the job. Question 2 - I cut extra teeth in the chute so it would go all the way around and while you could get a face full if you tried, it doesn't happen by mistake. As for expanding on what I did, I'll send you a PM.

Dean
 
   / Kubota BX1850 snowblower actuator wiring #10  
Hi Dean, very nice write up, and a very neat installation. I,ve got all the parts on order to do the electric chute control on my B2750D snowblower, and should be starting the instal mid next week. Great idea for the switch location and mounting method.
I,m going to copy those as well. Cheers
 
 
Top