Hydraulic Chute Rotator on the BX2750 Snowblower

   / Hydraulic Chute Rotator on the BX2750 Snowblower #1  

Junkman

Super Member
Joined
Aug 15, 2002
Messages
7,386
Location
North East CT
Tractor
2003 Kubota BX-22
Hydraulic Chute Rotator on the BX2750 Snowblower

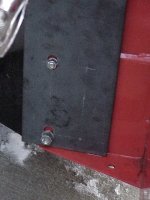
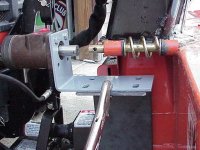
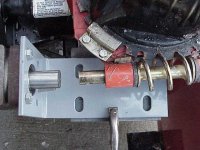
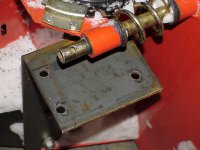
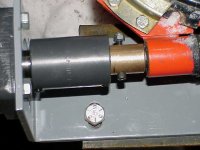
I have been bugged by my future father in law to get started on the hydraulic chute rotator on the BX2750 snowblower, so I decided to put some more time into it today. I had a piece of 1/4" plate 6" wide bent into a 90 degree angle and punched 2 holes in the bottom to bolt it to the snowblower lower frame attachments. The measurements for mine are one leg is 15 1/2" and the top leg is 5". See picture.... It appears to be quite stiff and I intend to add one brace to further stiffen it so there should be no movement of the brackets once everything is bolted down solid.
 

Attachments

  • 560461-ABX1.jpg
    560461-ABX1.jpg
    90.1 KB · Views: 1,752
   / Hydraulic Chute Rotator on the BX2750 Snowblower
  • Thread Starter
#2  
Re: Hydraulic Chute Rotator on the BX2750 Snowblower

I also purchased a Char Lynn motor mount on e Bay last week for $20 plus shipping. I figured it was faster and easier to purchase the mount and not have to be dealing with getting the placement of the mounting holes exactly where they needed to be along with getting the center hole properly centered and of the correct dimension. What I would have spend on the hole saw and the time to do it, the $20 was cheap in my mind not to have to worry about getting it right. In this picture the motor mount is clamped to the new mount that I had made and the motor is bolted to the mount.
 

Attachments

  • 560462-MVC-002S.JPG
    560462-MVC-002S.JPG
    42.1 KB · Views: 3,275
   / Hydraulic Chute Rotator on the BX2750 Snowblower
  • Thread Starter
#3  
Re: Hydraulic Chute Rotator on the BX2750 Snowblower

In this final picture, taken from the top looking down, you can see how it is going to line up with the shaft. I have to figure out how I am going to increase the size of the blower shaft to match up to the motor shaft. The shaft on the blower is slightly larger than 3/4" and the motor shaft is 1". I had originally thought of using a 1" x 3/4" bronze bushing, but I am not certain how I will enlarge the hole in the bushing to match the chute turning shaft. I was thinking that if I do get it to the same diameter, that I could then use Locktite to hold the two together. Then I will use a piece of plastic tubing to connect the two together as seen in PineRidge's hydraulic motor set up. Stay tuned and I will post more pictures as I progress.
 

Attachments

  • 560463-MVC-003S.JPG
    560463-MVC-003S.JPG
    41.4 KB · Views: 2,074
   / Hydraulic Chute Rotator on the BX2750 Snowblower #4  
Re: Hydraulic Chute Rotator on the BX2750 Snowblower

Have You thought about using yokes with roll pins on each shaft?
Or a keyed Yoke on one end and a roll pin on the other depending on what the shaft on the motor is.

I would think You could find Yokes at some of these industrial suppy concerns.
 
   / Hydraulic Chute Rotator on the BX2750 Snowblower #5  
Re: Hydraulic Chute Rotator on the BX2750 Snowblower

Junk (dad) I'm glad to see that the pep talk I gave you finally got you off the couch and moving on this project. You've been hanging on to that hydraulic motor long enough. /forums/images/graemlins/wink.gif

Why not head on over to Surplus Center and pick up a couple of flow restrictors and while you are at it one of those inexpensive shaft couplings. You may have to work on one end since your rotator shaft is smaller in diameter than your hydraulic motor shaft but that shouldn't be a biggie for a guy of your talents.

Or just use a piece of flexible tube like we used on ours with a couple of stainless clamps. I think you would still need to bush the smaller sized shaft so they would pretty much be the same diameter.

Looks to me like you're in the home stretch on this project, and you did it with your own two hands. Nice work dad!

TC-40D SS web pictures click here
 
   / Hydraulic Chute Rotator on the BX2750 Snowblower #6  
Re: Hydraulic Chute Rotator on the BX2750 Snowblower

Junkman,
I am doing the same project on my BX2750 snowblower. I have designed my bracket a little different. However, the final location of the motor is the same as yours.

I am using the Lovejoy motor couplings sold on the Northern tool website to connect the two shafts. You can buy each coupling halve as required for your shaft size. It is a real nice setup for only $20.00.

Look on the Northern website. Also you need to purchase the insert that goes between the coupling.

Also. just for curiosity, did you buy the bracket that the motor is attached too?

Jon
 
   / Hydraulic Chute Rotator on the BX2750 Snowblower
  • Thread Starter
#7  
Re: Hydraulic Chute Rotator on the BX2750 Snowblower

The grey bracket in the picture came from a Buy it Now auction on e Bay for $20 plus shipping the seller had a variety of different motor mounts (brackets) available to fit almost any hydraulic motor. I had the long bracket fabricated at a local shop that specializes in bending steel. They have a press there that will bend just about any thickness steel that is customarily bent. It took all of about 5 minutes from getting the stock off the shelf, cutting to length, and then bending to the 90 degree angle. The only thing that took any amount of time was the punching of the two holes. I had to bring the bracket home and fit it to the snowblower and mark where the holes were to be punched. Then I brought it back and they punched the two holes. Had I planned this in advance, I could have had them punch the four holes in the top of the bracket for bolting on the motor mount. Unfortunately, the punch didn't have enough clearance to do the punching on this side. I will be drilling those 4 on my drill press this week. Tomorrow we are supposed to get another 6" - 8" of snow, so I won't have time to deal with this... /forums/images/graemlins/frown.gif
The problem that I see with the Lovejoy coupling is that there is no safety factor when you reach the ends, unless you consider a torn coupling a solution to this. I have used Lovejoy couplings in other applications and I know that they are fairly rugged. I need to work on a coupling that will have a built in safety "switch" that will release the pressure if it goes too far or the chute should jam. I had a ice jam in the chute yesterday that locked up the chute from turning at all. If I didn't have the hand crank, I don't know if I would have noticed the resistance with the hydraulic motor and damage could have been done if the motor continued to try to turn the chute and the chute didn't move. It would have either broken the chute or the turning mechanism. For that reason, I feel that a built in safety "net" is a must.
 
   / Hydraulic Chute Rotator on the BX2750 Snowblower #8  
Re: Hydraulic Chute Rotator on the BX2750 Snowblower

Junk if you want that safety net that you are talking about then you might want to use the inexpensive coupling that we came up with. If you totally destroy one they are cheap to cut and easily replaceable.

The first time that we used the blower to move some snow after adding the hydraulic motor we actually had to speed up the chute rotation since it was moving too slow for us. With that kind of control it highly unlikely that you're ever going to hit and damage the end stops anyway, unless you fall asleep while blowing snow. /forums/images/graemlins/grin.gif

TC-40D SS web pictures click here
 
   / Hydraulic Chute Rotator on the BX2750 Snowblower
  • Thread Starter
#9  
Re: Hydraulic Chute Rotator on the BX2750 Snowblower

In this picture you can see the bare shaft after the manual chute rotator has been removed. The shaft has been coated with Never Seize, so the bronze bushing will not bond to the shaft anytime in the future.

1
 

Attachments

  • 572771-MVC-003S.JPG
    572771-MVC-003S.JPG
    31.2 KB · Views: 1,662
   / Hydraulic Chute Rotator on the BX2750 Snowblower
  • Thread Starter
#10  
Re: Hydraulic Chute Rotator on the BX2750 Snowblower

In this picture you can see the bronze bushing installed on the shaft. I had to use a King Pin Reamer to enlarge the inside diameter of the bushing because the shaft is slightly larger than 3/4". I made a wooden block jig to drill the hole through the bushing also. The coupling for the motor came from Surplus Center, and that had to have 1/2" removed from each end because without this, the motor hung off the bracket too far. The very fine bolt acts as a shear pin in this installation. The motor mount came from a e Bay auction. The only thing left to do now, is to get two quick disconnects tomorrow and install them to put it to work.
 

Attachments

  • 572772-MVC-006S.JPG
    572772-MVC-006S.JPG
    29.3 KB · Views: 1,485
 
Top