BX2750 snowblower

   / BX2750 snowblower #101  
Dyer,
That's where I initially starting pulling out the rust, from inside the feet attaching holes. The holes themselves weren't bad, and the metal that forms the back of the thrower in that section is plenty thick, where the potential problem is, is the thinner ( like half as thick or less) metal that makes up the lower inside of the auger section of the unit, that forms the front of the triangular hollow area. One quarter size hole right through, and other areas looking like they are getting soft. Luckily it's just flat plate with plenty of clearance to the auger. I could easily make up a patch sheet and weld it right over the whole lower auger cavity piece.
I bought the BX2200 used with the thrower, 2002 I think the BX is, with 550 hours, thrower looks about the same age. Totally acceptable wear and rust everywhere except inside that hollow area. This is only my second winter with the tractor....looks to me like snow/water/salt is entering the hollow area from the two 1" or so diameter drain holes underneath that section.
JohnnyB
 
   / BX2750 snowblower #102  
I'm looking forward to seeing a picture of it when you get it back. The Powder coat will offer up rugged protection and is a good way to go...especially at that price! :D Dyer, retired

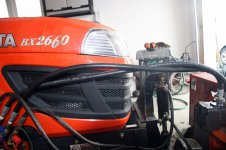
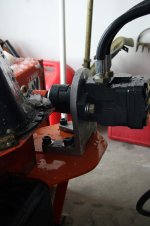
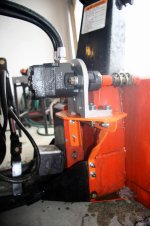
Well, the orange isn't close to Kubota orange but it'll do (a little grease and dirt and it will blend right in.) The setup works like a charm. I had about 4 inches of snow and slush to give it an immediate tryout. Did my neighbor's driveway too.

The hydraulic hoses cost me about $100. I should have asked the guy how much before I said to make them. They are high quality and no adapters required. I played it too tight on the length. They work -- but they just make it with but a little play to spare. No problem lifting the blower because it tilts it back and gives me more slack. I "ballparked" the length while the blower was at my son's shop. Stupid of me, but I lucked out.

I used a soft aluminum screw to connect the worm gear. The hope is that if I go too far rotating the chute that the screw will break before the worm gear does. I'm thinking I may remove the chute and cut more notches so the chute can do a full 360 so I'd get a wake up call if I rotated too far, but no breakage.

Here's some pics -- and thanks for all the help!:)
 

Attachments

  • IMG_0310.jpg
    IMG_0310.jpg
    351 KB · Views: 533
  • IMG_0311.jpg
    IMG_0311.jpg
    389.3 KB · Views: 508
  • IMG_0312.jpg
    IMG_0312.jpg
    470.9 KB · Views: 504
   / BX2750 snowblower #103  
Well, the orange isn't close to Kubota orange but it'll do (a little grease and dirt and it will blend right in.) The setup works like a charm. I had about 4 inches of snow and slush to give it an immediate tryout. Did my neighbor's driveway too.

The hydraulic hoses cost me about $100. I should have asked the guy how much before I said to make them. They are high quality and no adapters required. I played it too tight on the length. They work -- but they just make it with but a little play to spare. No problem lifting the blower because it tilts it back and gives me more slack. I "ballparked" the length while the blower was at my son's shop. Stupid of me, but I lucked out.

I used a soft aluminum screw to connect the worm gear. The hope is that if I go too far rotating the chute that the screw will break before the worm gear does. I'm thinking I may remove the chute and cut more notches so the chute can do a full 360 so I'd get a wake up call if I rotated too far, but no breakage.

Here's some pics -- and thanks for all the help!:)

Huck,

Excellent looking setup and I especially like the motor mount! It's compact, strong, and looks like a factory installation. As I said before, it sure shows when a good machinist gets working on something. The paint is close enough and the powder coat job looks professional.

I probably mentioned that I cut notches in the chute base all the way around, so I can turn the chute through 360 degrees. I will never turn the chute all the way through 360 degrees, but figured if I hadn't cut the slots all the way around, I would eventually hit the stop and tear the worm out...Murphy's law and all. I read other threads where guys have ripped the worm gear apart doing that and the motor never hesitated, so I thought notching the base was the quickest and easiest answer. If I had it to do over again, I'd have the machine shop do the notching....mine works fine, but I wouldn't enter it in any beauty contest.

It looks like your hoses will be fine as they are and if you got nervous about it, adding two 45 degree adapters to feed the hoses straight back would free up an extra couple of inches for you. I didn't remember the hoses being expensive, but the quick connects price was surprising.

It sounds like you aren't experiencing any trouble with the stick movement? When you push to the right, the chute turns right....you can feather it, etc.?

I'm very impressed and think you'll like it much more than the old hand crank setup you had. Congratulations! John
 
   / BX2750 snowblower #104  
Dyer,
That's where I initially starting pulling out the rust, from inside the feet attaching holes. The holes themselves weren't bad, and the metal that forms the back of the thrower in that section is plenty thick, where the potential problem is, is the thinner ( like half as thick or less) metal that makes up the lower inside of the auger section of the unit, that forms the front of the triangular hollow area. One quarter size hole right through, and other areas looking like they are getting soft. Luckily it's just flat plate with plenty of clearance to the auger. I could easily make up a patch sheet and weld it right over the whole lower auger cavity piece.
I bought the BX2200 used with the thrower, 2002 I think the BX is, with 550 hours, thrower looks about the same age. Totally acceptable wear and rust everywhere except inside that hollow area. This is only my second winter with the tractor....looks to me like snow/water/salt is entering the hollow area from the two 1" or so diameter drain holes underneath that section.
JohnnyB

JohnnyB,

Thanks for the clarification. I'm going out in a few minutes and lifting mine up for a quick look. I think I will follow your suggestion and load that area up with whatever spray rust inhibitor I can get up in there. I bought my tractor and blower in 2003. We don't have a lot of salt issues here, but I think that any moisture allowed to sit in there would probably be bad....just never thought about it before. Thanks again. John
 
   / BX2750 snowblower #105  
Well, the orange isn't close to Kubota orange but it'll do (a little grease and dirt and it will blend right in.) The setup works like a charm. I had about 4 inches of snow and slush to give it an immediate tryout. Did my neighbor's driveway too.

The hydraulic hoses cost me about $100. I should have asked the guy how much before I said to make them. They are high quality and no adapters required. I played it too tight on the length. They work -- but they just make it with but a little play to spare. No problem lifting the blower because it tilts it back and gives me more slack. I "ballparked" the length while the blower was at my son's shop. Stupid of me, but I lucked out.

I used a soft aluminum screw to connect the worm gear. The hope is that if I go too far rotating the chute that the screw will break before the worm gear does. I'm thinking I may remove the chute and cut more notches so the chute can do a full 360 so I'd get a wake up call if I rotated too far, but no breakage.

Here's some pics -- and thanks for all the help!:)

Huck-

Very clean setup .... doesn't that PYO about not getting the hose length perfect!

Given the look of strain on the hoses near the quick couplers, I would consider threading in some right angle adapters coming out of the hydraulic motor. I bet you would end up with 3 or 4 more "effective" inches of length on the hoses and I would be willing to bet several more years of life from them.

Nice work.
 
   / BX2750 snowblower #106  
JohnnyB,

Thanks for the clarification. I'm going out in a few minutes and lifting mine up for a quick look. I think I will follow your suggestion and load that area up with whatever spray rust inhibitor I can get up in there. I bought my tractor and blower in 2003. We don't have a lot of salt issues here, but I think that any moisture allowed to sit in there would probably be bad....just never thought about it before. Thanks again. John


Started to do some patch welding on it today....and..well, that whole front panel that forms the front of the hollow triangle section is going to have to be replaced. When I started removing paint for welding I found the metal to be holed in numerous places. Come spring time I'll remove the augers, cut out that whole section, paint the inside of the hollow area, weld on a new stainless front plate. The whole unit looks to be a 7.5 out of 10 at a casual glance, I would never have suspected this level of rust anywhere on it. It appears that when the first hole is worn/rusted in the center of this area the auger proceeds to shove salty snow through it to the inside of the hollow area, acclerating the whole process.
JohnnyB
 
   / BX2750 snowblower #107  
Huck,

Excellent looking setup and I especially like the motor mount! It's compact, strong, and looks like a factory installation. As I said before, it sure shows when a good machinist gets working on something. The paint is close enough and the powder coat job looks professional.

I probably mentioned that I cut notches in the chute base all the way around, so I can turn the chute through 360 degrees. I will never turn the chute all the way through 360 degrees, but figured if I hadn't cut the slots all the way around, I would eventually hit the stop and tear the worm out...Murphy's law and all. I read other threads where guys have ripped the worm gear apart doing that and the motor never hesitated, so I thought notching the base was the quickest and easiest answer. If I had it to do over again, I'd have the machine shop do the notching....mine works fine, but I wouldn't enter it in any beauty contest.

It looks like your hoses will be fine as they are and if you got nervous about it, adding two 45 degree adapters to feed the hoses straight back would free up an extra couple of inches for you. I didn't remember the hoses being expensive, but the quick connects price was surprising.

It sounds like you aren't experiencing any trouble with the stick movement? When you push to the right, the chute turns right....you can feather it, etc.?

I'm very impressed and think you'll like it much more than the old hand crank setup you had. Congratulations! John


John,

I know I read somewhere about notching it to turn 360!:) The only thing I recall is a response that said "I can't because the hoses from the hydraulic chute deflector would wrap." and I thought "well, I don't have that problem."

I don't want to push my luck at my son's shop, but I'd prefer an experienced machinist to make the cuts. Maybe I'll just take the chute off and bring it down and ask for some quick advice on making the cuts. ;)

The stick movement is fine. I need to go to the far right (beyond the detent) when moving the chute to the right. It didn't take much getting used to. In fact, the only thing that was a little odd was when I first started to use the new setup. I felt like something was missing. It was too easy! :)
 
   / BX2750 snowblower #108  
Huck-

Very clean setup .... doesn't that PYO about not getting the hose length perfect!

Given the look of strain on the hoses near the quick couplers, I would consider threading in some right angle adapters coming out of the hydraulic motor. I bet you would end up with 3 or 4 more "effective" inches of length on the hoses and I would be willing to bet several more years of life from them.

Nice work.

Paul,

First of all, I love your avatar. It reminds me of my granddaughter. Beautiful little girl.

Yes, it does PMO that I didn't add 6" to the length of the hoses. I was thinking that I didn't want the hoses drooping down on the tires (like the quick hitch hydraulics can do if you don't tie them up on the frame.) I played it too close.

The guy that did the hoses forgot the dust caps for the quick connects so I'm heading down there today to pick them up. I'll ask him about the right angle adapters.

Thanks for the feedback.
 
   / BX2750 snowblower #109  
Paul,

First of all, I love your avatar. It reminds me of my granddaughter. Beautiful little girl.

Paul, here's the pic I was thinking of when I said your avatar reminded me of my granddaughter. See what I mean? Have a great Thanksgiving all!
 

Attachments

  • IMG_1277.jpg
    IMG_1277.jpg
    284.1 KB · Views: 175
   / BX2750 snowblower #110  
John,

I know I read somewhere about notching it to turn 360!:) The only thing I recall is a response that said "I can't because the hoses from the hydraulic chute deflector would wrap." and I thought "well, I don't have that problem."

I don't want to push my luck at my son's shop, but I'd prefer an experienced machinist to make the cuts. Maybe I'll just take the chute off and bring it down and ask for some quick advice on making the cuts. ;)

The stick movement is fine. I need to go to the far right (beyond the detent) when moving the chute to the right. It didn't take much getting used to. In fact, the only thing that was a little odd was when I first started to use the new setup. I felt like something was missing. It was too easy! :)

I think if I had to notch my chute again, I'd have it done by the machine shop. Just to clarify, I will probably never rotate the chute around 360 degrees, but I wanted the notches there, so if I went past where the previous stop would have been, I wouldn't tear the worm gear out. I figured that I would be rotating the chute some day and get distracted just long enough to hit the stop and cause big damage, so I went ahead and notched the base. I guess if you had a hydraulic or electric chute deflector, you could not rotate 360 degrees...even if you wanted to.

In the meantime, you're ready for the white stuff and have a great looking modification to help you do it. John
 
 
Top