Kubota3710
Bronze Member
Folks, it took more time to figure this out than to do the install. Getting comfortable that I was tapping into the hydraulics correctly took the most time. Attached is a write up with some pictures that may help others. Rich
TITLE: Installing 3rd function remote on LS XR4046
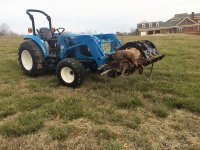
I installed a W.R. Long 3rd function remote on my XR4046 to support opening and closing a grapple bucket. Following is my experience.
The W.R. Long kit included the 3rd function hydraulic value, the hoses and fittings to hook it up, and a new job stick hand grip with a switch designed to replace the OEM joystick hand grip that came on the tractor. The new grip had the wiring and wire loam to attach to the tractor.
The only other things I purchased were some electrical connectors to tap into the tractor's 12V power supply, a hose saving spring kit, and some hydraulic hose fabric.
A couple observations. 1) Every kit is tractor dependent and a bit different and hooks up to a different place on the tractor it is design for. I didn' realize that ahead of time. The 3rd function hydraulic value on my tractor replaced the left step onto the tractor, which was acceptable to me. I ended up putting the step back on with it to help protect the new 3rd fcn valve. 2) The most challenging part of the job for me was knowing where to tap into the hydraulics of the tractor. I had to identify and tap into the Power Beyond port on the loader value. For my tractor the POWER BEYOND PORT came off the bottom of the loader value and ran back to near the right rear tire and attached to the REMOTE CONTROL VALUE, which is the value that drives the rear tractor remotes. YOUR TRACTOR my be very different. 3) I ordered the HOSE SAVING SPRING KIT after I got it installed. The hoses up near the grapple need a bracket or spring kit or similar to hold them in place and lower the chances of damage.
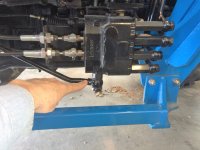
The First picture is of the POWER BEYOND PORT on the front end loader valve. You can see the hydraulic hose is hooked to the loader value with a banjo fitting, and the metal hydraulic hose goes aft about two feet where it hooks into the REMOTE CONTROL VALUE on my tractor. I had to remove this hydraulic line totally, and the 3rd FUNCTION REMOTE hydraulic valve is installed in series between the two open ports resulting from removal of the hose.
Here is a picture of my finger pointing to the POWER BEYOND PORT on the loader hydraulic value.
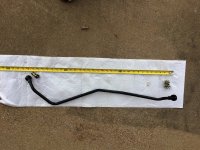
Here is the picture of the hydraulic line removed. This hose and the banjo fittings are NOT put back on.
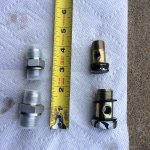
Here is a picture comparing the kit fittings that replace the original tractor banjo fittings.
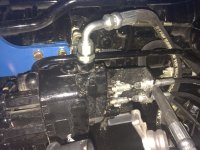
Here is a picture of the kit provided hydraulic line installed on the POWER BEYOND PORT. The straight fitting screws into the port, and the hydraulic hose had a 90 degree fitting to direct it under the tractor.
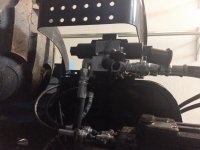
Here is the new 3rd FUNCTION REMOTE installed in place of the right hand step of the tractor. I have already hooked up the hoses on the front that go up to the grapple bucket.
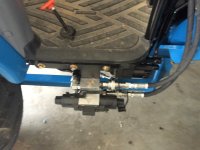
I now hooked up the two hydraulic hoses provided in the kit to the tractor. The following picture is looking from below. One of the hoses coming down from the 3rd FUNCTION REMOTE valve goes to the loader value POWER BEYOND PORT and the other hose went to the REMOTE CONTROL VALUE back near the right rear tire. The 3rd FUNCTION REMOTE value has letters on it to ensure you hook them up correctly.
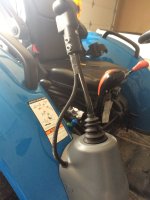
You have to find a 12V electric source from the tractor. I pulled from a switched terminal on the key, but intend to go back and install a switch on the dash with a relay from the battery. The kit includes a new joystick to replace the one on the tractor and it includes a switch that operates the grapple. It also has three wires, two of which hook up to the 3rd function remote and one that provides 12V power from the tractor to operate the remote. I show a picture here for how I routed the wire inside of the trim on the tractor. The kit came with the plastic wrap to protect the wire. I purchased a rubber grommet where I went through the plastic trim. Obviously you should leave some slack in the electrical wire so the joystick can move.
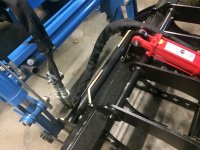
The other issue I had was the hoses up front at the grapple had nothing to hold them in place and hung below the level of the grapple. I was worried about them getting caught on something and ripped off. I ordered a Hose saving spring kit from EA and had my local shop weld it on the loader. I had to put it to the side of the loader to keep it from hitting the brush guard when the loader and bucket were tilted. The springs provide some flexibility if the hoses get caught on something. I had to play with it a bit to ensure none of the hydraulic hoses were rubbing.
I also added hydraulic hose wrap that I purchased at my local hydraulic supply store for additional protection. Even with the bucket all the way down, the hoses are still about 6 inches from the ground and have good clearance in all positions.
Here is a picture of the installed HOSE SAVING SPRING KIT on the front of the loader.
I love the grapple and why did I wait so long to purchase a tractor?
TITLE: Installing 3rd function remote on LS XR4046
I installed a W.R. Long 3rd function remote on my XR4046 to support opening and closing a grapple bucket. Following is my experience.
The W.R. Long kit included the 3rd function hydraulic value, the hoses and fittings to hook it up, and a new job stick hand grip with a switch designed to replace the OEM joystick hand grip that came on the tractor. The new grip had the wiring and wire loam to attach to the tractor.
The only other things I purchased were some electrical connectors to tap into the tractor's 12V power supply, a hose saving spring kit, and some hydraulic hose fabric.
A couple observations. 1) Every kit is tractor dependent and a bit different and hooks up to a different place on the tractor it is design for. I didn' realize that ahead of time. The 3rd function hydraulic value on my tractor replaced the left step onto the tractor, which was acceptable to me. I ended up putting the step back on with it to help protect the new 3rd fcn valve. 2) The most challenging part of the job for me was knowing where to tap into the hydraulics of the tractor. I had to identify and tap into the Power Beyond port on the loader value. For my tractor the POWER BEYOND PORT came off the bottom of the loader value and ran back to near the right rear tire and attached to the REMOTE CONTROL VALUE, which is the value that drives the rear tractor remotes. YOUR TRACTOR my be very different. 3) I ordered the HOSE SAVING SPRING KIT after I got it installed. The hoses up near the grapple need a bracket or spring kit or similar to hold them in place and lower the chances of damage.
The First picture is of the POWER BEYOND PORT on the front end loader valve. You can see the hydraulic hose is hooked to the loader value with a banjo fitting, and the metal hydraulic hose goes aft about two feet where it hooks into the REMOTE CONTROL VALUE on my tractor. I had to remove this hydraulic line totally, and the 3rd FUNCTION REMOTE hydraulic valve is installed in series between the two open ports resulting from removal of the hose.
Here is a picture of my finger pointing to the POWER BEYOND PORT on the loader hydraulic value.

Here is the picture of the hydraulic line removed. This hose and the banjo fittings are NOT put back on.

Here is a picture comparing the kit fittings that replace the original tractor banjo fittings.

Here is a picture of the kit provided hydraulic line installed on the POWER BEYOND PORT. The straight fitting screws into the port, and the hydraulic hose had a 90 degree fitting to direct it under the tractor.

Here is the new 3rd FUNCTION REMOTE installed in place of the right hand step of the tractor. I have already hooked up the hoses on the front that go up to the grapple bucket.

I now hooked up the two hydraulic hoses provided in the kit to the tractor. The following picture is looking from below. One of the hoses coming down from the 3rd FUNCTION REMOTE valve goes to the loader value POWER BEYOND PORT and the other hose went to the REMOTE CONTROL VALUE back near the right rear tire. The 3rd FUNCTION REMOTE value has letters on it to ensure you hook them up correctly.

You have to find a 12V electric source from the tractor. I pulled from a switched terminal on the key, but intend to go back and install a switch on the dash with a relay from the battery. The kit includes a new joystick to replace the one on the tractor and it includes a switch that operates the grapple. It also has three wires, two of which hook up to the 3rd function remote and one that provides 12V power from the tractor to operate the remote. I show a picture here for how I routed the wire inside of the trim on the tractor. The kit came with the plastic wrap to protect the wire. I purchased a rubber grommet where I went through the plastic trim. Obviously you should leave some slack in the electrical wire so the joystick can move.

The other issue I had was the hoses up front at the grapple had nothing to hold them in place and hung below the level of the grapple. I was worried about them getting caught on something and ripped off. I ordered a Hose saving spring kit from EA and had my local shop weld it on the loader. I had to put it to the side of the loader to keep it from hitting the brush guard when the loader and bucket were tilted. The springs provide some flexibility if the hoses get caught on something. I had to play with it a bit to ensure none of the hydraulic hoses were rubbing.
I also added hydraulic hose wrap that I purchased at my local hydraulic supply store for additional protection. Even with the bucket all the way down, the hoses are still about 6 inches from the ground and have good clearance in all positions.
Here is a picture of the installed HOSE SAVING SPRING KIT on the front of the loader.

I love the grapple and why did I wait so long to purchase a tractor?


