You are using an out of date browser. It may not display this or other websites correctly.
You should upgrade or use an alternative browser.
You should upgrade or use an alternative browser.
We have liftoff of my Massey 135 Rebuild
- Thread starter Forester Massey
- Start date
/ We have liftoff of my Massey 135 Rebuild
#21
OP
Forester Massey
Bronze Member
Today was a great day. I fixed the carb float issue and was anticipating getting it started and bringing it home. Got the carb on, put a new gas tank cut off valve and the only other issue was a wire from the distributor to solenoid that came off. Once those were out of the way she fired up quickly.
WV, I know you have not started yours yet but I can tell you. When everything is right, these things start right up. The only pressing issue right now is the antifreeze leak coming from behind the water pump. I am a bit embarrassed by this leak. When I took the engine apart I did not realize that part of the engine came off. I took off the water pump but not the piece behind it. I had the gasket for it put I could not figure out where it went. I wish those kits came with a diagram of their location. Of course, if I were to do another it would be in half the time and I know where everything would go.
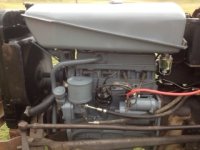
Included are some pics of the engine running from both the left and right side. Also included are the hydraulics and the pto. These are the areas I am having some leak issues. It looks like I have the ability to use a no til drill. That is awesome. The hydraulic fluid is a bit low and I want to get the leaks fixed soon. I will likely send in an oil sample on the fluid to see its state of condition. This thing takes about eight gallons so it makes sense to know its condition before I spend the money on the change. Plus, I like to know whats going on. I might even send in a sample of the engine oil. It will really tell you what's going on in the engine without tearing it apart. Wear metals, fuel dilution, etc.
I will update as I fix the antifreeze issue.
WV, I know you have not started yours yet but I can tell you. When everything is right, these things start right up. The only pressing issue right now is the antifreeze leak coming from behind the water pump. I am a bit embarrassed by this leak. When I took the engine apart I did not realize that part of the engine came off. I took off the water pump but not the piece behind it. I had the gasket for it put I could not figure out where it went. I wish those kits came with a diagram of their location. Of course, if I were to do another it would be in half the time and I know where everything would go.
Included are some pics of the engine running from both the left and right side. Also included are the hydraulics and the pto. These are the areas I am having some leak issues. It looks like I have the ability to use a no til drill. That is awesome. The hydraulic fluid is a bit low and I want to get the leaks fixed soon. I will likely send in an oil sample on the fluid to see its state of condition. This thing takes about eight gallons so it makes sense to know its condition before I spend the money on the change. Plus, I like to know whats going on. I might even send in a sample of the engine oil. It will really tell you what's going on in the engine without tearing it apart. Wear metals, fuel dilution, etc.
I will update as I fix the antifreeze issue.
Attachments
WV, I know you have not started yours yet but I can tell you. When everything is right, these things start right up. The only pressing issue right now is the antifreeze leak coming from behind the water pump. I am a bit embarrassed by this leak. When I took the engine apart I did not realize that part of the engine came off. I took off the water pump but not the piece behind it. I had the gasket for it put I could not figure out where it went. I wish those kits came with a diagram of their location. Of course, if I were to do another it would be in half the time and I know where everything would go.
I'm glad to see you got yours running! While mine isn't running yet, I know the feeling of starting a newly rebuilt engine for the first time all too well. Just before you turn the key, it's a combination of fear and excitement, all at the same time. Then, when the engine fires up... what a rush.
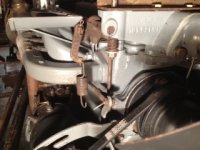
Fixing the water pump housing leak is relatively easy. After you remove the water pump, there are only two remaining nuts to remove. The image below shows my water pump housing just before I installed the water pump. The nuts and washers which hold it in place are indicated by yellow lines. Note that I used an old bearing and washer as temporary spacers so I could seat the water pump housing gasket and allow the sealer to set prior to installing the water pump.

OP
Forester Massey
Bronze Member
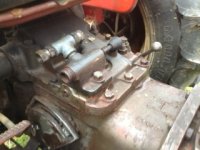
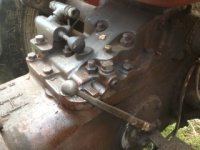
Tonight I started to take the water pump housing off to take care of overlooked gasket. I had most items off quickly and got the main even. Like most times I work on this tractor, you might move along quickly on a few items but eventually something slows or stops you from advancing. In this case, the housing is none to eager to come off. I worked so hard on it I broke a piece off.
I have the housing loose on the spark plug side of the engine. Its the other side that simply will not give. I need suggestions. I believe its rusted around the two studs and won't break free. Is heating it my next move?
My next question is not time sensitive but I can't figure out. Where does the small spring on the governor attach to once I get this back together. Its dangling in the pic.
Attachments
The kid
Elite Member
- Joined
- Apr 25, 2012
- Messages
- 4,132
- Location
- Middle Tennessee
- Tractor
- 1965 135 gasser, 1967 135 diesel
If you have already tried penetrating fluid on it, then your next move would be some carefully directed heat on the offending bolts. Smokin hot then try to pry it loose. More heat, then try some more. It's worked for me hundreds of times. Heat breaks down the rust and also expands the two metals making it easier to remove. Have you tried PB blaster before. Good stuff.I have the housing loose on the spark plug side of the engine. Its the other side that simply will not give. I need suggestions. I believe its rusted around the two studs and won't break free. Is heating it my next move?
My next question is not time sensitive but I can't figure out. Where does the small spring on the governor attach to once I get this back together. Its dangling in the pic.
Here's picture of where it goes.
View attachment 301424
Last edited:
OP
Forester Massey
Bronze Member
I don't know what PB blaster is. Can you expand.
murphy1244
Epic Contributor
- Joined
- Nov 25, 2011
- Messages
- 20,035
- Location
- Ohio
- Tractor
- Kubota 1120 RTV Kioti DK-40, MF-135, Ventrac 4500Y
I don't know what PB blaster is. Can you expand.
Its like liquid wrench or Kroil, penetrant
The kid
Elite Member
- Joined
- Apr 25, 2012
- Messages
- 4,132
- Location
- Middle Tennessee
- Tractor
- 1965 135 gasser, 1967 135 diesel
I don't know what PB blaster is. Can you expand.
If you have heard of WD40' it's like that but much much more effective. Sold at most auto parts stores. When working on old stuff, it's a must have.
Sent from my iPad iOS 6.1 - TBN v1.6
OP
Forester Massey
Bronze Member
Ben pecking along on the tractor. I noticed once it was first started that I have an exhaust leak on #4. Knowing how hard it is to torque those nuts I was not surprised. However I have re-tightened them and I am not optimistic I have solved the problem. Here is a pic of what I am seeing.
You can see the carbon from the leak. This is a replacement manifold but it is far better than the original. I do have a one year warranty but am thinking about trying to double up on the gaskets with copper coat to bridge the gap and get a good seal. Tell me if I am crazy. I am willing to spend the money on a cheap gasket before sending it back.
You can see the carbon from the leak. This is a replacement manifold but it is far better than the original. I do have a one year warranty but am thinking about trying to double up on the gaskets with copper coat to bridge the gap and get a good seal. Tell me if I am crazy. I am willing to spend the money on a cheap gasket before sending it back.
The kid
Elite Member
- Joined
- Apr 25, 2012
- Messages
- 4,132
- Location
- Middle Tennessee
- Tractor
- 1965 135 gasser, 1967 135 diesel
Quick question. Are the two outside upper bolts longer than the rest? They are your bolting points to the manifold for the heatshield. I can take my heatshield off without removing the manifold. I torqued the bolts, then installed the heat shield. How?
Here's what I did to the heat shield.
View attachment 301903
As you can see I opened the holes on all attachment points. I also notched out around the upper inner two bolts. Now the manifold can be torqued to specs, then double nutted to secure the heatshield. It's tight fit sliding it between the throttle rod going to the governor, but it will slide in.
View attachment 301904
You can see where I double nutted to secure the heatshield
Your gasket for the manifold. Did it look like this one.
View attachment 301905
Forrester, if you can't seal that #4 then something is wrong. You've got a burr or something warped to keep the manifold from mounting flush. With a new gasket you should be able to apply 1/2 torque to the nut and the manifold not leak. The gasket I used was of a paper type metalized if you where to peel it apart. If I where you I'd break it down again and look at things carefully to see why it's not sealing flush. -robert