Johnny_B
Silver Member
I recently replaced the two hoses inside the boom on my CB05 backhoe for the GC2410. It was easier than I thought it would be, so I figured I'd pass on a little info in case anyone else needs to do this. One OEM hose was leaking, but I replaced both with higher quality hose (an ounce of prevention).
Parts: Both hoses inside the boom are identical. A local hydraulic shop made me two 80-inch hoses: 1/4 ID, with JIC 37 degree female swivel fittings (size -06), 5800 PSI (OEM was 3000 PSI, but I wanted a more durable hose).
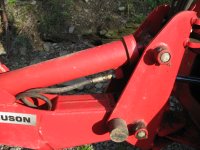
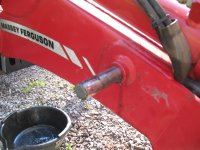
I also bought a roll of nylon hose protector to feed the hoses through (and secured with cable zip ties). The little open area in the boom where the hoses come through is where the OEM hose rubbed on a sharp edge and failed. So hopefully using the nylon sleeve will help prevent this in the future. They use this elsewhere on the backhoe, but not in this area.
Step 1. Remove the cover on the backhoe controls, label the old hoses (I simply used A and B).
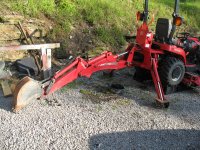
Step 2. Extend the backhoe as far out as possible. I used car ramps to raise the back tires up a few more inches so I could extend the hoe down a few more inches (the ramps may not be necessary, but it gave me a few more inches to work inside the boom when removing the cylinder).
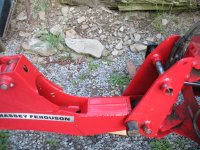
Step 3. I removed the pin furthest from the tractor (the pin in the boom). This was done by removing the retaining bolt and then tapping the pin with a large brass punch and handheld mini-sledge. The pin was a lot easier to remove than I anticipated, and any type of large wooden/plastic dowel could have probably been used. It didn稚 take much force to lose/remove them.
Step 4. Retract the hydraulic boom cylinder using the backhoe controls. Once I did this I was going to try and leave the front pin (closest to the tractor) connected and just reach inside the boom to access the fittings, but it was still a little tight, so I removed the front pin and then removed the cylinder. I disconnected both hoses and set the cylinder out of the way.
Step 5. Disconnect the hoses from the controls (and take them to your local shop to have them make duplicates). Label the new hoses (A and B). Reconnect the new hoses at the controls, feed them through the new nylon hose connector and into the boom.
Step 6. Connect the hoses to the cylinder and put the cylinder back inside the boom. Reconnect the pin closest to the tractor, and then use the backhoe controls to extend the cylinder inside the boom.
Step 7. The trickiest part is lifting the front end of the cylinder to line up where the pin goes through. I used a small block of wood to help prop it up and then I got a smaller diameter rod (I had a piece of 3/8 aluminum rod lying around) to use as a pilot to push through and help line up the cylinder hole. This kept the cylinder just about in place while I re-installed the pin. Make sure you re-install all the retaining bolts and re-grease the pins you just re-installed.
Step 8. Install the cover over your controls and check/fill your hydraulic fluid level as necessary.
Parts: Both hoses inside the boom are identical. A local hydraulic shop made me two 80-inch hoses: 1/4 ID, with JIC 37 degree female swivel fittings (size -06), 5800 PSI (OEM was 3000 PSI, but I wanted a more durable hose).
I also bought a roll of nylon hose protector to feed the hoses through (and secured with cable zip ties). The little open area in the boom where the hoses come through is where the OEM hose rubbed on a sharp edge and failed. So hopefully using the nylon sleeve will help prevent this in the future. They use this elsewhere on the backhoe, but not in this area.
Step 1. Remove the cover on the backhoe controls, label the old hoses (I simply used A and B).
Step 2. Extend the backhoe as far out as possible. I used car ramps to raise the back tires up a few more inches so I could extend the hoe down a few more inches (the ramps may not be necessary, but it gave me a few more inches to work inside the boom when removing the cylinder).
Step 3. I removed the pin furthest from the tractor (the pin in the boom). This was done by removing the retaining bolt and then tapping the pin with a large brass punch and handheld mini-sledge. The pin was a lot easier to remove than I anticipated, and any type of large wooden/plastic dowel could have probably been used. It didn稚 take much force to lose/remove them.
Step 4. Retract the hydraulic boom cylinder using the backhoe controls. Once I did this I was going to try and leave the front pin (closest to the tractor) connected and just reach inside the boom to access the fittings, but it was still a little tight, so I removed the front pin and then removed the cylinder. I disconnected both hoses and set the cylinder out of the way.
Step 5. Disconnect the hoses from the controls (and take them to your local shop to have them make duplicates). Label the new hoses (A and B). Reconnect the new hoses at the controls, feed them through the new nylon hose connector and into the boom.
Step 6. Connect the hoses to the cylinder and put the cylinder back inside the boom. Reconnect the pin closest to the tractor, and then use the backhoe controls to extend the cylinder inside the boom.
Step 7. The trickiest part is lifting the front end of the cylinder to line up where the pin goes through. I used a small block of wood to help prop it up and then I got a smaller diameter rod (I had a piece of 3/8 aluminum rod lying around) to use as a pilot to push through and help line up the cylinder hole. This kept the cylinder just about in place while I re-installed the pin. Make sure you re-install all the retaining bolts and re-grease the pins you just re-installed.
Step 8. Install the cover over your controls and check/fill your hydraulic fluid level as necessary.
Attachments

Last edited: