2001 John Deere 4300 HST tractor extensive repairs and refurbishment

   / 2001 John Deere 4300 HST tractor extensive repairs and refurbishment #11  
Holy cow, almost looks like it was submerged in pond muck! :(
 
   / 2001 John Deere 4300 HST tractor extensive repairs and refurbishment #12  
Sure does make mine look good
 
   / 2001 John Deere 4300 HST tractor extensive repairs and refurbishment
  • Thread Starter
#13  
It would not surprise me at all if a lot of 10 yo tractors have
never had these areas opened up. Maybe it's just as dirty as this
rental tractor?

This is also true for the engine (pix). I wanted to examine the air
intake hoses for wear, and also set the valve lash. Readers of my last
4300 project will recall that failure of the intake hose is what destroyed
that engine. This is the hose that is between the filter housing and
the intake manifold. A fuel overflow drain hose was pinched between
the air intake hose and the fuel tank, causing wear to the hose and
eventual failure. That drain hose is missing here...great news. The
intake hose looks OK. Some wear, but not too much (arrow).
 

Attachments

  • engine_1.jpg
    engine_1.jpg
    69.6 KB · Views: 371
  • engine_2.jpg
    engine_2.jpg
    73.5 KB · Views: 352
   / 2001 John Deere 4300 HST tractor extensive repairs and refurbishment #14  
Very interesting!
I'll be watching this progress too!

Mark
 
   / 2001 John Deere 4300 HST tractor extensive repairs and refurbishment
  • Thread Starter
#15  
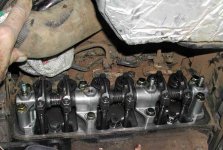
Here I have opened the valve cover and performed the valve
adjustment. What is amazing is that this may be the first
valve adjustment done on this engine in its 2020 hrs of life. Of
the 6 valves, 3 were in-spec, and the other 3 were off only
2-3 thousandths, both loose and tight. This shows that you can
get away with infrequent valve adjustment. Still not advised.

The valve adjustment was easy: I just turned the crank with a wrench
until I was sure each valve was closed, then used my feeler guages.
Here is another write-up on adjusting the valves (by ARRABIL):
http://www.tractorbynet.com/forums/...ating/183025-42-43-4400-valve-adjustment.html

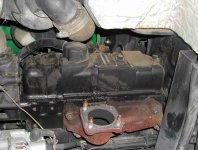
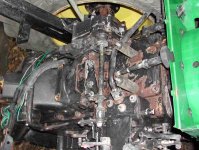
By far the hardest part of the adjustment was cleaning the area over
the injectors before I opened the valve cover. Normally, I clean
everything I can before opening anything sensitive, but getting to this
area was very difficult. Once I had the muffler off, I had some access,
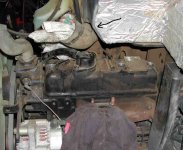
but I no longer wanted to use water because of the open manifolds. I
used picks and air to chisel away an inch or so of buildup on the intake side
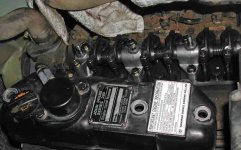
of the head. When I got it to where I dared to open the valve cover,
I still got a few pieces of dirt on the valve train. I very carefully cleaned
all that before rotating the engine.

This is how most of us would have to adjust the valves. The previous
4300 benefited tremendously from having the engine out and meticulously
clean.
 

Attachments

  • engine_3.jpg
    engine_3.jpg
    69 KB · Views: 344
  • engine_4.jpg
    engine_4.jpg
    68.2 KB · Views: 312
   / 2001 John Deere 4300 HST tractor extensive repairs and refurbishment
  • Thread Starter
#16  

Attachments

  • after_clng.jpg
    after_clng.jpg
    81.2 KB · Views: 325
Last edited:
   / 2001 John Deere 4300 HST tractor extensive repairs and refurbishment
  • Thread Starter
#17  
OK, now that the transmission is buttoned up, I can give some more
attention to electrical issues.

I replaced the front and rear lights, which will be shown in the final pix. I also
spent a lot of time cleaning the dirt out of several connectors and relays. Some
had become intermittant. You can see the cleaned up relay panel in the
first photo.

The turn signal/hazard flasher unit had become totally non-functional. The
connectors are clearly corroded, but the internals are dead. Instead of
buying a new flasher unit from JD ($$$), I substituted a common Wagner
flasher so I could have working hazard lights, but no turn signals. I have
no use for turn signals anyway. (If I drive on the public road, I use the
hazards, not the turn signals.)

For the last tractor, I picked up a new Wagner flasher at Kragens Auto, but
for this one, I found some spares: one from Napa, one from an older Ford,
and one a generic. To wire this up, I tied the green wires together, and the
orange power wire went to the other terminal. Since these use a bi-metal
strips, they only flash when they see current from both bulbs. There is
no polarity for these Wagner units. Works great!
 

Attachments

  • turn_sig.jpg
    turn_sig.jpg
    66.3 KB · Views: 252
  • turn_sig_2.jpg
    turn_sig_2.jpg
    45.3 KB · Views: 169
  • turn_sig_3.jpg
    turn_sig_3.jpg
    74.9 KB · Views: 240
   / 2001 John Deere 4300 HST tractor extensive repairs and refurbishment
  • Thread Starter
#18  
I knew this tractor had a bad front tire and wheel. The rental yard
had resorted to a tube because the tire was leaky and the rim leaked.

So I dismounted the tire, and peeled the tube out. It was cemented
to the wheel with rust. The bead area was also very rusty. I thought
I had a 'before' shot, but I can't find it. Anyway, I spent nearly an
hour with a wire wheel and sand paper, then painted it up.

After installing a new valve stem, I mounted a good used tire I had.
I used Slime for a lubricant and sealant for the beads. I have had
good experience with this product with past difficult tires.
 

Attachments

  • wheel_1.jpg
    wheel_1.jpg
    55 KB · Views: 185
  • wheel_2.jpg
    wheel_2.jpg
    75.1 KB · Views: 211
  • wheel_3.jpg
    wheel_3.jpg
    72.3 KB · Views: 192
 
Top