Rocker shaft bracket repair.

   / Rocker shaft bracket repair. #1  

Mean Jean

Gold Member
Joined
Dec 17, 2010
Messages
320
Location
Hazelridge, MB
Tractor
Kubota L1801 and Massey 65
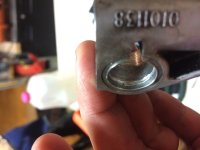
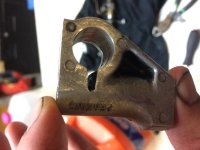
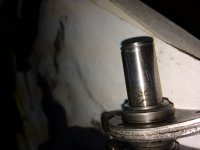
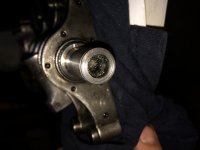
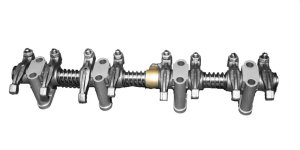
Putting the rocker shaft back together and I'm unable to get the last bracket on. The bracket was a PITA to remove and required some heat. I gave it a light tap on reassembly then took it back off as it's not sliding on smoothly. Any suggestions?
 
   / Rocker shaft bracket repair. #2  
A picture is worth a 1000 words. Also what engine are you working on? What does the micrometer say? Flat spot, burr or pitting? Are they all in the proper order and direction? Is the end supposed to be a press fit? I'd hate to recommend a hone or a lapping compound or any other irreversible solution without a full understanding of why it's so tight.
 
   / Rocker shaft bracket repair.
  • Thread Starter
#3  
A picture is worth a 1000 words. Also what engine are you working on? What does the micrometer say? Flat spot, burr or pitting? Are they all in the proper order and direction? Is the end supposed to be a press fit? I'd hate to recommend a hone or a lapping compound or any other irreversible solution without a full understanding of why it's so tight.

Was fighting with the pics.
Think I've got it now.

Engine is a Perkins 203.
It's a burr likely created when I gave the bracket a light tap with a hammer. They are made of aluminium. Noticed a bit of shavings when I was finally able to separate the SOB.
 

Attachments

  • IMG_3546.JPG
    IMG_3546.JPG
    992.7 KB · Views: 83
  • IMG_3547.JPG
    IMG_3547.JPG
    958.8 KB · Views: 106
   / Rocker shaft bracket repair.
  • Thread Starter
#4  
A picture is worth a 1000 words. Also what engine are you working on? What does the micrometer say? Flat spot, burr or pitting? Are they all in the proper order and direction? Is the end supposed to be a press fit? I'd hate to recommend a hone or a lapping compound or any other irreversible solution without a full understanding of why it's so tight.

Thank you very much for the reply.
All great suggestions from you as well.

Closer examination shows some damage at the start of the assembly shaft.
That's where I'm getting hung up.
The last bracket also has some damage.

It's the far left bracket in the third picture.

It doesn't show well but in picture number two there's some damage visible in the 1 o'clock position. It's likely from lightly tapping on it in the removal process.

Fart.
 

Attachments

  • IMG_3551.JPG
    IMG_3551.JPG
    1.5 MB · Views: 62
  • IMG_3552.JPG
    IMG_3552.JPG
    1.2 MB · Views: 67
  • IMG_3554.JPG
    IMG_3554.JPG
    62.2 KB · Views: 41
Last edited:
   / Rocker shaft bracket repair.
  • Thread Starter
#5  
The plan is to file off the flat spot of shaft with a metal file.
Then I'm going to take 60 grit sand paper and clean up the gouges in the aluminum bracket.
 
   / Rocker shaft bracket repair. #6  
I'd hone or lap it in- I assume you want a uniformity to the fit.
 
   / Rocker shaft bracket repair. #7  
I wouldn't use the sandpaper. Take a 3 cornered file and grind the teeth off two flats to make a sharp edge. Use that to scrape only the highs out of the bore. You might be able to do the same with a pocket knife. I have a file ground that way with a wooden handle and it is very handy for deburring parts. The hone would work too, but be careful to only take the burrs out. You don't want to make it loose.
 
   / Rocker shaft bracket repair.
  • Thread Starter
#8  
Thanks to all who took time out of their day to reply.
My neighbor came by with a small file and touched up the end of the shaft.
He also deburred the inside of aluminum bracket with the same file.
He then took 120 grit sandpaper her and worked the last 1.5" of the assembly shaft.
Everything slipped back on real nice.
I'm going to button everything back up and move on to the other repairs on the list
 
 
Top