DCWhitley
Member
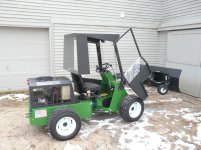
Attached are some pictures of the cab and other modifications I have made, a lot of which I learned from members at this site. Everyone here is great for all kinds of ideas and help.
My Modifications:
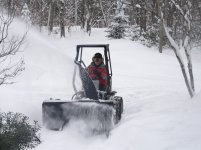
1. Moved head lights to top of ROPS - I did this mainly because I use my PT a lot in the dark during the winter for moving snow. When the lights were mounted low, they just shined at the back of the snow blower.
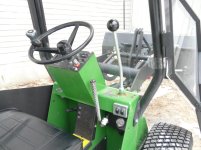
2. Added Suicide Knob - makes steering with one hand very easy. I would call this a necessity.
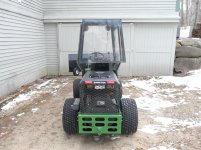
3. Added Rear lights - the red ones were just so people could see me at night and are wired into the headlight circuit, the white one is for backing up, on its own switch.
4. Added Gas Gauge - I wanted to know how much gas I had left without having to get off and check, this has been very useful.
5. Added Lighted switches on dash - current only one is used for the white backup light. I wasn't sure how to mount the panel but the switches fit so well in the holes, I just push them in and the panel stays in place, nice and tight. The panel is 1/8" aluminum, still to be painted.
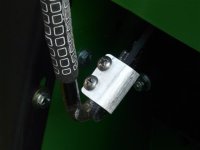
6. Added Extension for the quick attach lever - I have the backhoe attachment and this modification is really a necessity. Bracket is made from aluminum and attaches a steel rod (bent and ground flat at the end) to the existing handle, no drilling or threading of the existing handle. Cover is a golf grip.
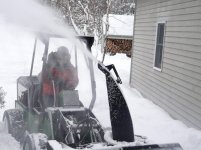
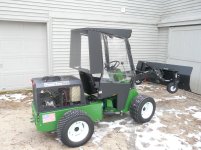
7. Cab - I need something to keep the blowing snow off me when using the snow blower, but I also wanted it to look good, like it belonged there from the factory. I debated whether to use the ROPS or not, not using it would have been much easier, but I decide for safety sake I should use it, so I came up with this design. I moved the ROPS up as far as possible to have room for the joystick and steering wheel and it gave me just enough room so I could mount the windshield (1/4" Plexiglass w/hand operated windshield wiper) on the ROPS without interfering with them. Door frames are made out of 1" square aluminum with a lower panel of 1/8" aluminum, middle panel of 1/4" plexiglass and the top section of heat shrink plastic. Doors are mounted to the ROPS with a removable hinge so the doors lift right off the hinge for easy removal. The pieces for the door are held together using a piece of 1/8" thick aluminum cut at the proper angle and width then inserted inside the tubing and held in place by drilling, taping and screwing together. The back panel is a combination of the 1" square tubing and the 1/8" alum sheet for the sides, back window is heat shrink plastic. It is held in place by 3 screws on each side into the ROPS top. I was very pleased with the result looks good, gives great visibility, doesn't feel cramped, keeps the snow out, is fairly rugged and is easy to remove for summer by removing 6 screws.
My Modifications:
1. Moved head lights to top of ROPS - I did this mainly because I use my PT a lot in the dark during the winter for moving snow. When the lights were mounted low, they just shined at the back of the snow blower.
2. Added Suicide Knob - makes steering with one hand very easy. I would call this a necessity.
3. Added Rear lights - the red ones were just so people could see me at night and are wired into the headlight circuit, the white one is for backing up, on its own switch.
4. Added Gas Gauge - I wanted to know how much gas I had left without having to get off and check, this has been very useful.
5. Added Lighted switches on dash - current only one is used for the white backup light. I wasn't sure how to mount the panel but the switches fit so well in the holes, I just push them in and the panel stays in place, nice and tight. The panel is 1/8" aluminum, still to be painted.
6. Added Extension for the quick attach lever - I have the backhoe attachment and this modification is really a necessity. Bracket is made from aluminum and attaches a steel rod (bent and ground flat at the end) to the existing handle, no drilling or threading of the existing handle. Cover is a golf grip.
7. Cab - I need something to keep the blowing snow off me when using the snow blower, but I also wanted it to look good, like it belonged there from the factory. I debated whether to use the ROPS or not, not using it would have been much easier, but I decide for safety sake I should use it, so I came up with this design. I moved the ROPS up as far as possible to have room for the joystick and steering wheel and it gave me just enough room so I could mount the windshield (1/4" Plexiglass w/hand operated windshield wiper) on the ROPS without interfering with them. Door frames are made out of 1" square aluminum with a lower panel of 1/8" aluminum, middle panel of 1/4" plexiglass and the top section of heat shrink plastic. Doors are mounted to the ROPS with a removable hinge so the doors lift right off the hinge for easy removal. The pieces for the door are held together using a piece of 1/8" thick aluminum cut at the proper angle and width then inserted inside the tubing and held in place by drilling, taping and screwing together. The back panel is a combination of the 1" square tubing and the 1/8" alum sheet for the sides, back window is heat shrink plastic. It is held in place by 3 screws on each side into the ROPS top. I was very pleased with the result looks good, gives great visibility, doesn't feel cramped, keeps the snow out, is fairly rugged and is easy to remove for summer by removing 6 screws.
")