Ed's Pictures of 425 and attachments

   / Ed's Pictures of 425 and attachments
  • Thread Starter
#21  
Re: Ed\'s Pictures of 425 and attachments

Actually it doecsn't come with a quick attach bracket it mounts to the 2425 a different way - I made a special bracket to lock into the backhoe and then I welded the quick attach bracket to that
 
   / Ed's Pictures of 425 and attachments
  • Thread Starter
#22  
Re: Ed\'s Pictures of 425 and attachments

It is pretty smooth when going sideways around corners
the only time I notice a little matt down is when it is really hot outside
but that is pretty normal - next summer I will post some pictures of the stripes - they are really pronouced - especically if you mow in the same groove and then go crossways - you get the baseball field checker board

the roller is heavy machined tube steel with end caps - I decided to mount the bearings externally to the roller because it is a little easier - golf rollers are internal but they are not as wide - the Steiner has a 60 inch with external bearings
 
   / Ed's Pictures of 425 and attachments
  • Thread Starter
#23  
Re: Ed\'s Pictures of 425 and attachments

Hey Moss - pretty neat isn't it


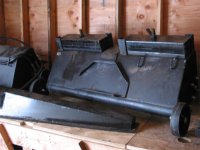
1. That is the stock backhoe from the 2425, correct?
YES it is
What is the reach out, depth of hole straight down and lift up height to the best of your knowledge?

You can check the PT site - I think the specs there are right - But think it digs 6ft and has an 8ft reach - not sure how high
it is a nice backhoe with plenty of power - good for digging holes for trees trenches / etc

2. Did you have to mount the quick attach plate to it, or was that standard for the rear of the 2425? Yes the bracket you see ies custom - and then I welded a custom attachment plate to that - I did not modify the backhoe the plate locks in without welds

3. So you just drive up, hook the quick attach, pull the locking cylinder lever, set the brake, get off, switch the two locking cylinder hoses to the back hoe, get back on , release the brake, lift a little and drive away? That's it? 30 or 40 seconds?

You GOT IT

4. You mentioned that you hook the Aux PTO/quick attach handle and that supplies hydraulics to the hoe. How do you hook it and is it always in the up position?

I basically made a metal clip that holds it on in the "up" postion - the backhoe only works with one direction of flow

Last one:
5. Is that the way they do it on the 2425 or are there rear hydraulic outlets that require no valve operation to get power to the hoe?

Not sure - I know somehow it is tapped of the Aux circuit -that is what Terry told me - but I think it probably has a dedicated switch or something

Sorry for all the questions, but you are the first with a full hoe on a PT400 series that I've seen. Thanks for sharing, but curses for making me want to spend more money

Well thats half the fun of it
 
   / Ed's Pictures of 425 and attachments #24  
Re: Ed\'s Pictures of 425 and attachments

You have really started something here. I did not know that you could purchase the backhoe part of the 2425 by itself. Would you mind telling us the cost?
Do you still have the swing capabilities when attached to the 425?
Is the 2425 the replacement for the 2422?
PJ
 
   / Ed's Pictures of 425 and attachments #25  
Re: Ed\'s Pictures of 425 and attachments

PJ,
Go to the power trac site and go to the prices page. Then select the price list for the PT2425. I believe the last time I looked it was around $2700.00 for the back hoe. Not too bad when compared to other hoe prices.
 
   / Ed's Pictures of 425 and attachments #26  
Re: Ed\'s Pictures of 425 and attachments

Ed,

Wondering if you could hook it upto the main PTO circuit. You get more hydraulic capability, plus it turns on with a switch. Not sure if the hydraulic flow and pressure is above the capabilities of the backhoe.

Duane
 
   / Ed's Pictures of 425 and attachments #27  
Re: Ed\'s Pictures of 425 and attachments

MossRoad,
Thanks for the tip, found it right away.
PJ
 
   / Ed's Pictures of 425 and attachments
  • Thread Starter
#28  
Re: Ed\'s Pictures of 425 and attachments

Here are some more - this is the motor I use for the slicer attachment
 

Attachments

  • 54-216557-Picture021s.JPG
    54-216557-Picture021s.JPG
    137.1 KB · Views: 503
   / Ed's Pictures of 425 and attachments
  • Thread Starter
#29  
Re: Ed\'s Pictures of 425 and attachments

Hey Duane - the problem I believe is that the main PTO
circuit has Too much flow- it is also larger diameter hose

- The Aux circuit is the circuit used on the 2425 -
the backhoe again has more power than the machine has weight to hold back - basically if you are trying to pry something out that is really caught in there - the backhoe has the power - you need more machine weight - it will drag the machine around - and this is on the Aux circuit which is the same pump for lift / steering

It would be nice to have the dedicated circuit with a switch - I suppose you could plumb this off the Aux before the hoses enter the valve for the quick attach

That would be great - two Aux circuits - that would work - right?
- I want to do this anyway because that is how I plan to run the dump hopper for grass that I have not built yet - this way I don't tie up the quick attach Aux - as long as everything is not running at the same time - shoud be OK right? I would not be dumping the hopper while lifting something in the front or steering

don't really need it for the backhoe though - The clip bracket works fine for the amount of time I use it - which is not that often
 
   / Ed's Pictures of 425 and attachments
  • Thread Starter
#30  
Re: Ed\'s Pictures of 425 and attachments

Another shot of the Core Aerator - see the weight system added - I really think this works much better than using downpressure - because with the amount you have to use you really can't steer - With the added weight you can leave the tractor in float and really get the penetration I was looking for
- The bracket can take two more plates but that is starting to get really heavy at around 35 lbs for each plate

The wheels were mounted because I share this frame with the slicer shaft and motor - I needed gauge wheels in the back for that
 

Attachments

  • 54-216568-Picture011s.JPG
    54-216568-Picture011s.JPG
    103.1 KB · Views: 484
 
Top