Post Trenching Trench Cleanout - MicroHoe

   / Post Trenching Trench Cleanout - MicroHoe #21  
If the bucket is to be used for trenching, the body of the bucket can be as narrow as you want, and longer so that the attaching plate never has to get in the ground.

This is a bucket that I built from a kit. The backside of the backet is 4 in.
 

Attachments

  • 819648-grapple stowed1.JPG
    819648-grapple stowed1.JPG
    19.8 KB · Views: 206
   / Post Trenching Trench Cleanout - MicroHoe
  • Thread Starter
#22  
That looks good. Where did you get the kit?

Bob Rip
 
   / Post Trenching Trench Cleanout - MicroHoe #23  
From a guy in Canada, who laser cuts parts. You could use any bucket as a model and make it the size that you want.
 
   / Post Trenching Trench Cleanout - MicroHoe #24  
</font><font color="blue" class="small">( Another thought would be, after trenching with the chain trencher, to run down the trench line with something like that yellow scoop at the depth you want.

I also have one of those old U-Haul rental trenchers . It digs with a spinning wheel with carbide teeth in the forward direction. It has a rubber flap that the dirt is thrown over and is deposited about 6 in from the trench. It can dig just about as fast as you can push it. Pushing is the tough part. I was thinking of modifying it so the PT could pick it up and provide the push power. )</font>

That sounds like the PT wheel trencher or the older model stump grinder with fixed teeth. ( Reversed of course ).
 
   / Post Trenching Trench Cleanout - MicroHoe #25  
No, is not like the old trencher/stumpgrinder. It digs a trench with PT driving backward. The wheel can not be reversed. It has no flap to deposit dirt away from the trench. The teeth are fixed. It does makes a decent trench
 

Attachments

  • 820865-nikonjjatlanta 033-1.jpg
    820865-nikonjjatlanta 033-1.jpg
    62 KB · Views: 134
   / Post Trenching Trench Cleanout - MicroHoe
  • Thread Starter
#26  
Well I built the microhoe. I used 5/16 inch plate steel for the sides. I picked up all of the steel at a recycling yard for $25, and I still have some left. It is heavy, my guess is 50 pounds. I will attach some pictures.
Pardon my welds.
Bob Rip
 

Attachments

  • 825319-micro bucket front view up.JPG
    825319-micro bucket front view up.JPG
    46.6 KB · Views: 216
   / Post Trenching Trench Cleanout - MicroHoe
  • Thread Starter
#27  
Another picture. I have a tongue sticking out the front. I put two layers of steel here, so hopefully it will not bend.

Bob Rip
 

Attachments

  • 825320-micro bucket wide lip showing.JPG
    825320-micro bucket wide lip showing.JPG
    65.7 KB · Views: 216
   / Post Trenching Trench Cleanout - MicroHoe
  • Thread Starter
#28  
I still need to sand blast and paint it.

Bob Rip
 

Attachments

  • 825321-Micro bucket inside bucket.JPG
    825321-Micro bucket inside bucket.JPG
    61.9 KB · Views: 141
   / Post Trenching Trench Cleanout - MicroHoe #29  
Bob, Sure looks sturdy enough. What size is your box tubing, and how wide is the assembly in the trench? How will you control the depth? If you leave it in float, it might dig more than you want. Let me offer this suggestion. Put some adjustable wings on the part in the ground to limit the depth. Just roll backwards until the bucket is full, and you should have a nice even trench.
 
   / Post Trenching Trench Cleanout - MicroHoe
  • Thread Starter
#30  
</font><font color="blue" class="small">( Bob, Sure looks sturdy enough. What size is your box tubing, and how wide is the assembly in the trench? How will you control the depth? If you leave it in float, it might dig more than you want. Let me offer this suggestion. Put some adjustable wings on the part in the ground to limit the depth. Just roll backwards until the bucket is full, and you should have a nice even trench. )</font>

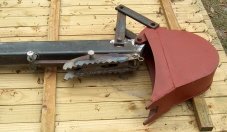
The box tubing is 2X2 and fits nicely in the 2 inch receiver. A good find. I found three 4 foot pieces at the recycling yard.
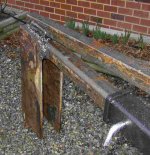
The bucket is 3 inches wide, so it is good for probably even a 4 inch pipe since the pipe is smaller at the bottom.
I had actually thought about some wings. I could put a wing on a pipe clamp and slide it up and down to adjust the depth. (I just thought of that). Weld the clamp to a pipe. Maybe you have a better thought. I hate to drill the tube.

Any suggestions would be appreciated. I would like to make changes before I paint it, it's a lot easier to weld that way.

Bob Rip
 
 
Top