ETpilot
Gold Member
I have read a few threads regarding poor battery performance. Thought I would share this Battery Rejuvenator with the members here. It may help restore weak and old batteries. Like many things, no guarantee but it is worth a try. This new thread will take me a couple of posts to complete. Hope I get it right.
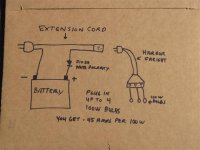
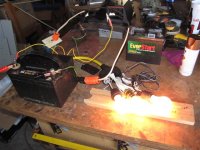
The battery charger schematic was posted on one of my aviation forums and I saved it for future use. When my very expensive 24 volt battery showed weak starting symptoms, I made this charger and managed to restored my battery. I have since restored a few 12V batteries. The charger has no name, I just call it my Battery Rejuvenator. It works on the principle of battery equalization. It may or may not work depending on battery condition.
I am no battery guru but have learned a few things about them. If I misstate anything feel free to correct me. I don't want to confuse nor provide wrong information. First an important warning.
WARNING
With this charger you working with and are applying 120 volts directly to the battery terminals . This voltage, 120V, is dangerous and you must exercise good and safe handling precaution. Always disconnect the circuit before touching, testing or handling the battery or charger. Use at your own risk.
Normal voltage testing with test leads is OK. Just like normal 120 volt home voltage testing.
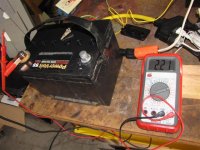
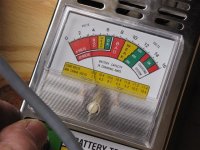
The battery should be removed, cleaned and placed on an insulated surface. A battery can conduct electricity thru the case. I did not believe this when I first read about it but it is true. In this first picture you can see this. The meter positive probe is held to the positive battery terminal and I am holding the negative probe to the battery case. I am reading 9.10 volts thru the case. Test your battery and see if you may have one that conducts thru the case.
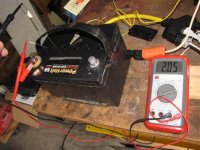
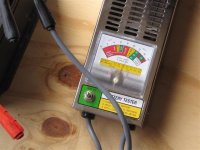
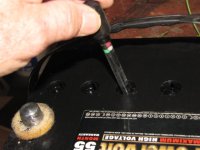
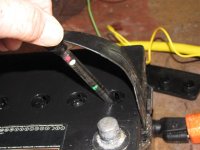
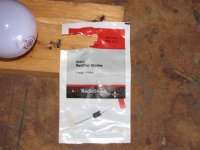
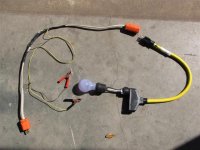
A 12 volt battery has 6 cells. Each cell should be capable of generating 2+ volts. You can check each cell to see what voltage you have and whether the cell is good or bad. To do this you need test leads with alligator clips. I used my spring loaded clips. Cut 2 lengths of wire about 4-6" long. Connect them to the alligator clips to use as probes. Now starting at the positive battery terminal, hold the positive lead probe on the battery positive terminal and dip the negative probe into the electrolyte of the first cell. It should read about 2 volts if it is holding a good charge. Then dip the positive probe into that first cell and the negative probe into the second cell. Do this until you get to the last cell. Each test should show about 2 volts. Another way to test is to hold the positive test probe on the positive terminal and dip the negative probe in each cell in succession. The readings should increase by 2; 2, 4, 6, 8, 10 and 12. If one cell reads out of line with the others you may have a bad cell. This charger may not restore the bad cell. The next 2 pictures shows this cell test.
The battery charger schematic was posted on one of my aviation forums and I saved it for future use. When my very expensive 24 volt battery showed weak starting symptoms, I made this charger and managed to restored my battery. I have since restored a few 12V batteries. The charger has no name, I just call it my Battery Rejuvenator. It works on the principle of battery equalization. It may or may not work depending on battery condition.
I am no battery guru but have learned a few things about them. If I misstate anything feel free to correct me. I don't want to confuse nor provide wrong information. First an important warning.
WARNING
With this charger you working with and are applying 120 volts directly to the battery terminals . This voltage, 120V, is dangerous and you must exercise good and safe handling precaution. Always disconnect the circuit before touching, testing or handling the battery or charger. Use at your own risk.
Normal voltage testing with test leads is OK. Just like normal 120 volt home voltage testing.
The battery should be removed, cleaned and placed on an insulated surface. A battery can conduct electricity thru the case. I did not believe this when I first read about it but it is true. In this first picture you can see this. The meter positive probe is held to the positive battery terminal and I am holding the negative probe to the battery case. I am reading 9.10 volts thru the case. Test your battery and see if you may have one that conducts thru the case.
A 12 volt battery has 6 cells. Each cell should be capable of generating 2+ volts. You can check each cell to see what voltage you have and whether the cell is good or bad. To do this you need test leads with alligator clips. I used my spring loaded clips. Cut 2 lengths of wire about 4-6" long. Connect them to the alligator clips to use as probes. Now starting at the positive battery terminal, hold the positive lead probe on the battery positive terminal and dip the negative probe into the electrolyte of the first cell. It should read about 2 volts if it is holding a good charge. Then dip the positive probe into that first cell and the negative probe into the second cell. Do this until you get to the last cell. Each test should show about 2 volts. Another way to test is to hold the positive test probe on the positive terminal and dip the negative probe in each cell in succession. The readings should increase by 2; 2, 4, 6, 8, 10 and 12. If one cell reads out of line with the others you may have a bad cell. This charger may not restore the bad cell. The next 2 pictures shows this cell test.