Driveway grader question

   / Driveway grader question #1  

DuckHunterJon

Bronze Member
Joined
Apr 18, 2004
Messages
50
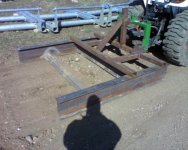
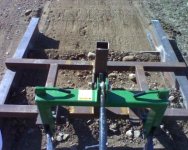
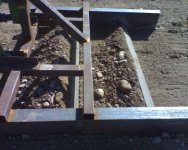
Hi all. I topped my 1100' driveway this week, and I want to build something to level and groom it periodically. My thought was to build a light duty landplane for the job. Will be pulling it with a JD3120. Its 5' wide with 8" tall channel sides (scrap on hand). My question is, I built it with a hinge point between the hitch and base, thinking it would be better to follow the contour of the drive. Chains run from the top link to the rear of three skids, so I can still lift it. Any opinons on whether this will work ok, or should it be solidly mounted?

Second question, how far below the skids should the grader blades be set. Again, only for grading #1 crush run gravel

Thanks for any advice. I'll try to post up some picgures tomorrow.
 
   / Driveway grader question #2  
I picture would help in understanding what you have.
On my grader if I run a chain for a top link the big problem is when I hit anything solid, like a rock . The back of the grader kicks up violently because there is no Top Link to hold it down. It has never flipped over into the rear of the tractor but it is a concern. I only run the chain when I am sure the road surface is good and loose and there are no snags. Also if the surface is not realyl loose the rear of the grader tends to rotate up a little as the front blade cuts the hard surface so the back blade has little effect. I don't know if yours would act like that or not. But yes, it follows the contour better.

I set my blades down 3/4" below the skids. Road is packed crusher run.
 
   / Driveway grader question #3  
On my grader if I run a chain for a top link the big problem is when I hit anything solid, like a rock . The back of the grader kicks up violently because there is no Top Link to hold it down. It has never flipped over into the rear of the tractor but it is a concern.

Use a regular top link and put the chain on the grader, with a bar and a short chain for the floating ability without too much kick up.

Bruce
 
   / Driveway grader question #4  
Use a regular top link and put the chain on the grader, with a bar and a short chain for the floating ability without too much kick up.

Bruce

Aahhh - That would be a better way to do it. I like your sketch.
 
   / Driveway grader question
  • Thread Starter
#5  
I didn't see any replys by yesterday morning, so I went ahead and gave it a shot. I kept the articulating mount with the chains as I mentioned, and put the grader blades flush with the bottom. See picture below.

Problem 1 - the blades definitely need to be lower, I'm going take Gordon's advice and start at 0.75. I might even go ahead and spend the time to make this adjustable, haven't decided yet.

Problem 2 - the whole thing lifts up at the rear end as I start to pull it. I put 4 12" cinder blocks in the front rack, it helped, but it still lifted up at the rear. Looking at it, it's all about where the pull force is acting. The pins are 16" off the ground, and my 3pt at it's lowest is 12". I could probably lower it a bit, but I wanted to leave some room so the arms would never bottom out. I'm thinking the two solutions would be - weld another weight rack along the back to get the weight further back, or go ahead and mount rigid arms in place of the chains. Both pretty easy to try.

Any other idea's, comments are welcome. This is my first 3 pt attachment build. Still learning and remembering how to weld (it's been a long time since I did anything more than light wall tubing).
 

Attachments

  • 2012-05-06_12-14-41_175.jpg
    2012-05-06_12-14-41_175.jpg
    634.9 KB · Views: 1,068
   / Driveway grader question #6  
I think you would be better off making the whole thing stiff. If you did you would find that the top link adjustment has alot of control over how aggressive it cuts and the back end won't rotate up. It is even posible you would not have to lower the blades. If you wanted to follow the road contour you could put the flex in the top link.
But, if you add enough wt to the back, like you said, it will hold it down. To work good it should be pretty heavy anyway unless you are only working with loose pea stone.
 
   / Driveway grader question
  • Thread Starter
#7  
Thanks Gordon. The more I think about it, i'm leaning towards doing the rigid mount. The drive way is pretty flat for the most part, and this will allow me to flatten any areas if need be better than the pivot mount would. I'll try that and see how it works before I cut out the tack welds and lower the blades. Will update when I get a chance to work on out next. Thanks again.

Jon
 
   / Driveway grader question #8  
I think you would be far better off with an 8' york (landscape) rake. Most people don't get one wide enough. When swung out to 45 degrees, you can dig and comb gravel towards the center of the driveway on both sides. Then set it to zero degrees and run a level top lane. The high angle also fills in the ruts and wallows. Use a chain for the top link and two gauge wheels at the back of the rake, so its essentially independent of the tractor's movement.

In 10 minutes or less, you can have a perfectly graded driveway. When angled, the swath should be the width of your vehicle's tire track.
 
   / Driveway grader question #9  
Here's mine I built this spring. It was pretty straight forward. When I use it in really hilly drives I just use a chain in place of the top link. I set my blades at 1/2 deep and that does me very well. I also have them set straight. I eventually will get a TnT kit, but for now works very well.
 

Attachments

  • image-1228792195.jpg
    image-1228792195.jpg
    197.3 KB · Views: 662
  • image-2304942032.jpg
    image-2304942032.jpg
    229 KB · Views: 554
  • image-13009353.jpg
    image-13009353.jpg
    208.1 KB · Views: 695
   / Driveway grader question #10  
I didn't see any replys by yesterday morning, so I went ahead and gave it a shot. I kept the articulating mount with the chains as I mentioned, and put the grader blades flush with the bottom. See picture below.

Problem 1 - the blades definitely need to be lower, I'm going take Gordon's advice and start at 0.75. I might even go ahead and spend the time to make this adjustable, haven't decided yet.

Problem 2 - the whole thing lifts up at the rear end as I start to pull it. I put 4 12" cinder blocks in the front rack, it helped, but it still lifted up at the rear. Looking at it, it's all about where the pull force is acting. The pins are 16" off the ground, and my 3pt at it's lowest is 12". I could probably lower it a bit, but I wanted to leave some room so the arms would never bottom out. I'm thinking the two solutions would be - weld another weight rack along the back to get the weight further back, or go ahead and mount rigid arms in place of the chains. Both pretty easy to try.

Any other idea's, comments are welcome. This is my first 3 pt attachment build. Still learning and remembering how to weld (it's been a long time since I did anything more than light wall tubing).

After reading this post I had to go and check my scraper and now I know part of the problem I'm having with it. The arms of my 3PTH only drop about an inch lower than the pins. That's hardly enough for floating as intended.:eek: I will have to raise the pins at least two, maybe three inches. I had just assumed the arms went lower than that and didn't check.:(:eek: I don't anticipate any problem with the rear lifting since mine is some seven feet long. When I'm done, I'll have provision for weighting it down for gravel work, but removable for when I'm using it to smooth out dirt prior to seeding grass, etc. I plan to position the weight more or less at the center. I'll go into more detail in my own thread in this category when I get back working on it.
 
 
Top