You are using an out of date browser. It may not display this or other websites correctly.
You should upgrade or use an alternative browser.
You should upgrade or use an alternative browser.
tc25d cab heater hookup
- Thread starter kjwpop
- Start date
/ tc25d cab heater hookup
#1
RoyJackson
Rest in Peace
- Joined
- Nov 17, 2001
- Messages
- 24,890
- Location
- Bethel, Vermont
- Tractor
- John Deere 4052R Cab,, Deere 855D UTV, Z920A Zero Turn Mower and assorted implements
Boy...are you in the wrong forum! LOL!
I know it's not a Curtis Cab heater but it may help you out with the hookups. I found this on Sims website because I just finished installing a Sims cab with heater on my tractor. My heater will drive you right out of the cab on high speed. I mounted my heater high in the cab verses down low and the fan motor doubles as a defroster blower too.
The link takes you to the TC25D cab page. Look below under options and click on the water heater, the instructions should be right there just click on them.
TC25D Cab Depot
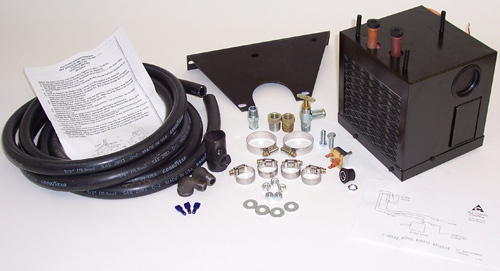
Here's page 2 of the instructions. There is a sketch that you may want to look at. I couldn't figure out how to copy it and paste it.
1) Remove the INSIDE bolt from the RIGHT side of the Cab Windshield.
2) Bolt the Heater Mounting Bracket to the Windshield using 2 (two) 5/16 x 1” Hex Bolts, 4 (four)
Flat Washers. And 2 (two) Nylon Lock Nuts.
3) Install the Heater Switch into the Heater Mounting Bracket using the Hardware supplied with the
Switch.
4) Install the Heater To the Bracket using 2 (three) 5/16 Nuts supplied in the Heater Kit.
5) Cut the Heater Hose in half, and secure one end of each of the Hoses to the Heater, and secure
using 2 (two) Hose Clamps provided in the Heater Kit. Run the Hoses through the Cowl Curtain
and DOWN and under the Tractor Hood.
6) Drain the Tractor Radiator of Coolant.
7) Remove the Plug on TOP of the Water Pump and install first 1 (one) 90 degree Street Elbow and
then the Shut-Off Valve supplied with the Heater Kit. Attach one of the Hoses to the Valve and
secure using 1 (one) Hose Clamp provided in the Heater Kit.
8) Remove the LEFT side Engine Side Cover.
9) Remove the Lower Radiator Hose, and Cut approximately 1” out of the Hose. See the Heater
Installation Drawing.
10) Install the Pipe Adapter using 2 (two) Hose Clamps Provided in the Heater Kit.
11) Install the other 90 deg. Street Elbow, making sure that the Elbow faces towards the REAR of
the Tractor. Install the Straight Pipe Fitting to the Elbow.
12) Install the Radiator Hose Assembly using the original hardware. Connect the remaining Hose
from the Heater using the Hose Clamp provided in the Heater Kit.
13) Crimp on the Wire Connection to the Wires from the Heater Kit and install them on the terminals
on the Heater Switch.
14) Connect the Heater Switch to a line that is “live” only when the Tractor Ignition is on to prevent
any accidental discharge of the Tractor Battery, or any damage to the Electrical System.
15) Refill the Radiator, adding enough Coolant to fill the Heater, and MAKE SURE that the Shut-Off Valve is OPEN. Run the Tractor engine and check for any leaks before placing the Side Cover back in place.
Hope this helps.
The link takes you to the TC25D cab page. Look below under options and click on the water heater, the instructions should be right there just click on them.
TC25D Cab Depot
Here's page 2 of the instructions. There is a sketch that you may want to look at. I couldn't figure out how to copy it and paste it.
1) Remove the INSIDE bolt from the RIGHT side of the Cab Windshield.
2) Bolt the Heater Mounting Bracket to the Windshield using 2 (two) 5/16 x 1” Hex Bolts, 4 (four)
Flat Washers. And 2 (two) Nylon Lock Nuts.
3) Install the Heater Switch into the Heater Mounting Bracket using the Hardware supplied with the
Switch.
4) Install the Heater To the Bracket using 2 (three) 5/16 Nuts supplied in the Heater Kit.
5) Cut the Heater Hose in half, and secure one end of each of the Hoses to the Heater, and secure
using 2 (two) Hose Clamps provided in the Heater Kit. Run the Hoses through the Cowl Curtain
and DOWN and under the Tractor Hood.
6) Drain the Tractor Radiator of Coolant.
7) Remove the Plug on TOP of the Water Pump and install first 1 (one) 90 degree Street Elbow and
then the Shut-Off Valve supplied with the Heater Kit. Attach one of the Hoses to the Valve and
secure using 1 (one) Hose Clamp provided in the Heater Kit.
8) Remove the LEFT side Engine Side Cover.
9) Remove the Lower Radiator Hose, and Cut approximately 1” out of the Hose. See the Heater
Installation Drawing.
10) Install the Pipe Adapter using 2 (two) Hose Clamps Provided in the Heater Kit.
11) Install the other 90 deg. Street Elbow, making sure that the Elbow faces towards the REAR of
the Tractor. Install the Straight Pipe Fitting to the Elbow.
12) Install the Radiator Hose Assembly using the original hardware. Connect the remaining Hose
from the Heater using the Hose Clamp provided in the Heater Kit.
13) Crimp on the Wire Connection to the Wires from the Heater Kit and install them on the terminals
on the Heater Switch.
14) Connect the Heater Switch to a line that is “live” only when the Tractor Ignition is on to prevent
any accidental discharge of the Tractor Battery, or any damage to the Electrical System.
15) Refill the Radiator, adding enough Coolant to fill the Heater, and MAKE SURE that the Shut-Off Valve is OPEN. Run the Tractor engine and check for any leaks before placing the Side Cover back in place.
Hope this helps.
Boomerboy
Silver Member
Say Roy,
I'm trying to see the satire or humor in your reply to KJWPOP, but I'm having a problem with "Boy,,, are you in the wrong forum". It seems that the only logical place for a question for a NH TC25D is in this forum. Let's all encourage any new members to participate and not scare off our new members with innuendo or past thread comments that they may not understand.
So go ahead, KJWPOP, ask away. We love all questions concerning New Holland tractors!
tawilson
Platinum Member
I looked into this a little bit, cause I felt bad that no one helped him out over a month ago, but apparently he posted the same question twice, web page , and did get referred to the Curtis site. Maybe that's what Roy was joking about. I installed my Curtis heater two years ago, and as I recall, the directions were wrong about where to connect the hoses. I'm trying to do a search cause I think I brought it up here, but I suck at searches.
Boomerboy
Silver Member
I could do nothing but expect Roy was joking - He's a great member here at TBN. I just want lots of folks to participate so the Board's activity will increase! We don't want new members to feel excluded or that they are not free to ask away.
Roy - Hope you were not offended - my apologies if you were.
Roy - Hope you were not offended - my apologies if you were.