At Home In The Woods

   / At Home In The Woods #4,941  
One piece of advise on using a grinder (all types, but especially angle grinders): ALWAYS wear a face shield over your safety glasses when using it. Sooner or later, you will find out why, if it isn't obvious already...

This is double true when using wire wheels on it...
 
   / At Home In The Woods #4,942  
Obed,
A couple of things re: your 'new' old mower. First, you're getting there, and a 24 year old mower is made of better, thicker, stronger materials than one made today. The blades need to be SHARP! As guys have stated, you want them to CUT the grass, not mash it down or shred it, because that makes your entire lawn prone to disease. And you want to cut only 1/3 of the length of the grass at each mowing or disease, drought and sun can and will kill it. Best lawn is a properly watered and cut lawn that can breath, doesn't have a thatch build-up and is healthy due to regular cutting and watering, from the sky or your sprinkler.

I was surprised when I took my blades in from my 61" Scag Wildcat and had the local Scag dealer look at them. Before I even got them placed on the counter he said: those are bent!:rolleyes: I said: What?!:confused2:
He said: you need 3 new blades!!! I said: 'do you have them and how much?' He said: a lot of $, (he, he,:laughing:) and sold me three blades, and a few other things.
My point is that I hadn't looked at the blades as far as whether they were straight or not. And, bend blades do NOT cut properly, leave weird grass contours on the lawn, and most of all if the blades are not SHARP, Straight, and BALANCED, on the little pyramid balancer, they will do damage to the spindle bearings and those will cost way more than a mere pulley. Remember the price of the idler arm spring!
Your Kubota mower will thank you for cleaning off the deck after every cutting to keep the belts and pulleys and spindle bearings from overheating due to their not being able to cool properly from all the grass, leaves, etc. from blocking air flow.

On the grease gun storage I wrap the end of the nozzle in a plastic baggie and use a rubber band to secure it so it will not leak. Then I put it on the wall in the grease gun hangar I got at TSC for the purpose of hanging a grease gun on the wall. Or you can use a nail and put it between the handle and pump arm and basically get the same result.

For your BB pin repair I would say you could use an oxy/actelene torch setup complete with hoses, tanks, roll around cart, and goggles, gloves, etc., Oh, yeah, a bench grinder with wire wheel and stone wheel too! Oh, and a bench vice too, for sure. And the little balancing pyramid to round out your next purchase! Look at it this way, if you bundle it, then the wife can't complain as often...:laughing:

Actually you could MAYBE use a small propane torch, self igniting model, with a MAPP gas tank -(yellow tank) (which is like 5 times hotter than propane, to heat up the bent flange to then bang it straight with a sledge hammer). And you might be able to make some bushings, to fit the pins to the oversized holes too.
I'm not a metal guy, so someone else with more knowledge on this subject could comment on whether that might work, or not.
 
   / At Home In The Woods #4,943  
Chris,
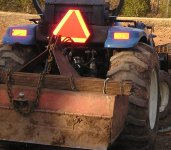
I like your setup. If I don't hear any other ideas I like better, I may copy yours. Thanks.
Obed

No problem. Seen it at a race track in the pit stalls mounted to the trailers.

Chris
 
   / At Home In The Woods #4,944  
Nice start with your new tools. I see you got the new tool bug after HAVING the tool and something comes up and you now can think - hey- I can fix it MYSELF. Gone are the days of - gee , now how much is this gonna set me back? :laughing:

Anyway, when you go in a tractor supply store or similar to pick up new pins, you will see they have longer threads pins. Those are the ones I'd pick up. TSC or home depot/lowes/ACE/Do it best store also have flat bar metal stock. I know its a bit more then you should pay, but its a good start to get small pieces of metal without driving all over the place. I'd get a 4 footer or longer. This way you can start your metal scrap bin for other metal projects in future, now you have a welder. As for the crack on BB, the other guys are right- vertical can be harder. more difficult to see puddle as a newbie. I'd use your tractor to lift one end up and set it up on a end and use the loader as a safety to prevent falling over while still chained up. This way the welding will be horizontal. First, grind the flat part of metal around crack. Try using a big hammer to close crack gap. It doesnt need to be perfect closed crack- a bit closer is better then where it is now. Next - I am not sure which welder did you got - I am thinking 120 volt MIG. ( I am not a experienced welder but I have done DIY welding) If so- I'd grind the crack so its beveled into the crack. This way the root pass will penetrate to other side. next, lay down the root pass, then weld a fill pass on each side of root to fill in. Once you get it filled - I'd use a grinder to grind welds flat so you can add the flat bar stock you get from TSC or lowes/home depot. grind the edges of metals pieces where welds gonna be and weld the flat bar over the hole. drill a new hole with right size metal twist bit that fits new pin. Repeat on other side. Now your crack is reinforced with new plates and crack welded. Now you can install new pin. :thumbsup: Sounds like alot of work? probably, but its satisfying work I'd say as a novice.
 
   / At Home In The Woods #4,945  
For welding the box blade stand it up with your FEL and do the weld. Spend 75% ir more of your time on prep and the rest on the welding.


Beat that bent cracked side in place. DON'T weld metal to the outside of the flange. Weld it on the inside. Welding on the outside will change your pin spacing and if you have a quick hitch or I Match it will not fit.

If it were me I would beat it back. Weld the crack, then weld a heavy washer over the hole.

Remember, you can grind out a bad weld and start over.

Chris
 
   / At Home In The Woods #4,946  
Jim, I like your box blade hitch ball. Do you have any pictures closer up? I'm trying to figure out how I will make mine.
Obed

This is about as close as I have currently. I didn't do the weld job myself. I bought this blade used and the hitch plate was already welded in place.

Boxball.jpg
 
   / At Home In The Woods #4,947  
Well Obed, One thing is for sure ... the more tools you have the more opinions you can get. :laughing: Lot of good ideas.

I think I would reinforce the bb arm in some way. The crack at the bottom of the hole indicates metal fatigue. The only thing holding it together is the metal above the hole. That section has to have experienced some fatigue too, it just hasn't hardened up enough to crack - yet. Plus, I think it was heated with a torch at some point since the paint appears to be burnt off.

Any solution that involves drilling 7/8" holes is going to cost you, unless you have a good 1/2" drill motor and a 15/16" bit with a reduced shank, and the bits to step up to that size hole. You would generally start with about a 1/4" bit and work your way up such that the center web of the next size bit fits into the previously drilled hole size. The larger the bit, the slower the rpm's.

Access to a drill press would be the best thing. Bits love to snap off when drilling holes in metal with a handheld drill because it is almost impossible to control the drill motor when the bit gets to the bottom of the hole and grabs the remaining thin cross-section of metal. That gets expensive and can give you a twisted wrist too.

A good heavy washer welded on will tie it together better than nothing, or maybe some 3/8" to 1/2' square bar stock could be strapped on (welded) above or below the hole and extending back along the arm if it doesn't interfere with the access to the pin.

I would definitely straighten the arm and weld the crack, but I would also look for a way to reinforce the arm.
 
Last edited:
   / At Home In The Woods #4,948  
Beat that bent cracked side in place. DON'T weld metal to the outside of the flange. Weld it on the inside. Welding on the outside will change your pin spacing and if you have a quick hitch or I Match it will not fit.


Remember, you can grind out a bad weld and start over.

Chris

:duh: you are right about that .. totally spaced out on the outside width part.
He is right -- if you got a bad weld (most likely too cold bead) you can grind it out and start over. I know I did at first.:eek:
 
   / At Home In The Woods #4,949  
Now that you have the pin out, the side that has the crack looks like (from the coloration difference) it may have been heated and straightened once before. And that pin has been wobbling around in that hole for a long time judging by the wear in the pin.

You really don't want one lower link to let go while the other remains attached. That could lead to a bent/broken lower lift arm on the side that remains attached--it's going to become a pivot point if one side lets go, and it will have a lot of leverage against the connected side.

I would consider reinforcing the cracked side, heck do both sides while you are at it. Get some 1/4" plate and cut some squares to weld on each side of the cracked location. Then maybe switch to the type of pin that has a nut on each side of the bb arm, with the pin sticking out or in as best fits your tractor lift arms/tire clearance.

Glad you are enjoying your tools!

Was going to say the exact same thing. I would heat the tab and beat it straight. Take your grinder and grind out that crack, you want the side of it clean and V shaped to fill with weld metal. I would then do like dave said and cut some plate and weld at least to one side if not both and get an extra long pin to go on that side, they must make them.

See we spent your money up front but this stuff will actually start paying you back literally after you first project according the that quote from your wlder you got (although I do feel you could of found someone way cheaper). Put a hitch ball on fix your BB, fix a few other things, cut some broken rusted nuts off You will not see how you got by without a grinder and welder in short order.

Yea after reading teds post at the end of the last page I would forget adding new metal, I would heat the cracked piece beat it with the sledge, gind out the crack and weld it up, then tack the vertical piece to it with a weld bead across the top and bottom of the horizontal piece then put your pin through it, it will be fine.

And since I have the same welder my thought on the settings you need for that is the welder set to "high" and then I would run the wire at maybe the 6-8 speed range? That's just me guessing, I have not played with mine in a while though :)

but remember not to attempt it until you feel good about laying a bead, esp in that vertical position. OH and like mentioned grind your ground connection clean.
 
   / At Home In The Woods
  • Thread Starter
#4,950  
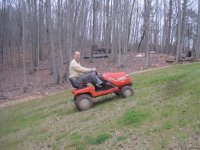
I put the new belt and pulley arm spring on the mower. It now goes up a hill just fine! I suspect the mower would have been fixed without the new belt and spring. The big problem was that the pulley arm would not swing on the pin before I cleaned greased it.

IMG_0404.JPG

Thanks for your suggestions! Now I don't have to go out and buy a $3500 mower - just yet.
 
 
Top