At Home In The Woods

   / At Home In The Woods #5,051  
I would just use any kind of oil i had before i spent that kind of money for a one off hole.
 
   / At Home In The Woods #5,052  
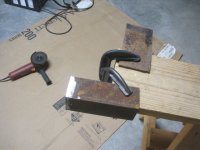
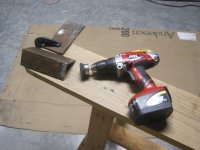
I found this piece of 1/4" angle iron at the scrap yard when I went back to find some heavier metal on which to practice my welding. It's about the size of a brick lentel. However, I keep picking up practice scraps and then thinking of some real use for them which makes it difficult to then use them for practice welding. It's funny now that when driving around, I keep my eyes on the watch for junk metal sitting around. A month ago, junk metal was just junk. Now it's something I covet.

View attachment 313138

I think I'll cut a piece off of it and use it to make Jinman's suggested ball mount for my box blade. I may not even add the side support pieces shown on Jim's drawing. I suspect this angle iron may support 500 lbs tongue weight by itself.

309837d1364162546-home-woods-1-hitchpad.jpg

Junk metal is never JUNK, you should be picking it up regardless, at least i do. You then just put it in a pile in the edge of your woods or out of site from the house just in the woods or something. when you get a truck full of it, old lawnmowers you find, scrap steel, old grills, refridges freezers, AC units or washer/driers are gold!! anyway when you get a truck full you take it with you to the scrap yard and sell your metal to offset what your purchasing or just for extra cash. I do this, dont even go out of my way for metal. I tell freinds that i will pickup metal at thier house etc. I get old freexers and such just to haul them off. Save all my old auto parts like water pumps and ac parts and radiators and heat cores. Get any copper or Al you can. I went this last time a few months ago and hauled my ranger full and my 4x8 trailer packed. I got $130 for stuff that i just get a piece or so at the time. I had 1200lbs of "crusher steel" as they called it. Which means it was anything from like old break rotors to an old washer i found at my farm to an old freezer a coworker wanted gone.
 
   / At Home In The Woods #5,053  
I found this piece of 1/4" angle iron at the scrap yard when I went back to find some heavier metal on which to practice my welding. It's about the size of a brick lentel. However, I keep picking up practice scraps and then thinking of some real use for them which makes it difficult to then use them for practice welding. It's funny now that when driving around, I keep my eyes on the watch for junk metal sitting around. A month ago, junk metal was just junk. Now it's something I covet.

I think I'll cut a piece off of it and use it to make Jinman's suggested ball mount for my box blade. I may not even add the side support pieces shown on Jim's drawing. I suspect this angle iron may support 500 lbs tongue weight by itself.

How will you orient the piece? Will you cut it and put one flat side against the boxblade and weld around the perimeter? Will you turn the lip up or down? My choice would be to turn the lip down so I did not have to weld where the angle iron is thickest at the corner. I'd turn the lip down and weld around the three sides of the flat against the boxblade. If it ever bends down, you could weld a couple of gussets under it for added support. I agree, that angle is likely to never bend with the loads you are describing.

BTW: I used to work with a German machinist who would go ballistic if somebody was caught using oil as cutting fluid. He'd scream that oil is a lubricant, not a cutting fluid. I think you could use just plain water and dish soap in a squirt bottle. What you want the soap for is to break the surface tension and wet the piece so that you get good transmission of heat away from the cutting area. You want your drill bit to knock chips instead of slide over the surface. At the point of contact, soapy water is thin and will not keep the bit from cutting the metal. Oil will stick and lubricate, making it hard to cut chips. You want coolant around the bit, not at the point of contact.

I once designed a course for drilling and reaming composites. We had special drills that squirted cutting fluid on the bit only after it came in contact with the cutting piece. For composites, a hot cutting area causes delamination. For metal, if you don't knock a chip, you work harden the surface and then generate a tremendous amount of heat so that drilling becomes nearly impossible. For example, if you work harden titanium, you may never get a hole drilled into it.
 
   / At Home In The Woods
  • Thread Starter
#5,054  
How will you orient the piece? Will you cut it and put one flat side against the boxblade and weld around the perimeter? Will you turn the lip up or down? My choice would be to turn the lip down so I did not have to weld where the angle iron is thickest at the corner. I'd turn the lip down and weld around the three sides of the flat against the boxblade. If it ever bends down, you could weld a couple of gussets under it for added support. I agree, that angle is likely to never bend with the loads you are describing.
Jim,
I was thinking I would orient the ball mount the same as in your picture but without using the side support pieces. I just figured I would weld around all 4 sides of the ball mount. Why would you avoid welding the side along the angle iron corner that is thickest?
Obed
 
   / At Home In The Woods #5,055  
Jim,
I was thinking I would orient the ball mount the same as in your picture but without using the side support pieces. I just figured I would weld around all 4 sides of the ball mount. Why would you avoid welding the side along the angle iron corner that is thickest?
Obed

I would weld the two sides and top. Welding the bottom gives little to no support and just trap water and debris.

Chris
 
   / At Home In The Woods #5,056  
Jim,
I was thinking I would orient the ball mount the same as in your picture but without using the side support pieces. I just figured I would weld around all 4 sides of the ball mount. Why would you avoid welding the side along the angle iron corner that is thickest?
Obed

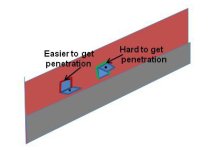
Cause your welder wont likely get hot enough to penetrate well enough on that thick end, but it you turn it like yall are talking that end is thinner allowing that metal to totally be penetrated by the weld metal.
 
   / At Home In The Woods #5,057  
Cause your welder wont likely get hot enough to penetrate well enough on that thick end, but it you turn it like yall are talking that end is thinner allowing that metal to totally be penetrated by the weld metal.

That's exactly my point. The thicker portion of the angle will be harder to get good penetration. With the angle turned up, that's the part that must take the most stess and it is likely to be the weakest weld. By inverting the angle like an "L", you don't have to weld that thick part and all welds are on metal of similar thickness. The bottom of the "L" presses against the boxblade with weight and there's no need to weld it. My simple illustration is below.
boxbladeballmount.jpg
 
   / At Home In The Woods
  • Thread Starter
#5,058  
Ok Jim, diamondpilot, and clemsonfor, I follow you. Thanks.
Obed
 
   / At Home In The Woods
  • Thread Starter
#5,059  
It's carpenter bee time again. They are trying to eat our porch and deck again. I got out my carpenter bee racquet and have killed a couple. The racquet will stay on the porch all spring.

IMG_0461.JPG
 
   / At Home In The Woods
  • Thread Starter
#5,060  
Miserable Welds

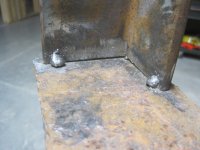
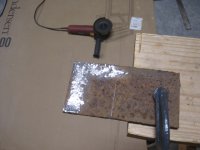
Last night I tried to do a "T" weld using 1/4" thick scrap metal. Using the angle grinder and the drill cup brush, I cleaned off the areas I would be welding.

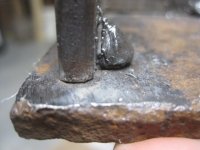
IMG_0462.JPG IMG_0463.JPG IMG_0471.JPG

I took a piece of angle iron and set it upright on a flat piece. I set the welder on high current and the fastest wire speed per the welder's chart for thick metal. I then attempted to make a couple tack welds. The welds did not penetrate. One of the tack welds did not even attach to the upright angle iron piece.

IMG_0464.JPG IMG_0465.JPG

I cut off the tack welds and tried again. The second attempt was no better than the first.

My welder is rated for 3/16" thick steel. These pieces are 1/4" thick. I figured the welder could handle 1/4" thick pieces. I hope there's just something wrong with my technique; I'm hoping the welder is not too small for the job. During my next session, I plan to weld some practice beads on the flat piece (no joins) just to see if I can get beads to penetrate the 1/4" steel.

If I have trouble welding 1/4" steel, I'll really have a problem fixing the crack on the 1/2" thick flange on the box blade.
 
 
Top