At Home In The Woods

   / At Home In The Woods #501  
I'm also comfused by the 19.2" spacing. Although, I just did the math and it does work out for 8ft sheets. Must not be a 4ft offset between rows.

It is an old standard - not used much today in residential-- but most quality tape measures have little (black or red) diamonds every 19.2" to aid in layout.
 
   / At Home In The Woods #502  
It is an old standard - not used much today in residential-- but most quality tape measures have little (black or red) diamonds every 19.2" to aid in layout.

Learn something new everyday - thanks.
Dave.
 
   / At Home In The Woods #504  
The joists are looking good. I'm also comfused by the 19.2" spacing. Although, I just did the math and it does work out for 8ft sheets. Must not be a 4ft offset between rows.

I have to admit the 19.2" made me look for my calculator...

Eddie: I haven't done any calculations on this, but do you think these trusses being 3.5" wide instead of only 1.5" for dimensional lumber provides enough resistance to them tipping onto their sides to eliminate the need for the diagonal braces?
 
   / At Home In The Woods #505  
Eddie and Dave,
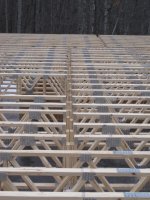
Diagonal bracing (bridging) is not needed with this type of floor truss. Bridging is used to transfer some of the load to adjacent joists. If bridging happens to keep the joists from tipping its just a bonus.
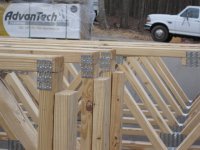
This type of truss usually hangs from the top cord much like a bar joist you often see used for roofs in commercial applications. Since they hang from the top they aren't prone to tipping like a traditional joist. When they are installed with the bottom cord sitting on a wall or beam they add a vertical member between the top and bottom cords on the ends. The first picture in post #492 shows this.
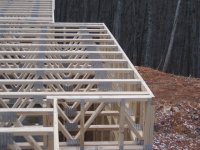
When they are placed with the bottom cord on the wall the 3 1/2" width gives plenty of support to keep them from tipping in most cases. The taller the truss, the more likely it could tip. Once the wall sheathing is installed (if properly nailed to the end of the trusses) they won't tip. I agree with Eddie that there should be blocking between the trusses to support the edge of the floor sheathing and wall. Especially since the walls will be framed on different centers.
Pops
 
   / At Home In The Woods #506  
Obed, just ran across this thread and have a lot of catching up to do. Congrats on the house! We built 3 years ago and looks like we have similar taste.

I have most of the build documented here if you're really bored.
New lot pictures by CampWI - Photobucket
 
   / At Home In The Woods #507  
Learn something new everyday - thanks.
Dave.

Ditto.
I've seen the diamonds on tape measures, but never new what they were for and didn't associate the 19.2". Guess I'm just too used to 12, 16, or 24 inches. Never too late to learn something new.
 
   / At Home In The Woods #508  
It is an old standard - not used much today in residential-- but most quality tape measures have little (black or red) diamonds every 19.2" to aid in layout.

and 38.4, 57.6, etc..
imagine that... they're there!

:D
 
   / At Home In The Woods
  • Thread Starter
#509  
Bracing
I spoke to the truss designer today about bracing. Bracing is accomplished in 3 ways.

1. The ends of the trusses are notched to accept a 2x4. You can see the notches in the first picture. The second and third pictures show trusses that have the 2x4's installed in the notches.

2. 2x6 strongbacks will be nailed to the uprights in the trusses at 10' O.C. The strongbacks might not be installed until after the ductwork and plumbing has been run.

3. 1x4 boards will be nailed to the bottom chords at 10' O.C. to provide less vibration when walking on the floors for a sturdier feel.

Diagonal bracing is not required according to the truss designer. The Advantech subflooring is tongue and grove. The subflooring will be glued and screwed. Glue will go under the flooring and also in the tongue and grooves. The truss designer said that the trusses will be in good shape using these steps.
 

Attachments

  • IMG_2997.JPG
    IMG_2997.JPG
    109.9 KB · Views: 429
  • IMG_2994.JPG
    IMG_2994.JPG
    136.9 KB · Views: 396
  • IMG_2998.JPG
    IMG_2998.JPG
    168.7 KB · Views: 414
   / At Home In The Woods
  • Thread Starter
#510  
This picture shows the trusses sitting on the center bearing wall. Note the notches at the ends of in the trusses where the 2x4s will be nailed. You are seeing 2 trusses that meet in the middle where the center bearing walls are underneath. Our center bearing wall has a couple zags to accommodate the future basement floor plan.
 

Attachments

  • IMG_3008.JPG
    IMG_3008.JPG
    134.6 KB · Views: 394
 
Top