My 30x40x12' Pole Barn Thread

   / My 30x40x12' Pole Barn Thread
  • Thread Starter
#41  
My brother-in-law and I are trying to set some lean-to posts. We got those up and the front head and got some perlins up. Only 18 more boards to go and then its onto windows and doors. Then framing inspection time. (cross your fingers) Then metal time. The end is getting near!
 

Attachments

  • 9-4-10 #4.jpg
    9-4-10 #4.jpg
    415.2 KB · Views: 1,069
  • 9-4-10 #5.jpg
    9-4-10 #5.jpg
    442.5 KB · Views: 749
  • 9-4-10 #3.jpg
    9-4-10 #3.jpg
    561 KB · Views: 952
   / My 30x40x12' Pole Barn Thread #42  
Looking good.. Sorry to hear about your dad, but it sounds like his pride took the brunt of the fall.

Wedge
 
   / My 30x40x12' Pole Barn Thread
  • Thread Starter
#43  
Now that my framing is complete, I'm ready to start the metal sheeting. I've priced out an "underlayment" that serves as both a moisture barrier and radiant barrier. Its about 1/8th inch thick and is called "Solar Guard". To do the roof it would cost me about $480. My question is whether there is anything else that can serve as a moisture barrier and prevent the dreaded condensation that can accumulate on the underside of metal roofs?

I've thought about 30lb roofing felt or Tyvek???
 
   / My 30x40x12' Pole Barn Thread #44  
boy howdy, do I hear that! My sons are both the [BOLD]intellectual artist types [/BOLD] and have no interest in matters of the farm. .........

Tell them this:
The person with practical farm hand experience says "I'll make it work!"
The person with a Science Degree says, "Why does this work?"
The person with an Engineering Degree says, "How does this work?"
The person with an Accounting Degree says, "How much does it cost?"

The person with a Liberal Arts Degree says, "Ya want fries with that?"

LOL,
Very nice pole buildings. My now, 30 yr old Lawyer son (Husband, Dad, Homeowner) now wishes he had paid more (any, than eye rolls) attention way back when.
regards,
Steve
 
   / My 30x40x12' Pole Barn Thread #45  
......We had an accident the day we set the trusses and my father fell off the top of an 8' step ladder. He didn't set it on level ground and it teetered over. He tried to catch himself on every girt as he went down, but managed to bruise & scrape his arm up pretty good on a post corner.....

When we had our pole buildings put up a 5 years ago, the 6ft wooden step ladder I was on teetered over and I broke my humerus (long bone, upper arm). Still costs me in limited mobility, weakness and discomfort today. I had (now I have 2), but didn't use my "Little Giant" ladder. Absolutely no interest, other than being a satisfied customer.
Hope your dad is OK now.
regards,
Steve
 
   / My 30x40x12' Pole Barn Thread
  • Thread Starter
#46  
Sorry about the lack of recent updates on the barn project. Between work and play (work on the barn), I've had a hard time finding spare time to update everyone. I finally drove in the last nail and hurricane clip and reluctantly called in for a framing inspection. The inspector came out a few days later, and I don't even think he got out of the truck, except to leave me an approval sticker. However, I don't really care! :laughing:

From that point forward, I knew it was time for the metal work and into the realm of the unknown on my part. I had never worked with sheet-metal and had always heard of difficulties in square cuts. However, when you're this far into a project you can't exactly turn back so press-on we did! Check out some of our photos in the next few posts!
 
   / My 30x40x12' Pole Barn Thread
  • Thread Starter
#47  
These are some of the last photos of the framing portion of the construction. We finally got the lean-to completed. We opted to go with double rafter arm extensions for the porch support. It allowed for a more secure attachment to the porch posts. We were able to continue with our roof line and perlin pattern b/c of this setup. In the second photo, we are on the south side of the barn cutting off the truss arms b/c our building design did not call for an overhang. The last 2 photos are detail photos taken later in the build, but they show the porch framing a bit better.
 

Attachments

  • 9-10-10 #1.jpg
    9-10-10 #1.jpg
    737.8 KB · Views: 662
  • 9-10-10 #2.jpg
    9-10-10 #2.jpg
    585.4 KB · Views: 554
  • 10-8-10 #8.jpg
    10-8-10 #8.jpg
    322.2 KB · Views: 772
  • 10-8-10 #2.jpg
    10-8-10 #2.jpg
    385.9 KB · Views: 664
   / My 30x40x12' Pole Barn Thread
  • Thread Starter
#48  
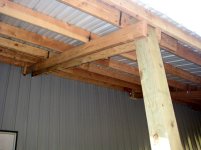
My great-aunt works for a nationwide metal building construction company, where she is the purchaser for this region. She knows costs and their mark-ups and contacted me a few days before I was planning to start the metal work. I had sent her my building dimensions and a rough drawing and she a found a great deal on some insulation. I could get 3" thick VRR fiberglass insulation with a vapor/radiant barrier backing that had an R-10 rating for $650 for the entire enclosed building. So after some begging and pleading with my banker (my wife) to stretch my credit, I was approved to proceed with the insulation. :thumbsup:

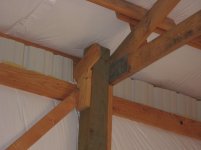
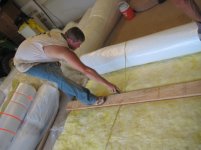
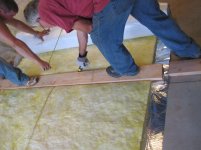
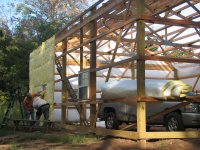
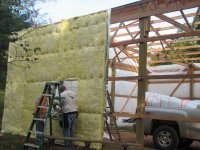
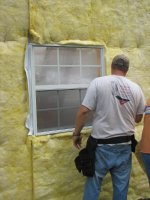
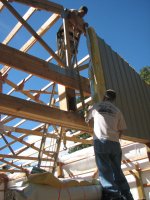
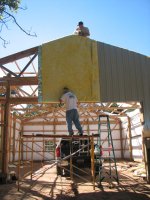
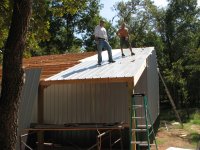
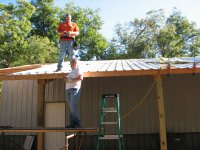
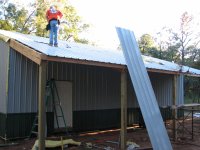
The rolls were shipped and labeled for use on roof, sidewalls, endwalls, etc. However, you have to cut them into pieces for each section. There was a 4' wide starter roll on each wall and then 6' wide rolls to finish out the walls/roof. This prevented the seams from falling on the metal seams. It was easier to unroll the insulation in our house garage, place a board under and over the cut point, and then slice it with a box knife. A 6" tab made it easy to attach double sided tape to and then the next insulation piece would overlap, leaving a nice, clean inside appearance. We opted to staple the insulation to the barn so it remained taught until the metal went up. We had been instructed to sheet the building as soon as you insulate it, so as to avoid disturbance to the insulation.
 

Attachments

  • 09-20-10 #1.jpg
    09-20-10 #1.jpg
    299.7 KB · Views: 506
  • 09-20-10 #2.jpg
    09-20-10 #2.jpg
    402.9 KB · Views: 263
  • 09-25-10 #8.jpg
    09-25-10 #8.jpg
    154.2 KB · Views: 513
  • 09-25-10 #9.jpg
    09-25-10 #9.jpg
    134.2 KB · Views: 484
  • 09-26-10 #1.jpg
    09-26-10 #1.jpg
    87.4 KB · Views: 436
  • 09-25-10 #10.jpg
    09-25-10 #10.jpg
    60.3 KB · Views: 353
   / My 30x40x12' Pole Barn Thread
  • Thread Starter
#49  
We started with the back wall, when installing the insulation and metal. I thought there might be a learning curve so I wanted to make my mistakes early. We used tin snips to cut the angled roof line cuts and a metal-cutting blade on my circular saw to make vertical cuts. I now understand what everyone means when they say it sounds like a cat being murdered when you use the circular saw.

I HIGHLY RECOMMEND safety glasses, hand, and ear protection when using the saw. It throws hot, molten, metal shards like no one's business. My father in law was8 feet away and supporting the end while I was cutting and got a hot shard to his nose. He dropped the piece and started slapping his face thinking a wasp has stung him. I thought it was amusing at the time, until I realized it was a metal shard.

Overall, I think things would have gone faster and smoother if I had not opted for wainscoting, or if the girt at 3 feet would have been a 2x6 rather than a 2x4! It would give you more room to screw the wainscote, z-trim, & upper metal to. The wainscote was 3' but the distance from the bottom of the skirt board to the top of the 1st girt was 3'. Rather than cutting each wainscote piece, was just dug out a small trench along the skirt board and buried the end. I figured we would have to bring dirt up to the grade at some points so "oh well!"
 

Attachments

  • 09-25-10 #7.jpg
    09-25-10 #7.jpg
    130 KB · Views: 418
  • 09-26-10 #2.jpg
    09-26-10 #2.jpg
    130.3 KB · Views: 354
  • 09-26-10 #3.jpg
    09-26-10 #3.jpg
    79 KB · Views: 285
  • 09-26-10 #4.jpg
    09-26-10 #4.jpg
    75.4 KB · Views: 324
  • 09-26-10 #5.jpg
    09-26-10 #5.jpg
    79.4 KB · Views: 372
   / My 30x40x12' Pole Barn Thread
  • Thread Starter
#50  
After finishing the walls, we moved on to the roof metal work. The roof insulation was tricky on the 1st roll, however, once we got it covered with metal, the next rolls went fairly smooth. I could definitely tell the difference in thickness between the 29G sidewalls and the 26G roof. It also gave me a bit more piece-of-mind when it came to walking on it as well.

I got my wife to climb onto the roof with me and help with unrolling the insulation and taping the backside of the seam, but it took some coaxing. The 1st time she got up there, her shoes were a bit bald and she went sliding toward a sidewall, screaming the entire way. So after changing her shoes (and I'm sure her pants) she reluctantly climbed back up to help me with a few more rolls. :thumbsup: I've gotta give her some recognition her, since she has had to put up with me and this project for a couple of months!
 

Attachments

  • 10-2-10 #1.jpg
    10-2-10 #1.jpg
    159 KB · Views: 486
  • 10-3-10 #2.jpg
    10-3-10 #2.jpg
    179.1 KB · Views: 472
  • 10-3-10 #4.jpg
    10-3-10 #4.jpg
    153.5 KB · Views: 458
  • 10-3-10 #5.jpg
    10-3-10 #5.jpg
    120.1 KB · Views: 481
 
Top