Garden tractor dump trailer build

   / Garden tractor dump trailer build #1  

Tenn_Blue

Silver Member
Joined
Nov 14, 2007
Messages
154
Location
N.E Tennessee
Tractor
Deere 2320, Bobcat 322 mini-ex, Bobcat 763 skidsteer
I know several people have posted similar projects, but I made a dump trailer for my lawn/garden tractor. Thought I would share it with everybody.

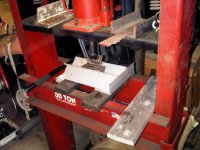
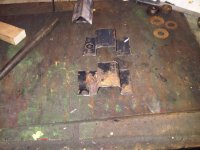
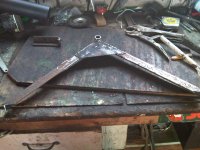
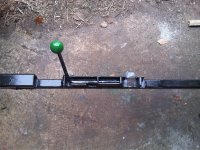
First off, this was not the most logical build!!! It would have been easier if I bought the steel angle iron to make this with instead of recycling the materials I used, BUT, I only have about $10.00 in this whole project, and gave an old garden tractor new life in the process.

But, lets start at the beginning.....

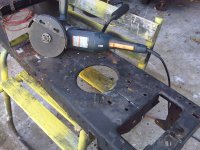
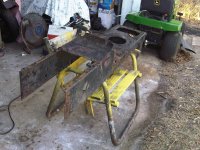
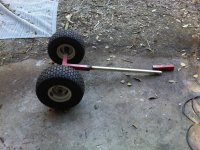
We had an old Sears garden tractor laying around. Before we got married, my wife had bought this thing used, she used it for several years, and we used it for a number of years after we got together. So we don't really know how old it was, but was at least 15 years old - probobly more than that.... Anyway, it was a faithful servant and cut many a lawn, pulled many a trailer, etc. It finally sucumbed to a tired motor and rusty body, and was just plain worn out - beyond reasonable repair, but I hated to just throw it out!

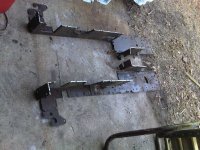
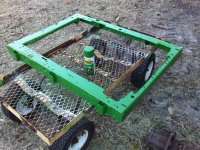
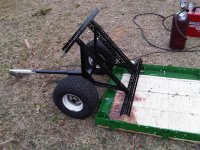
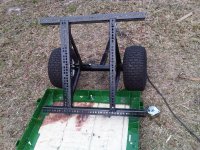
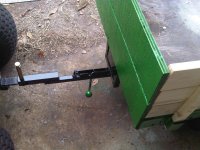
So I got the idea to use the frame and front end to make a dump trailer for the replacement garden tractor. I was originally going to model after the older Deere 8 bushel metal dump carts, but the final product morphed some, as you will see.

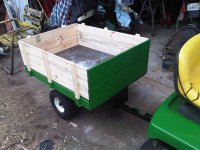
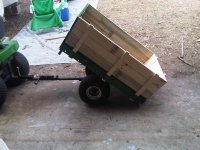
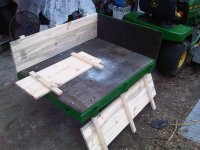
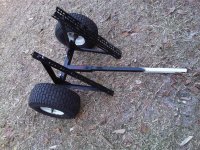
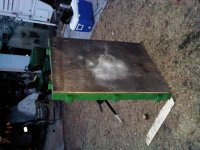
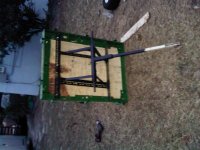
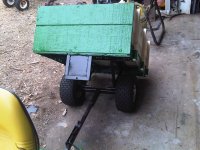
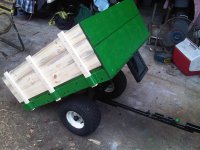
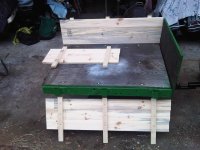
Here is the final product. I made the sides removable in three pieces (each side and the back) to make the trailer more flexible.
 

Attachments

  • IMG00327-20110204-1649.jpg
    IMG00327-20110204-1649.jpg
    388.8 KB · Views: 7,720
  • IMG00330-20110204-1650.jpg
    IMG00330-20110204-1650.jpg
    411.8 KB · Views: 10,433
  • IMG00335-20110204-1651.jpg
    IMG00335-20110204-1651.jpg
    369.5 KB · Views: 8,121
   / Garden tractor dump trailer build
  • Thread Starter
#2  
I took the Craftsman's frame and cut it into 3x3 strips at the edge - basically making angle iron out of it. The frame was still in pretty good shape. Since I didn't have enough edge, I took some of the center section and bent it in the press to make more frame. Then welded the pieces to make the frame for the cart. I saved the remaining metal from the frame for use later in the build.

Also used some of the pieces to put reinforcements in the underside of the frame. See pictures below.
 

Attachments

  • IMG00290-20110121-1746.jpg
    IMG00290-20110121-1746.jpg
    465.7 KB · Views: 913
  • IMG00283-20110120-1445.jpg
    IMG00283-20110120-1445.jpg
    511.6 KB · Views: 1,069
  • IMG00282-20110120-1422.jpg
    IMG00282-20110120-1422.jpg
    428.4 KB · Views: 1,003
  • IMG00279-20110120-1413.jpg
    IMG00279-20110120-1413.jpg
    386.8 KB · Views: 1,573
   / Garden tractor dump trailer build
  • Thread Starter
#3  
Next I used some of the left over frame steel to press out the stake brackets to mount on the frame. I had to make a jig for the hydraulic press to bend the metal, since it was so thick.. Welded it all up and rattle canned a coat of green paint on it since it would be following a John Deere around.

I wanted the frame to be strong enough to support the weight, then put a sheet of plywood on top of the frame to carry the load. Since it was going to be a dump trailer, the frame needed to be strong enough to keep from tweeking in use. I think this will work ok. :thumbsup:
 

Attachments

  • IMG00294-20110122-1445.jpg
    IMG00294-20110122-1445.jpg
    545.7 KB · Views: 763
  • IMG00302-20110122-1745.jpg
    IMG00302-20110122-1745.jpg
    242.2 KB · Views: 870
  • IMG00304-20110122-1757.jpg
    IMG00304-20110122-1757.jpg
    225.1 KB · Views: 524
  • IMG00310-20110126-1653.jpg
    IMG00310-20110126-1653.jpg
    668 KB · Views: 6,503
   / Garden tractor dump trailer build #4  
I know how you feel because the lawn tractor was like a family pet. So instead of throwing it in the scrap metal bin you will have it for use as something else. I think they also call that reuseing and recycle. I like to call it thrifty.
Craig Clayton
 
   / Garden tractor dump trailer build
  • Thread Starter
#5  
Next, started on the rolling assembly and hitch base.

I was originally going to use the front end of the Craftsman and just weld up the spindles. But I moved the mounting point for the wheels to the center of the cart for balance and that was going to make the trailer bed too tall.

So, I took some rod that I had and turned a couple axle stubs (actually the Wife did the machine work) on the lathe. Welded these stubs into some thick wall square tube I had laying around and welded a square rod onto it in a t shape for the running gear.

Mounted the front wheels from the old tractor onto the stubs and secured them with cotter pins. The hubs have grease fittings on them already, so it worked out well.
 

Attachments

  • IMG00311-20110126-1653.jpg
    IMG00311-20110126-1653.jpg
    479.9 KB · Views: 6,097
  • IMG00291-20110121-1747.jpg
    IMG00291-20110121-1747.jpg
    413.6 KB · Views: 1,819
  • IMG00305-20110122-1839.jpg
    IMG00305-20110122-1839.jpg
    440.1 KB · Views: 1,398
   / Garden tractor dump trailer build
  • Thread Starter
#6  
Then I fabbed the tilt assembly. I spent some time thinking about this and had several ideas before I decided on this way. The Deere carts use bent sheet metal to support the cart, but I didn't have two big enough pieces to form, and I was not sure how strong it would be.

So I used some angle iron (again, from the scrap pile) to weld up two triangle shapes, and welded some tube onto the peak. I figured this would be the strongest, simplest form. I don't think it needed it, but I used some sheet metal to brace the triangle.

I used some angle iron (more scrap...) to tye the two triangles together. This will then mount onto the base of the dump bed when we go to assemble the whole assembly.

Welded tube to the axle assembly and used a round rod to mount the tilt bed onto the axle assembly. So the whole shape is braced in several planes and should be plenty strong and resist twisting.

Some of the welds in this series of pictures were kind of messy. I ran out of gas for the MIG, and my local supplier was out of bottles - had to wait for almost a week for their supply truck to come. So I was using flux core for a while until I could get bottle replaced. I rarely use flux core, and it shows.... :ashamed:

Moral of the story, make sure you have what you need before you start a project.....
 

Attachments

  • IMG00313-20110126-1653.jpg
    IMG00313-20110126-1653.jpg
    342.4 KB · Views: 906
  • IMG00317-20110127-1630.jpg
    IMG00317-20110127-1630.jpg
    713.3 KB · Views: 1,781
  • IMG00319-20110127-1716.jpg
    IMG00319-20110127-1716.jpg
    541.5 KB · Views: 1,574
   / Garden tractor dump trailer build
  • Thread Starter
#7  
Next, secured the cart bed to the tilt frame, and the tilt frame onto the axle assembly. The bed (5/8 inch marine plywood - was leftover from some past project) was secured to the frame metal with carriage bolts.

Then the tilt assembly was mounted (bolts) to the metal frame and the wood bed. The load is spread out that way, and I can replace the wood bed if needed without too much trouble.
 

Attachments

  • IMG00324-20110127-1807.jpg
    IMG00324-20110127-1807.jpg
    311.8 KB · Views: 1,172
  • IMG00322-20110127-1806.jpg
    IMG00322-20110127-1806.jpg
    241.7 KB · Views: 1,195
  • IMG00321-20110127-1717.jpg
    IMG00321-20110127-1717.jpg
    682.8 KB · Views: 2,287
   / Garden tractor dump trailer build
  • Thread Starter
#8  
Next, and the hardest part, was the tilt release mechanism. I looked at several different designs, but ended up going with something simple and easy to make. Basically, its a sliding bolt design.

I welded a frame extension onto the front of the cart bottom. It projects down and contacts the axle frame in the locked position. The extension has a hole in it that the bolt goes through and into a reciever on the back side to tie the bed down on both ends of the bolt.

I made the channel for the bolt out of angle iron and bar stock. I used the Craftman's PTO engagement level as the bolt - seemed like a nice use of parts from the old gal! Bolt works like a rifle bolt - locks in the horizontal position into detents in the channel. Raise the bolt vertically and it slides locked/open. There is a little friction in the travel to keep it from jiggling open. I might end up putting a spring into the assembly to keep it from moving, but am going to try it as is for a while.
 

Attachments

  • IMG00331-20110204-1650.jpg
    IMG00331-20110204-1650.jpg
    458.9 KB · Views: 1,745
  • IMG00332-20110204-1650.jpg
    IMG00332-20110204-1650.jpg
    514.1 KB · Views: 1,069
  • IMG00329-20110204-1649.jpg
    IMG00329-20110204-1649.jpg
    441.6 KB · Views: 2,124
   / Garden tractor dump trailer build
  • Thread Starter
#9  
Finally, made the stake sides for the bed.

I used 1x2 firring strips and 1x3 boards (actually had to buy these...) to make the sides and back. The front of the box is plywood and is perminantly mounted onto the frame.

I can remove the sides and back (or use any combination of them) to carry things as appropriate. I wanted to be able to remove the sides to carry bigger items that might not fit inside the bed. I glued and screwed the slats to the uprights and each other to keep gravel/sand from dribbling out between the boards. I will probobly leave the stakes natural, and put a clearcoat on them to keep them from weathering.

There you have it! Aside from a few pieces of wood and a can of paint, everything used to make this was scrap. I tried to use as much of the Craftsman as I could, but there were a few items that needed to be made out of different materials.

I built this over the course of about 2 weeks - working a little here and a little there in my spare time. And I was able to keep the Craftsman going and extend it's useful life.

I still have the mower deck, transmission and engine and a little more metal plate - these will go onto the shelf for a while and might fuel a future project.
 

Attachments

  • IMG00333-20110204-1650.jpg
    IMG00333-20110204-1650.jpg
    387.9 KB · Views: 2,050
  • IMG00334-20110204-1651.jpg
    IMG00334-20110204-1651.jpg
    318.1 KB · Views: 634
  • IMG00335-20110204-1651.jpg
    IMG00335-20110204-1651.jpg
    369.5 KB · Views: 514
 
Top