OP
dstig1
Elite Member
- Joined
- Apr 7, 2010
- Messages
- 4,786
- Location
- W Wisc
- Tractor
- Kubota L5240 HSTC, JD X738 Mower, (Kubota L3130 HST - sold)
Summer work 2014
A lot of things have happened this year. After wrapping up insulation and the initial stab at the landscaping (still ongoing, but at least stable for now), the tasks turned to siding, final electric, some finish work, and getting the driveway in better shape.
Still it feels miles away from completion (probably because it is...), but the progress when looking back one year is pretty nice to see. It just isn't always easy to feel that way when everything is still swirling at a 100 mph around you.
After drywall fully wrapped up, and the subfloor was in, the next big item was interior paint. That sucked up over a month total. We started by spraying the interior walls and ceiling with a coat of primer. That took something like 45 gal of primer, and was mostly knocked out in a day or two. The next item was the walls. Since this is a very open plan, the thought was to spray the walls with the final color (2 coats) since it covers a lot of area and then mask the walls and paint the ceilings. The ceilings are a good item to spray as it goes fast and covers well on the textured surface. We had the drywall guy do knock-down texture on the ceilings. The walls were a little trickier as we found we really needed to back roll after spraying to make it more uniform. This was not an issue on the ceilings due to the texture, but it cost time on the walls Basically this means you spray the walls first, then come back with a paint-moistened paint roller and go over it again. This helps even things out, and gives it a little texture. It takes a little extra time, but not too much as you can lay a lot of paint with a sprayer and then just smoothing it out with the roller goes reasonably fast.
So here are some interior photos of the painting. We covered all the windows first.
Main level:


Lower level:


The lower level BR is getting a suspended ceiling for better access to the mechanicals above it, which you can partly see the framing for that going in here.

Lower level bathroom. Still need tile in the shower.

Great room after getting the color settled. Our designer had told us to use a light green for the ceiling as it would look great, but we really did not like it, so she ended up changing it to a cream color. We like that a lot better, so that is what we have. Would have been nice to save the time and only do it once, but it worked out in the end. You can see the Big Beam has the plastic off it finally here, too.


The office is a medium green color that we really like, and you can barely see the powder room on the right which is a dark brown/maroon color, which we also really like. Our designer was big help on this stuff as we are awful with picking colors.

Upper level.


The garage is fully functional too, which is great for storage, staging, and a work area.

We sprayed the walls first, then the ceilings with the logic being that since I was covering so much area, that spraying was faster and you can mask walls but not the textured ceilings. I've never seen the show (no time for TV the past couple years...), but I am told this made it look like something from Breaking Bad:

A lot of things have happened this year. After wrapping up insulation and the initial stab at the landscaping (still ongoing, but at least stable for now), the tasks turned to siding, final electric, some finish work, and getting the driveway in better shape.
Still it feels miles away from completion (probably because it is...), but the progress when looking back one year is pretty nice to see. It just isn't always easy to feel that way when everything is still swirling at a 100 mph around you.
After drywall fully wrapped up, and the subfloor was in, the next big item was interior paint. That sucked up over a month total. We started by spraying the interior walls and ceiling with a coat of primer. That took something like 45 gal of primer, and was mostly knocked out in a day or two. The next item was the walls. Since this is a very open plan, the thought was to spray the walls with the final color (2 coats) since it covers a lot of area and then mask the walls and paint the ceilings. The ceilings are a good item to spray as it goes fast and covers well on the textured surface. We had the drywall guy do knock-down texture on the ceilings. The walls were a little trickier as we found we really needed to back roll after spraying to make it more uniform. This was not an issue on the ceilings due to the texture, but it cost time on the walls Basically this means you spray the walls first, then come back with a paint-moistened paint roller and go over it again. This helps even things out, and gives it a little texture. It takes a little extra time, but not too much as you can lay a lot of paint with a sprayer and then just smoothing it out with the roller goes reasonably fast.
So here are some interior photos of the painting. We covered all the windows first.
Main level:
Lower level:
The lower level BR is getting a suspended ceiling for better access to the mechanicals above it, which you can partly see the framing for that going in here.
Lower level bathroom. Still need tile in the shower.
Great room after getting the color settled. Our designer had told us to use a light green for the ceiling as it would look great, but we really did not like it, so she ended up changing it to a cream color. We like that a lot better, so that is what we have. Would have been nice to save the time and only do it once, but it worked out in the end. You can see the Big Beam has the plastic off it finally here, too.
The office is a medium green color that we really like, and you can barely see the powder room on the right which is a dark brown/maroon color, which we also really like. Our designer was big help on this stuff as we are awful with picking colors.
Upper level.
The garage is fully functional too, which is great for storage, staging, and a work area.
We sprayed the walls first, then the ceilings with the logic being that since I was covering so much area, that spraying was faster and you can mask walls but not the textured ceilings. I've never seen the show (no time for TV the past couple years...), but I am told this made it look like something from Breaking Bad:


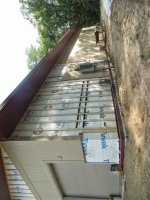
") . OK, not really, but the weather does turn fast, and getting a decent shot to paint the exterior means that I had to get on it pretty quickly. There were a number of details to clean up first, like getting protective mesh over the air intakes to keep critters out (My HVAC guy already found 2 dead birds in the furnace...). Also caulking various penetrations and getting a number of little details cleaned up. Plus before I started spraying, I had to poly all the windows and doors. I was ready to start painting near the end of august. I took the week of labor day off, plus a couple days at the end of august - roughly 1.5 weeks for paint. I spent a day covering all the windows I could reach from the ground or from a step ladder. The next day I picked up the lift. This was what made it possible to get the rest of this done in a reasonable time.
. OK, not really, but the weather does turn fast, and getting a decent shot to paint the exterior means that I had to get on it pretty quickly. There were a number of details to clean up first, like getting protective mesh over the air intakes to keep critters out (My HVAC guy already found 2 dead birds in the furnace...). Also caulking various penetrations and getting a number of little details cleaned up. Plus before I started spraying, I had to poly all the windows and doors. I was ready to start painting near the end of august. I took the week of labor day off, plus a couple days at the end of august - roughly 1.5 weeks for paint. I spent a day covering all the windows I could reach from the ground or from a step ladder. The next day I picked up the lift. This was what made it possible to get the rest of this done in a reasonable time.


