Post-Frame Shed Build

   / Post-Frame Shed Build #1  

MtnManSK

Member
Joined
May 29, 2012
Messages
26
Location
SW Idaho
Tractor
Husqvarna Garden Tractor
Hello all,

I have been reading all sorts of useful information on this forum for months, and although my tractor is just a Husqvarna Garden Tractor, I decided to join and post about my experience building a post-frame style shed at our Cabin in Idaho. Hopefully someone will get some benefit from it as I have from reading others' posts.

I'll start with the background:

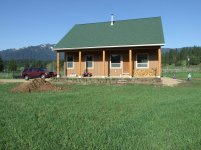
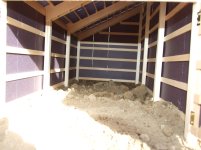
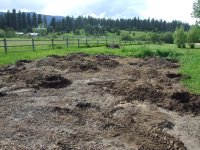
Last year, we had a modest cabin built on one acre in a beautiful valley in the Idaho mountains. We did a few pieces of it ourselves (some of the flooring, trenching and laying water lines and electrical conduit, etc.) but had a Contractor take care of most of it. We simply didn't have the time to do it ourselves during the 4-5 month window of time between spring's saturated ground and the next winter's snow. The cabin was a great success (see photo), and we enjoyed it on weekends through the winter, but we soon found out that we wanted to keep more toys up there than would fit under the porches.

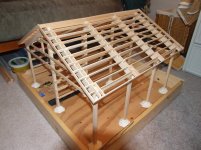
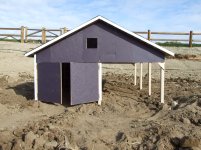
So, after a little convincing, my wife agreed that we should build a shed. We decided on 24'X24', with one half enclosed and the other side open with only roof cover. The open side would primarily be for firewood, canoe, ATV, and other large, hard to pilfer items.

To be continued . . .
 

Attachments

  • Cabin 012.jpg
    Cabin 012.jpg
    793 KB · Views: 2,014
   / Post-Frame Shed Build
  • Thread Starter
#2  
The Model:

I'm an engineer by training (Chemical Engineer actually), so it only seemed natural for me to build a model of the shed prior to trying to build it in full-scale.

I couldn't find any pre-drawn plans that matched what we wanted to build, and I didn't want to pay someone to draw it up. Also, we're lucky enough that the county where our cabin is located does NOT have building codes, so no structural engineering was required prior to getting a permit. I have some drawing software at work, but it just seemed more productive to figure it out as I went with small, cheap lumber.

As it turns out, small lumber is not as cheap as one might think, and I ended up spending about $100 on dollhouse lumber ordered online to get it done. I set the posts in modeling clay, used Super Glue for fasteners, and used construction paper for siding and roofing (cut to 3' scale width strips to match the ribbed steel I was planning on using). Everything was built on a 1:12 scale (i.e. 1" = 1'). See photos below (I set it up outside in the dirt for photos to send to the HOA for approval):
 

Attachments

  • 054.jpg
    054.jpg
    540 KB · Views: 1,020
  • Hula Hoop - Model Shed - Lawn Tractor 005.jpg
    Hula Hoop - Model Shed - Lawn Tractor 005.jpg
    651.4 KB · Views: 730
  • Hula Hoop - Model Shed - Lawn Tractor 014.jpg
    Hula Hoop - Model Shed - Lawn Tractor 014.jpg
    465.6 KB · Views: 409
  • Hula Hoop - Model Shed - Lawn Tractor 015.jpg
    Hula Hoop - Model Shed - Lawn Tractor 015.jpg
    323.7 KB · Views: 973
   / Post-Frame Shed Build #3  
More pls!
 
   / Post-Frame Shed Build
  • Thread Starter
#4  
The Estimate:

My wife and I both wanted to make sure before we went any further that we would actually be able to afford this project this year. So, I put together an estimate.

Once the model was built, I was able to make a pretty detailed materials list. I figured up the total number of board-feet of each type of lumber (treated members vs. #2 KD framing lumber). Then I went online and found some references for regional lumber prices per board foot, and picked one I thought was on the high side (to be conservative). I also measured and multiplied out the total number of "squares" of steel siding and roofing necessary. Again, the internet provided a rough price per square. Lastly, I utilized Lowe's and Home Depot's websites to find pricing on all of the miscellaneous parts (fasteners, foam condensation barrier, etc.).

I organized it all on a spreadsheet and totaled it all up, coming to around $4500 (not including road mix gravel to backfill the interior and build a lane to access it). In the end, this number turned out to be VERY close to correct.
 
   / Post-Frame Shed Build #5  
Looks great, very interesting build, I can't say I've seen anybody create a scale model of a shed before! Planning is always the key to having it come out well without any surprises, so whatever works for you.
 
   / Post-Frame Shed Build #6  
Very cool, and beautiful location!

Being an engineer myself, I can appreciate the planning and scale model. And I would also understand if "normal" people might think you're a nut job. As my wife tells me from time to time, "you engineers are just not normal". The trick is to have fun, learn, and exercise your brain a bit, and not worry about over-planning, over-analyzing, or over-building. When you start from scratch without prior experience, the engineering approach works well.
 
   / Post-Frame Shed Build
  • Thread Starter
#7  
Permitting and Material Procurement:

I sent pictures of the model to our HOA (the Cabin is technically in a subdivision), along with a plot plan I had drawn with MS Visio at work. We had to push right up to the minimum setbacks on the lot (10' side, and 20' rear) in order to fit it behind the septic drainfield. However, the HOA was gracious enough to approve it with no questions asked.

The county was very easy to deal with. Once they had their check, they rubber-stamped it and we were good-to-go.

I sent my lumber materials list (already completed for the estimate) to two local supply houses for bids. The bids came back almost identical, except one wanted twice as much as the other for delivery. We had no way to haul the 20' poles or the 24 sacks of redi-mix (due to sheer weight), so the lower delivery price got the bid. Unfortunately, lumber prices have increased this spring, so my estimate was several hundred dollars low on the lumber side. But, it didn't kill the project, so we went ahead and scheduled delivery for a Friday just before we would arrive for the weekend.

For the steel, we had been told by our cabin contractor that there was one local shop that used a much higher quality paint than the rest, so we didn't bother shopping around. I took measurements for each panel off of the model, and took that list to them for the bid. They actually came back several hundred dollars LOWER than my estimate, which offset the lumber overage nicely.

We borrowed my dad's 14' flatbed trailer and hauled it up there behind our half-ton Chevy ourselves. The total weight of the steel was only about 1500 pounds.

We had to re-stack almost all of the lumber since the delivery truck just dumped it in the mud, and of course we had to handle all of the steel to unload the trailer. However, we got it stacked and tarped so that it would be ready when the gound was ready to dig. I don't have a picture of the materials before we started buiding, but the one below gives you the idea.

Home Depot supplied all of the nails, bolts, and misc. supplies.
 

Attachments

  • Shed Construction 006.jpg
    Shed Construction 006.jpg
    818.5 KB · Views: 824
   / Post-Frame Shed Build
  • Thread Starter
#8  
Locating and Staking:

Knowing that we needed to be as close as allowed to the property lines, we started locating by setting the corner that would be closest. Then, we went parallel to the property line for 24' and set the next corner. From there, we had to calculate the hypotenuse (diagonal across the middle) and triangulate to get the next two corners squared-up. We used simple wooden stakes and staked out the location of each post.

Then, knowing that the stakes would have to move in order to dig the holes, we set stakes out away from the corners and stretched strings along the boundaries between these stakes. The strings could be removed for digging, then replaced for setting posts.

Lastly, I used my ATV sprayer to Roundup the native meadowgrass within the building area so we weren't trying to kill it after-the-fact.

All of this was done at least two weeks prior to breaking-ground. I wanted to have everything completely ready so that when we started digging, we could make fast progress.

I REALLY wish I had a picture of this available - if I can find one I'll edit the post and upload it.
 
   / Post-Frame Shed Build
  • Thread Starter
#9  
Digging Post Holes:

I went back-and-forth several times trying to decide what equipment to use to dig the post holes. I knew that, ideally, I needed about 18" diameter holes in order to be able to pour large enough "punch pad" footings for the posts. I also needed to get at least 36" deep to be below frost depth, but felt much better about 48" for a safety margin. The good news was that the ground on the valley floor up there is almost pure clay-silt. It's one of the only places I've seen in the entire state with NO ROCKS!!

Home Depot's tool rental center had a towable post-hole auger, but it's largest bit was 12", and I was afraid of under-sizing the footings that much and also having enough room in each hole to position the 6X6 posts if the holes weren't perfect. This option was, however, by far the cheapest.

On the other end of the spectrum, my boss at work gave me a number for a guy who has a post-hole auger mounted on the back of a Jeep. I'm not sure exactly how it works, but he claimed he can drill up to 24" holes VERY quickly. But, I really wanted to do this without hiring anyone, and he was going to charge full hourly rate for the drive up to the cabin (1.5 hrs) plus the work itself.

What we ended up doing was renting a Toro Dingo mini skid-steer with an auger drive and 18" auger (with extension to reach 4' depth) from a local equipment rental house. This was more money than the Home Depot option, but I'm VERY glad we did it because 12" holes would NOT have worked. The Dingo was pretty easy to tow behind our pickup, and was just enough machine to get the job done. It took about three hours to dig all twelve holes.

We knew exactly where to dig since we had already staked out the post locations. The biggest challenge was keeping the auger shaft approximately plumb while digging, so that the holes went straight down.

Here are a couple of pics. Yes, the operator is me.
 

Attachments

  • Shed Construction 001.jpg
    Shed Construction 001.jpg
    918 KB · Views: 658
  • Shed Construction 003.jpg
    Shed Construction 003.jpg
    800 KB · Views: 771
  • Shed Construction 005.jpg
    Shed Construction 005.jpg
    1 MB · Views: 663
   / Post-Frame Shed Build
  • Thread Starter
#10  
Pouring Footings:

After the holes were dug, we wanted to get the footings poured that same evening so that they could set-up for almost 24-hours before we stood the posts up on them.

So, we hurried-up and wheelbarrow-mixed one sack at a time, pouring one 90-lb sack in each hole. That gave about a 5" thick pad. I knew 6" was ideal, but the clay was VERY compact down that deep, and it was so simple to just put one sack in each hole that we just did it that way.

It was getting late, so we didn't get any pictures of this step.

One thing that was a little odd was that we had dug all of the holes to almost exactly the same depth (about 48"), but only two out of the twelve had some water run into them from the water table being that high. I'm not a hydrologist, but I'd never heard of the water table running in "veins" so that one spot will have water and another at the same depth only 8 feet away won't.

Regardless, it bothered me a little to pour concrete into water, but I've read that it only affects the strength of the SURFACE of the concrete, which we don't care about way down underground anyway. Hopefully this is true.
 
 
Top