Downspout Drywells

   / Downspout Drywells #1  

RobS

Super Member
Joined
Jun 26, 2000
Messages
7,725
Location
Goshen, IN
Tractor
None!
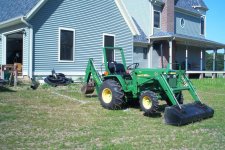
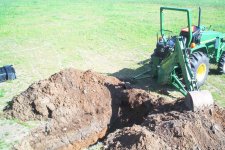
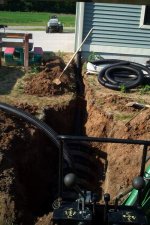
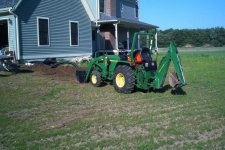
Here are some pictures of my weekend project. I put in five drywells to handle our gutter/downspout runoff. I had already buried the drains but left the ends above ground.

This first shot shows my supplies for the project. I used Infiltrator chambers designed for septic. I know, it's overkill but they were reasonably priced and easy to install. Also, they provide a lot more capacity than a rock filled trench as the area under the chamber is wide open /forums/images/graemlins/smile.gif
 

Attachments

  • 283996-IM000489.jpg
    283996-IM000489.jpg
    69.8 KB · Views: 882
   / Downspout Drywells
  • Thread Starter
#2  
Here I am poised and ready to start the digging, well at least my tractor is /forums/images/graemlins/smile.gif
 

Attachments

  • 283997-IM000490.jpg
    283997-IM000490.jpg
    94.8 KB · Views: 723
   / Downspout Drywells
  • Thread Starter
#3  
Not really related to the project, this is a close up of the subframe for a #7 hoe on a 790 Deere. The permanent subframe runs horizontally from the rear axle casting to the loader mounts. The hoe frame quick-hitches into the tractor subframe just about even with the forward edge of the back tire. The gold colored handle with the spring is the quick-hitch lever /forums/images/graemlins/smile.gif
 

Attachments

  • 283999-IM000491.jpg
    283999-IM000491.jpg
    69 KB · Views: 549
   / Downspout Drywells
  • Thread Starter
#4  
Here's another shot of the hoe/tractor mounting. A busy picture of the rear area but it really doesn't show much. Power Beyond connections and the top link bracket are most obvious. What doesn't show is the lower mount which seems to take the brunt of the hoe load. It's a beefy piece of iron securely bolted to the PTO case. It's back to the project after this /forums/images/graemlins/smile.gif
 

Attachments

  • 284003-IM000492.jpg
    284003-IM000492.jpg
    62.6 KB · Views: 438
   / Downspout Drywells
  • Thread Starter
#5  
Well I thought we were ready to dig but you can never have too many prep pictures. Besides, Norm always says "Measure twice, cut once and take a whole bunch of pictures because you'll forget to once you get started" /forums/images/graemlins/smile.gif
 

Attachments

  • 284005-IM000493.jpg
    284005-IM000493.jpg
    72.3 KB · Views: 571
   / Downspout Drywells
  • Thread Starter
#6  
Hey, we're finally moving some dirt! This is pretty fun. Our soil is pretty sandy so it's easy digging except that it's a tad dry lately. Just a couple of inches of hard crust to break through then we're home free /forums/images/graemlins/smile.gif
 

Attachments

  • 284007-IM000495.jpg
    284007-IM000495.jpg
    93.7 KB · Views: 589
   / Downspout Drywells
  • Thread Starter
#7  
Just about done digging this trench. If the picture uploads as well as it shows on my PC you can see the layers of our soil clearly. Topsoil is sand/clay/loam then the dreaded layer of hardpan (grey in the photo). Our site was a field for decades and this layer forms at the bottom of the tilled layer. It's all the fines from years of plowing forming an impermeable layer of hard clay. Fortunately, below that is nice sandy subsoil so my drywells should drain just fine /forums/images/graemlins/smile.gif
 

Attachments

  • 284009-IM000496.jpg
    284009-IM000496.jpg
    95.7 KB · Views: 634
   / Downspout Drywells
  • Thread Starter
#8  
Here's the first Infiltrator chamber in place. This particular drywell only used one chamber. I used up to three latched together for some of the others. Each chamber has 76 gallons of storage capacity so I should be all set for all but the heaviest rainfall /forums/images/graemlins/smile.gif
 

Attachments

  • 284012-IM000499.jpg
    284012-IM000499.jpg
    65.7 KB · Views: 722
   / Downspout Drywells
  • Thread Starter
#9  
And finally, the backfill. I've since taken the hoe off, put my landscape rake on and smoothed it out more (knowing it will settle some). The pipe sticking out of the ground is the overflow which gets cut off at grade and capped with a drain grate. Five drywells, nine total Infiltrator chambers and about 12 hours total time. I'm pretty sure I was smiling the whole time too /forums/images/graemlins/smile.gif
 

Attachments

  • 284016-IM000500.jpg
    284016-IM000500.jpg
    78.6 KB · Views: 610
   / Downspout Drywells #10  
Rob, excellent photos! I didn’t know you could do so much for rain gutters. I am having gutters installed on my house this week. I also have a 790 JD tractor with the #7 backhoe. Just took mine off this weekend for the first time. It took a while but, after a few times it should be easy. How do you like your machine? I really enjoy mine. I would like to get the 4500 with the 460 loader. I heard it is a huge difference in power. Maybe when this one is paid off. Keep up the good work!!
 
 
Top