My first of many Retaining Walls to tame my slope - DIY

   / My first of many Retaining Walls to tame my slope - DIY
  • Thread Starter
#11  
Very nice. Looks like you know what you are doing. Is the wall going to be straight up or do you slope slightly back towards the dirt/hill?

MoKelly
Looks can be deceiving. Seriously though... Did a lot of reading and researching. The blocks are designed to automatically set with 6 degree setback for each course indexing off the front lip. Very easy to install once you take the time to get the bottom row placed and level side to side and front to back as well as keeping them level to each other! Time consuming and the dang things are heavy!!!
 
   / My first of many Retaining Walls to tame my slope - DIY #12  
nice job, it is expensive stuff huh?
and you are right, the first course takes the most time,
after that it will go along pretty quickly
at least you don't have to worry about which piece goes next!
my poject had 4 different sizes of brick pavers in a pattern, and the wall block
had 5 different sizes...
 
   / My first of many Retaining Walls to tame my slope - DIY #13  
Good idea. Just installed hooks on my bucket. Could be first use! I was figuring pulling the plywood up after filling about 1ft of gravel and fill on each side. How deep did you fill before pulling up plywood?

About 2-3' at a time, we had it laying on the long edge. Now that I think about it, I would probably loop a few pieces of nylon rope around the plywood so you're lifting it from the bottom instead of pulling on the top. But we just used what we had.
 
   / My first of many Retaining Walls to tame my slope - DIY #14  
An idea for pulling the plywood...

I wanted to move a very large rock and there was no way I was going to be able to lift it in the loader. I thought about skidding it, so I laid a sheet of plywood next to it and was able to pull/roll the rock onto it with the backhoe. I had drilled a couple of holes through the plywood at the one end.

I tied each end of a short rope through the two holes and looped the arc of the rope on the draw bar, over a hitch ball on the draw bar. I went to pull the "skid" and the ropes just ripped right through the plywood. After looking at it for a bit I came up with a different idea to pull the plywood. I wonder if this could work for you.

I cut four small rectangles of plywood, two about 6x3 and two about 6x2. At the end of the plywood, inside my ripped out holes, I screwed on the two 6x2 blocks with a few long screws through the blocks and all the way pretty much through the sheet of plywood. Cross section:

---
----------------------------

Then, over the top of each block, I screwed a 6x3 block - with longer screws that went through both blocks and through the plywood sheet. The wider block was flush with the narrower block on the "tractor side", so on the back side there was that one inch offset on the inside between outer block and plywood.

-----
---
----------------------------

I then could loop the rope around the two "handles" I had made on the sheet of plywood (the rope fits into the slot created from the shorter block that's between the wider block and the plywood sheet). I brought both rope ends up and attached to the draw bar.

Cross section of rope in slot.

-----
---O
----------------------------

It worked - I was able to pull the plywood by the handles screwed to the plywood.

You may be able to create handles like this, only on the width side of the plywood. Then after you fill a foot or so, pull the plywood up by a rope looped around the handles with the two rope ends on your loader hooks.
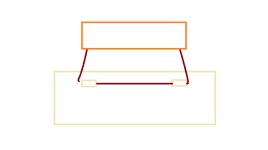
skid.png
 
   / My first of many Retaining Walls to tame my slope - DIY
  • Thread Starter
#15  
An idea for pulling the plywood...


You may be able to create handles like this, only on the width side of the plywood. Then after you fill a foot or so, pull the plywood up by a rope looped around the handles with the two rope ends on your loader hooks.

View attachment 326932
Yes I think that is going to be the plan using one of my moving straps and a couple of slots in the plywood. Thinking I might need two sheets that I can leap frog (side to side) so I can fill past the edge and work along the 40ft of wall.
 
   / My first of many Retaining Walls to tame my slope - DIY #16  
Just a passing thought. That wall looks pretty tight so it won't seep away the hydraulic pressure much after the fines plug up all the holes. be generous with 1 1/2" drain rock (not crushed) for a curtain drain to get that water into your sub drain line. Go close to 1' wide and use geotextile fabric between the plywood and the rock. I wouldn't back fill the whole thing at once. place one foot of fill, raise the plywood and compact the first lift. Go up one lift at time.

Ron
 
   / My first of many Retaining Walls to tame my slope - DIY
  • Thread Starter
#17  
Just a passing thought. That wall looks pretty tight so it won't seep away the hydraulic pressure much after the fines plug up all the holes. be generous with 1 1/2" drain rock (not crushed) for a curtain drain to get that water into your sub drain line. Go close to 1' wide and use geotextile fabric between the plywood and the rock. I wouldn't back fill the whole thing at once. place one foot of fill, raise the plywood and compact the first lift. Go up one lift at time.

Ron
Block install specs call for 3/4 crushed so I will stick to that, not to mention I have 10 yards sitting nearby ;) I will be manually tamping down at each course height (8in depth). Looked at renting a vibrator/plate compactor at HD but the cost was ridiculous. Bought a $25 hand tool instead. If I could get my hands on an idle compactor I know that would be ideal.

The block looks tight but is plenty able to drain down through and out through the front face. There are small gaps at every two corner/edge intersection of three blocks. I will post a few more progress pics tomorrow. Actually have two rows up now but only one filled, thus the discussion about backfilling with temporary plywood separator.

I am not sure about your suggestion to add the geotextile fabric 'vertically'. All research I have seen is that it should be laid horizontally (every two courses for engineered walls) and/or at top of rock and topsoil at very top of wall. In my thinking, the vertical placement creates a natural shear plane too close to the wall. Horizontally laid, it impedes a shear. :2cents:
 
   / My first of many Retaining Walls to tame my slope - DIY #18  
Block install specs call for 3/4 crushed so I will stick to that, not to mention I have 10 yards sitting nearby ;) I will be manually tamping down at each course height (8in depth). Looked at renting a vibrator/plate compactor at HD but the cost was ridiculous. Bought a $25 hand tool instead. If I could get my hands on an idle compactor I know that would be ideal.

The block looks tight but is plenty able to drain down through and out through the front face. There are small gaps at every two corner/edge intersection of three blocks. I will post a few more progress pics tomorrow. Actually have two rows up now but only one filled, thus the discussion about backfilling with temporary plywood separator.

I am not sure about your suggestion to add the geotextile fabric 'vertically'. All research I have seen is that it should be laid horizontally (every two courses for engineered walls) and/or at top of rock and topsoil at very top of wall. In my thinking, the vertical placement creates a natural shear plane too close to the wall. Horizontally laid, it impedes a shear. :2cents:

I think the filter fabric can also serve as a tie back. Say every other course? I believe I have seen plans in which the fabric sits on the block. the next block anchors it in place.

For sure the comment on the hydraulic pressure is a good one. If you don't get that water away from the wall you are in trouble IMO. I also question why you are compacting the crushed stone? You want voids in the stone to hold water and let it drop down to your drain pipe. And you are correct on 3/4" as I believe 3/4" holds most amont of water per cu. ft.
 
   / My first of many Retaining Walls to tame my slope - DIY #19  
you might think of a clamp to pick up and place all those blocks also
you have a loader use it
save some stress on the old back
at least mine is old
 
   / My first of many Retaining Walls to tame my slope - DIY #20  
My Walls used similar shape blocks , but mine are solid , 6" x 16" x 10" or so deep . 67 lbs. each , first row sucks , lifting and placing each block to level as with solid block , pounding with a rubber mallet was useless . Mine have a lip on bottom of each block thus when you stack on top of previous row , it would automatically step that next row back roughly 1.5" . Only went roughly 4' on mine then back filled but also front filled with 12" of top soil for out lawn , thus maybe 3' of block shows .

Looks Really nice , but Feel your pain :)

Fred H.
 
 
Top