OP
deranged
Gold Member
- Joined
- Nov 12, 2013
- Messages
- 254
- Location
- Marthasville, MO
- Tractor
- Cub Cadet 102, L3600 Kabota; 1530 John Deere


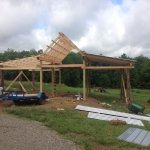
Nice touch with the cedar logs. Are they from your land? I use them on porches and gazebo's at my place. I found that when I put them in the ground, they start to rot fairly quickly. I have two on my porch that I did that way and I noticed the rot in about five years. They will be coming out this year and I will put them on to of a concrete pad. All of mine rest on concrete several inches above the ground. I drill a 3ft deep, 1ft wide hole in the ground and put a five foot length of channel iron in the hole. Then I fill the hole with concrete and make a form out of wood or a few inches cut off of a sono tube to get above grade. Then I put the post on top of the concrete and drill two holes through it and the c channel. Since the logs are so thick, I use galvanized threaded rod to bole it all together. This has proven to be a good long term solution to the rotting log problem.
Eddie


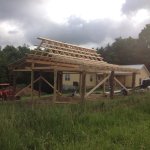
Okay, you officially made building a pole style shed look easy! I have collected a few cedars about your size to do just this and make a shed or barn or something like you have and to perform similar duties.
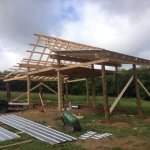
Did you buy the tin for the roof used or new? What was the rough price on that. That is the biggest part I need to have in the bank or lined out.
I will continue to watch as I love seeing folks build stuff.
And now I have to go see what Eddie made with those huge logs!