Setting posts

   / Setting posts #1  

sodamo

Super Star Member
Joined
May 20, 2004
Messages
16,981
Location
Big Island, HI
Tractor
LS XR4140H (Mine) BX2380 (wife’s)
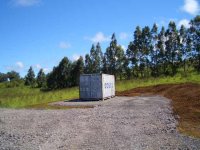
I'm about to start building my tractor/utility shed. Basically, this is an overbuilt carport, with a 20 ft container under one side, the other side is an open bay. The roof will become home to my solar (PV) panels, and possibly a solar HW system - rational for over built.
Anyway, here's what I need suggestions to accomplish:
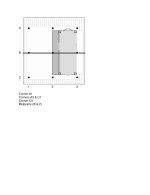
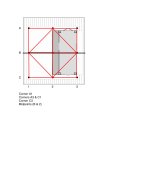
The structure is supported by 9 pipes, 4 in galvanized, 15 ft total length, 5 feet in ground (12 in hole filled with concrete).
Any suggestions how I can get and keep them lined up properly while the concrete sets? I'm not so concerned about height, as I think I can manage to keep them quite close and the threaded coupler will allow for small corrections when setting the beams.
These pipes will be exactly 11 ft apart, so 3 in 22 ft span. 9 in a square. The container is in place but nothing else.
Not only must I keep them aligned, but plumb as well.
Setting wooden posts on a concrete pier would have been so much easier, but alas, I am going with the permitted plans.
The attached drawing depicts locations and my current thoughts on order of installation. I think I will have to install corners, then midpoints.

All suggestions appreciated.

David
 

Attachments

  • 778654-Shedpipe.jpg
    778654-Shedpipe.jpg
    73.1 KB · Views: 650
   / Setting posts #2  
I'd set them all in the holes on concrete pads poured to the correct elevations, then tie them all together at the tops with (12) 12' 2x4's and (4) 16' 2x4's, making sure the top distances are accurate. Then position each steel post plumb and pour the concrete. There will need to be some angle bracing to hold the posts plumb once in place, and the container can be the stabilizer of this set of posts.

The 16' poles would make a square connecting the 4 middle posts with each other. Attached is a pic of the ties on the top, all of which are 12' 2x4's except the diagonals.
 

Attachments

  • 778666-shedPostrigging.jpg
    778666-shedPostrigging.jpg
    74.2 KB · Views: 446
   / Setting posts #3  
Fifteen foot four inch (4 5/8" O.D.) are manageable by one person, tough, but manageable.

If you don't have a wind to deal with there's no reason to brace them.

Just make your mud stiff and occasionally check them for plumb occasionally for fifteen minutes or so.

You can dig your holes. Then place all your posts in the holes leaning them in. Put your string lines back up. Set the posts starting where ever it's comfortable for you.

A trick we use is to mark your string centerline of posts with a sharpie.

Another trick when aligning a post of that size is to use the wall of the hole as a fulcrum. So instead of trying to lift the post and move it. Just move the bottom by bouncing it agaisnt the side, much easier on the back.
 
   / Setting posts #4  
Have you already drilled your holes?

Getting the corners square is the real trick, lining them up is simple.

Either decide where you want a particulart wall, or a corner. Then measure your distances from there. I like to do a wall first, then the next two corners. I mark the distance with an arc so I know where it is at various angles from the corner.

Then I measure my corners to get it square. Having the previous measurements marked at various angles allows me to find square allot faster.

Drill your corners and check to be sure you are still square.

Then set your corner posts. To help getting them in the exact spot you want them in the hole, I like to mark my lines well outside the hole so I can line up the post. Then I level it and adjust like Harvey said. I do this before putting any concrete in. Sometimes it takes a bit of effort, but this is the most important part of your build, so be sure to do it right.

Allot of times I have to take out more dirt off of one side of the hole to get it right. That's pretty normal for me.

Only when it's level and plumb should you put in the concrete.

After your corners are set, then run a string from corner to corner to line up your walls. With a tight string line, you have a perfectly straight line.

Mark and dig your holes off the string line.

Place your poles on the same side at the corners from the string. If the sting is on the outside of the corner posts, do the same on the line posts.

Level the post with the edge on the string. Never force the string, but be sure your gently touching it.

Check everything at least three times from every angle. You can never check it too many times, because once the concrete is in, it's too late.

Eddie
 
   / Setting posts
  • Thread Starter
#5  
Thanks Guys - lots of great info to digest and incorporate.

Beenthere - I'd actually planned on adjusting the height within each hole using 3/4 base, but I like your idea of using concrete even better. Guessing I can screw a piece of plywood to a 2x4 and use to tamp the concrete flat and use my level to ensure proper depth. Thanks for the drawing.

Harv - I will have 1 helper - my wife, and she's the best as long as I don't lose patience. Wind is unpredictable, but I expect to have some, if too windy, I'll just wait a day. I'll be mixin my own concrete, using a small electric mixer, so stiff won't be a problem. Besides, I have to haul my water. Like the Sharpie trick.

Eddie - No, haven't drilled holes yet. I need to fabricate an extension for my phd/auger to get the 5 ft depth. Holes will initially go through a crushed rock layer (about 4 inches) then clay, but don't expect problems based on past digging by hand. I will use the container as my base and square the holes/pipes to the container. I'll be doing this task while the slab to my house is being formed (6,000 sqft counting walkways, garage, etc.) and I fully suspect George to be checking me out, so if I have to check more than 3 times, not a problem. /forums/images/graemlins/smile.gif

I'll post some pics as I make progress. The attached pic is the container in the location to be used.

Thanks again

David
 

Attachments

  • 779402-container.jpg
    779402-container.jpg
    41.9 KB · Views: 332
   / Setting posts #6  
I understand pictures can be decieving, but wanted to comment on yours just in case.

It looks like you have a slope on one side of your pad and that water run-off will come directly to it.

I made the mistake of doing this on my container barn. I thought I had plenty of drainage and there wasn't much of a slope anyway. The day after I poured my slab it rained real hard. Flooded mud and silt over my entire slab.

I took my backhoe and dug a 2 foot by 2 foot trench around the entire area. Real pain in the but, but it had to be done. If I'd been smart, I'd have planned for the most extreme conditions and then some, instead I just sort of thought it was fine and learned the hard way.

Many times I saw that 2 foot trench get near the top in a heavy rain.

Hope you have enough drainage, it really sucks when you find out you don't and it would have been easy to fix early on.

Eddie
 
   / Setting posts #7  
How does someone go about getting one of those containers?
 
   / Setting posts #8  
I got mine from a place in the yellow pages. There are tons available around a port. Mine is 20' and cost about 2350 delivered. Waterproof, rodentproof, theft resistant, and fireproof.
 
   / Setting posts #9  
I just recently completed a machine shed on my place. I used 4" schedule 40 pipe for post's. I put batter boards in place to stretch strings from. Then I dug the holes. I put the post's in 4' below grade. I dry-mixed my concrete, then started pouring it (dry) into the hole. After adding about 2', I made certain the post was still plumb and in line. Then I finished filling (still dry) After completely filling with dry mix, I poured a couple 5 gallon buckets of water at the base of each post.

I checked them over the weekend. You'd need dynamite to get them out. By using dry mix, the post was set tight by the time the hole was filled.
 
   / Setting posts #10  
Sounds like a good idea!
What size holes did you go with for the 4" pipes?
 
 
Top