Step by step photos of new garage

   / Step by step photos of new garage #1  

roermo

Gold Member
Joined
Nov 6, 2005
Messages
330
Location
Hannibal MO.
Tractor
4110 JD
Every one here has been so good with help and advice when I write about tractor, when I built my add on to my house, and many more. So I thought I would post something just for fun and if all goes well no questions for help.
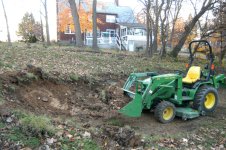
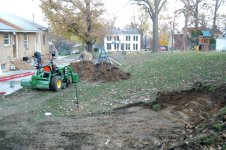
Here are the facts:
The garage is going to be 34 foot long and 26 to 28 wide, have not yet made up my mind.
Doing a footing 3 foot deep, 2 ft wide.
Brick lip for two sides (front and east side facing my house. The neighbors will only see roof because I set lower.
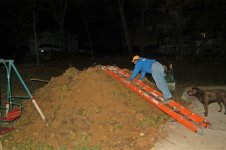
9Ft ceilings so I can get my tractor in with romps up.

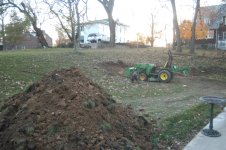
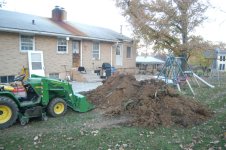
Check back each day or so I will add pics.

I do have to work too, so I will work evenings and week ends and hope to have it under roof in two weeks or so.
Any comments are welcome, but please do not tell me I am nuts my wife has already done that.

Roger
 

Attachments

  • d.jpg
    d.jpg
    364.5 KB · Views: 3,647
  • f.jpg
    f.jpg
    327.7 KB · Views: 2,301
  • b.jpg
    b.jpg
    315.1 KB · Views: 2,009
  • a.jpg
    a.jpg
    316.3 KB · Views: 1,923
  • k 2.jpg
    k 2.jpg
    236 KB · Views: 1,881
  • m 1.jpg
    m 1.jpg
    262.4 KB · Views: 2,001
  • l 1.jpg
    l 1.jpg
    472.3 KB · Views: 3,020
   / Step by step photos of new garage #2  
I won't tell you that you are nuts, but I will suggest that you make it 11' high inside, so when the floor is poured, you will still have 10'8". I would also use 2 10' X 10' over head doors with torsion bar lift mechanism. I am speaking from first hand experience. I built mine like this, but used standard 9' wide 8' high doors, and learned the hard way that sometimes you want that extra height. I just redid my garage doors and made them a foot wider and 2' higher. When you are building the the extra cost isn't that great when you consider it in the total scheme of things. Skimp on things that you can do later, but make sure that the things that are difficult to change later are done the way you want them originally. Almost everyone that has ever built a house finds things that they would have done differently if they had lived it the house for a year before building it. Hindsight is always 20/20.... learn from others experience. Good luck with the project and keep the pictures coming. Dusty
 
   / Step by step photos of new garage #3  
please do not tell me I am nuts my wife has already done that

Before, after, or at the time she was making the picture of you on the ladder on the dirt pile?:D Good luck with the project.
 
   / Step by step photos of new garage
  • Thread Starter
#4  
dusty:
I have been pondering the 9 ft ceiling and now you have given me thought for 10, hum what to do. ?

Bird: she told me I was nuts for such a large garage then later threw dirt clods at me while taking my picture. She missed.

Roger
 
   / Step by step photos of new garage #6  
roermo,

Jack up your tractor as if you where going to change out both rear wheels. Measure the height. Add a foot. This is the minimum height your ceiling needs to be above the top of your footers.

Now imagine a backhoe attached to your tractor. hhhmmm... I'd check if backhoes for your tractor sit higher than the rops in transport position.

When you start forming up the footers, think about putting a curb above floor level. saves the walls from the mess when you drive the tractor in from the mud and need to power wash the floor.
 
   / Step by step photos of new garage
  • Thread Starter
#7  
Now that is what I am talking abou, 10 ft. ceiling, and I did not think about a crub, for the wall to set on, I like that. I knew I loved this site for a reason.

Roger
 
   / Step by step photos of new garage #8  
Heck Roger,

If you want to confuse it further, add a few inches so you can put in radiant floor heating later. Then add 6 inches so you don't have to worry about light fixtures hanging down.

Then you can go truly nuts & make it a cathedral ceiling so you can put a hoist in the middle to work on your vehicles.

(Yup...I can come up with a million bright ideas for a shop...)
 
   / Step by step photos of new garage #9  
if it was mine to build,...
big doors tall and wide.
max ceiling height.
pitch the floor out not to a drain.
either trusses or a steel beam so there would be no lally columns.
if trusses still some kind of heavy beam for lifting.
put radiant in the floor even if you cant afford to hook it up now.
large cement apron in front with more radiant, no shoveling in front of doors.
max electric service for welders, big compressor, a/c, etc.
piping for remote compressor air usage.
max outlets 110v and 220v.
lots and lots of lights, nothing is worse than too little light.
plumbing roughs for future hot and cold water, bathrooms, dog wash station, etc.
separate walk in door less heat loss than thru the overheads.
fire code sheet rock even if its not required, welding sparks etc.
if its going to have live water in it overhead sprinklers are real cheap.
secure locks, dead bolts.
no windows, not even on the doors.
thats just off the top of my head, seen to many regrets from homeowners after the fact.
woulda, coulda, shoulda, gets real expensive after the fact.
this list brought to by caffine,... and 30 plus years in new construction.
 
   / Step by step photos of new garage #10  
Afternoon Roger,
Well, If I had the money to start mine tommorrow :confused: I would go with the 10 ft ceilings ! Once its up, its up for a long time :) You will be happy with the extra head room !

BTW, Im surprised you left your MMM on while moving rocks and soil, I would think it could get damaged easily !

Great pics, keep them commin !
 
 
Top