Timber Frame Tractor Home

   / Timber Frame Tractor Home #1  

khd

Gold Member
Joined
May 9, 2004
Messages
277
Location
Detroit Suburb
Tractor
Kubota 7610
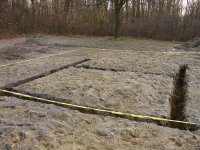
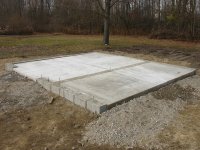
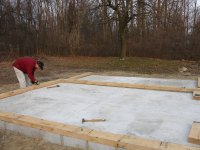
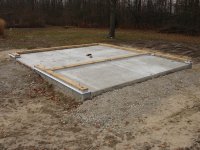
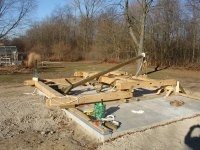
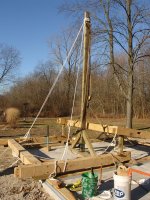
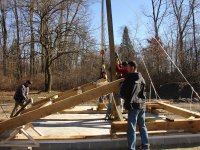
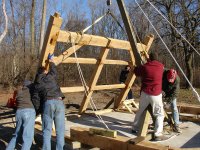
I decided I needed a small building for the tractor...I know, I know....go big or its full before its built...anyway I capitalized on the boss's okay for a "shed" and always being a traditionalist I went for a smaller building and sunk the money in astetics. Because the job limits the time I have for such things , I designed the building and got with the Amish in OH to cut it.

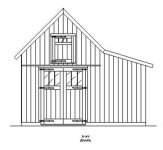
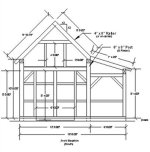
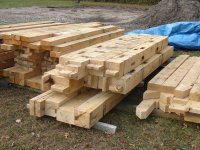
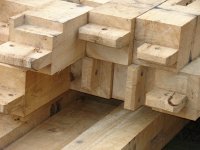
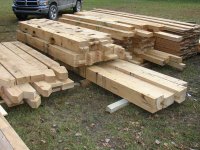
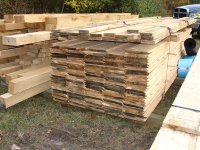
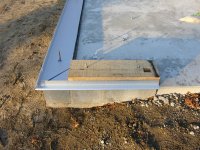
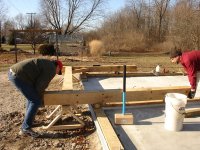
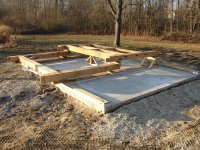
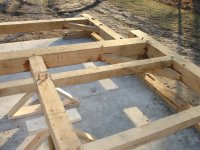
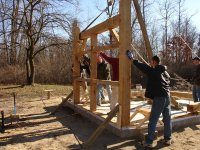
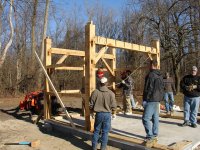
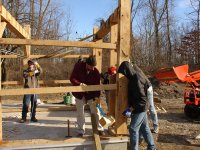
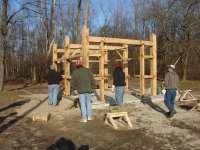
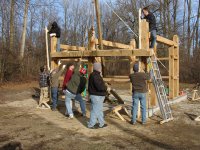
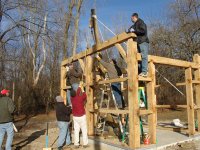
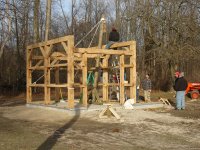
It is basically a 12 x 16 main building (Sobon style) with a 6' clear span, open lean-to. 10' sidwalls, 12/12 roof and half loft all cut from green white oak. I also had them do the siding, shiplapped,rough sawn hemlock and 4/4 oak for the loft flooring. I am attaching a couple of renderings of the design. The people I had cut it specialize in large frames in the traditional utilitarian style and when I went to see their work, I was very impressed.

The design started last May and I finally commited to the job in July. I'll be posting quickly to bring the story to present.

Regards,
Kevin
 

Attachments

  • 12x16_FinishedElevation.JPG
    12x16_FinishedElevation.JPG
    30.9 KB · Views: 2,790
  • 12x16_Elevation.JPG
    12x16_Elevation.JPG
    35.8 KB · Views: 2,121
   / Timber Frame Tractor Home
  • Thread Starter
#2  
Here is the site. Northeast coner of the property, back out of the way but visible from the road. The second pic is the site cleared, the mound in the pic is an old elm stump that took me a day with the FEL and axe to get it out.

Kevin
 

Attachments

  • site.jpg
    site.jpg
    191.1 KB · Views: 1,658
  • Cleared&Stump.jpg
    Cleared&Stump.jpg
    175.7 KB · Views: 1,712
   / Timber Frame Tractor Home
  • Thread Starter
#3  
The frame was cut in early October and delivered mid month. I was hurting just thinking about unloading it so I got with my locale lumber yard and he took delivery and then brought it to the house with his boom truck.... Ask Home Depot to do that.

Pic 1 is part of the frame stacked from shipping, Pic 2 shows a closeup of the joinery on the posts and girts, Pic 3 another view of the frame and Pic 4 is the siding. At this point I hadn't done anything about a foundation and the job and travel were eating up all my time and winter was quickly approaching so I was preparing to overwinter the frame. Spent two days stickering all the siding and frame.

As you probably guessed...how can anyone let that sit and not want to get started on all that oak.

Kevin
 

Attachments

  • StackedFrame1.jpg
    StackedFrame1.jpg
    180.9 KB · Views: 1,782
  • joinery.jpg
    joinery.jpg
    125.4 KB · Views: 1,788
  • StackedFrame2.jpg
    StackedFrame2.jpg
    189 KB · Views: 1,374
  • SidingStacked.jpg
    SidingStacked.jpg
    193 KB · Views: 1,468
Last edited:
   / Timber Frame Tractor Home
  • Thread Starter
#4  
I wasn't going to pull a permit but because the lean-to is covered and the total was over 200 sq. ft. I applied for a permit thinking for sure the Twp. was going to have an issue with the building; height, not engineered, etc but they came through with the permit. I found a really good cement contractor and commited to the job and then we waited for it to quit raining. Finally stopped long enough the week of Thanksgiving. The contractor showed up right when he said and did a beautiful job.

Pic 1 shows the trenches dug and Pic 2 shows the finished foundation. 9 x 24 rat wall, 1 coarse of 8" block filled and a 4 inch slab.

Kevin
 

Attachments

  • TrenchesDug.jpg
    TrenchesDug.jpg
    195 KB · Views: 1,499
  • FoundationDone.jpg
    FoundationDone.jpg
    156.3 KB · Views: 1,749
   / Timber Frame Tractor Home
  • Thread Starter
#5  
Having the frame and a foundation I couldn't wait anymore. Pic 1 shows the sills being layed out for anchor bolts. These are 3"x8" sills and the 16' ones took all I had to move them.

I fully intend for this to be a centuries old building some day so I wanted to be sure to keep all water and pests away. I am using foam sill seal and I found stock "over door" flashing in the metal roof catalogue which would fit nicely between the seal and the oak, give me a nice drip edge for water and keep the end grain of the siding dry. Pic 2 shows the "termite sheild" being layed out. Then I got worried about green wood laying directly on galvanized metal so I put a layer of 30 lb. felt on top of the metal. Pic 3 shows the sills set and just a little more tin work to be done.

Kevin
 

Attachments

  • SettingSills.jpg
    SettingSills.jpg
    144.4 KB · Views: 1,579
  • TermiteShield.jpg
    TermiteShield.jpg
    192.9 KB · Views: 1,650
  • SillsDone.jpg
    SillsDone.jpg
    154.2 KB · Views: 1,585
   / Timber Frame Tractor Home
  • Thread Starter
#7  
Now it was time to start pulling timbers out of the pile and assembling bents. Last Saturday a buddy stopped by and one by one we picked timbers out and used the FEL to get them to the foundation. Each one of the posts is 8"x8"x9'4" w/o the tennon and the girts 8"x8"x10'4". Easily 200 lb. ++ each. Pic 1 shows the middle bent being layed out for assembly. Pic 2 shows the middle and rear bent all assembled and ready to be raised. Pic 3 shows a closeup of the joinery.

Putting these two bents together only took a couple of hours so it was then a mad scramble that night to pull enough guys together to raise the main part of the building on Sunday.

Kevin
 

Attachments

  • AssemblingBents.jpg
    AssemblingBents.jpg
    193.6 KB · Views: 1,678
  • 2BentsReady.jpg
    2BentsReady.jpg
    225 KB · Views: 1,432
  • BentsReady2.jpg
    BentsReady2.jpg
    157.2 KB · Views: 1,620
Last edited:
   / Timber Frame Tractor Home
  • Thread Starter
#8  
Well I was sucessful in getting a bunch of guys commited to a Sunday barn raising so up at 5:00am Sunday making a big pot of chili. If your gonna make 'em work then you gotta feed 'em.

As I said, I am a traditionalist but being such requires some thought on how to raise such a thing without the expense and hassel of a crane rental. I stop by the forestry forumn now and again and there was an excellent thread on using a gin pole so I set out to make one.

A 16' 4"x6" PT timber cut and braced, two 2500 lb. blocks and 100' of 3/4" manila rope later I was ready to raise it. My ciphering estimates the pole will easily handle 1/2 ton and still be safe. Pic 1 show everything rigged waiting for the help to arrive. Pic 2 show the pole up and ready to lift. We estimated the back bent to be in excess of 750 lbs.

Pic 3 shows her in mid lift. It took two on the block and tackle with both of us weighing in at least 250 each to lift it. Pic 4 - Almost up. Pic 5 - Got it in the air and she stood right up.

Kevin
 

Attachments

  • GinPoleRigged.jpg
    GinPoleRigged.jpg
    195 KB · Views: 1,578
  • ReadyToLift.jpg
    ReadyToLift.jpg
    195.2 KB · Views: 1,412
  • HereSheGoes.jpg
    HereSheGoes.jpg
    219.3 KB · Views: 1,542
  • AlmostVerticle.jpg
    AlmostVerticle.jpg
    220.5 KB · Views: 1,426
  • Verticle.jpg
    Verticle.jpg
    218.3 KB · Views: 1,626
   / Timber Frame Tractor Home
  • Thread Starter
#9  
The middle bent didn't have as much timber in it and a couple of more guys stopped by so we just dead lifted it. Pic 1 shows it up with nailers in. The picture taker was slacking so nothing on that lift.

With the two bents up it freed up some more assembly room so the third bent (front) was assembled and readied for raising. Since the gin pole has to lift near verticle and there was no place to guy it to, bent 3 needed a little help from the FEL and alot of man power to get her standing. Pic 2 shows her going up you can see the nailers hanging from the middle bent waiting to fit in. Pic 3 shows that it needed a little persuasion to get it in the mortises.

Kevin
 

Attachments

  • No2WentQuick.jpg
    No2WentQuick.jpg
    217.5 KB · Views: 1,276
  • No3GoingUp.jpg
    No3GoingUp.jpg
    207.1 KB · Views: 1,158
  • NeedsSomeHelp.jpg
    NeedsSomeHelp.jpg
    207.8 KB · Views: 1,465
   / Timber Frame Tractor Home
  • Thread Starter
#10  
Got all three bents standing and pegged together. I only used 6 nails for the whole thing and those were for some temporary bracing.

Now the top plates needed to be raised. These are 8"x8"x16' timbers that need to go 10' in the air and gingerly set down so everything fits. Pic 1 shows everyone looking. Pic 2 shows one on its way up. Still took two on the block and tackle to get it up. We estimated that these were in the range of 400 ++ lbs each. Pic 3 shows it almost set lining up all the braces and Pic 4 shows the other side up and set.

Kevin
 

Attachments

  • TopPlatesNext.jpg
    TopPlatesNext.jpg
    200.8 KB · Views: 1,214
  • UpSheGoes.jpg
    UpSheGoes.jpg
    211.6 KB · Views: 1,134
  • AlmostSet.jpg
    AlmostSet.jpg
    207.5 KB · Views: 1,162
  • OtherSideSet.jpg
    OtherSideSet.jpg
    199.7 KB · Views: 1,408
 
Top