Installing my Ventless fireplace

   / Installing my Ventless fireplace #1  

Richard

Elite Member
Joined
Apr 6, 2000
Messages
4,823
Location
Knoxville, TN
Tractor
International 1066 Full sized JCB Loader/Backhoe and a John Deere 430 to mow with
Wifey wanted this for Christmas but other issues kept it from happenig like that.

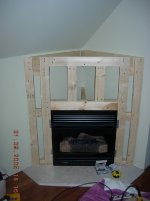
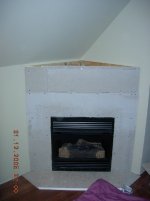
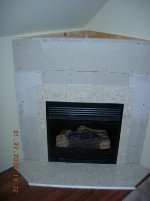
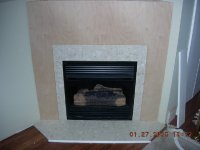
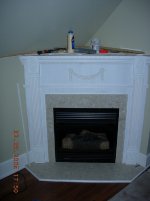
None the less, the wheels are in motion. This is a propane ventless fireplace, in the bedroom (10,000 btu) and is remote/thermostatically operated, as well as manual of course.

To cut down the pictures, I didn't show the "first" installation of it where the wifey said she wanted "this & that" and I had no clue how to accomplish it all.

After SHE realized she was asking a bit much, she agreed to redo it and I tore it all down and put it up this way. It turned out to be MUCH easier to install this way, than the way she'd wanted.
 

Attachments

  • 582586-1.JPG
    582586-1.JPG
    84.4 KB · Views: 154
   / Installing my Ventless fireplace
  • Thread Starter
#2  
Installing the stuff on front that the marble will be glued to
 

Attachments

  • 582589-2.JPG
    582589-2.JPG
    73.3 KB · Views: 187
   / Installing my Ventless fireplace
  • Thread Starter
#3  
Wifey attaches the marble (for the second time) this is the part she redid and I had to rip the first part out, fix the backer board and let her reinstall the new format
 

Attachments

  • 582592-3.JPG
    582592-3.JPG
    92 KB · Views: 124
   / Installing my Ventless fireplace
  • Thread Starter
#4  
Cutting the plywood was a REAL pain in the hiney as I had to cut it in one piece, cut it to fit into a corner with mitres on each side, AND cut the hole for fireplace all by freehand.

I DID buy a new Milwaukee circular saw /forums/images/graemlins/cool.gif and a sharp as all getout Freud blade at the recommendation of the HD dude. That blade did a BEAUTIFUL cut on the plywood (3/4 Birch)
 

Attachments

  • 582596-4.JPG
    582596-4.JPG
    89 KB · Views: 160
   / Installing my Ventless fireplace
  • Thread Starter
#5  
The semi finished fireplace.

Wifey still has to figure out some of the details she wants on it, but that's her issue, I'm just the grunt man.

The top isn't installed yet
 

Attachments

  • 582597-5.JPG
    582597-5.JPG
    80.1 KB · Views: 141
   / Installing my Ventless fireplace
  • Thread Starter
#6  
Some of the trim pieces butting up the the fireplace itself, were too tall. The only way we could get them to fit was to shave them down.,

Wifey suggested I hand hold them and use a jigsaw /forums/images/graemlins/shocked.gif

I told her I'd use the rotozip as I'd mentioned on this site a while back (rotozip upside down inside bucket with "table" on top to work on)

I used the straight edge I bought for plywood cuts and did a nice job.
 

Attachments

  • 582599-6.JPG
    582599-6.JPG
    95.8 KB · Views: 123
   / Installing my Ventless fireplace
  • Thread Starter
#7  
more
 

Attachments

  • 582600-7.JPG
    582600-7.JPG
    91.1 KB · Views: 116
   / Installing my Ventless fireplace
  • Thread Starter
#8  
The part I was trimming. Since the trimmed edge went against the fireplace, the rough edge didn't matter
 

Attachments

  • 582601-8.JPG
    582601-8.JPG
    46.4 KB · Views: 126
   / Installing my Ventless fireplace #9  
Nice job - looks pretty cozy already.
 
   / Installing my Ventless fireplace #10  
Looks great! I just wish I had enough room in my bedroom for one of those!

Lawrence
 
 
Top