Richard
Elite Member
- Joined
- Apr 6, 2000
- Messages
- 4,822
- Location
- Knoxville, TN
- Tractor
- International 1066 Full sized JCB Loader/Backhoe and a John Deere 430 to mow with
Situation: Just tiled floor in bathroom. Prior to tile, floor was simple concrete that we waited until now to get around finishing.
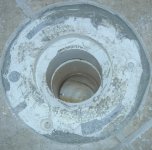
When the floor was first poured they made it flush with the toilet flange. Now that we’ve added tile the flange is roughly ¼” to maybe 3/8” of an inch below the floor.
In addition to that, the tabs used to insert the bolts are WAY off from being square to the wall. From the view of the picture #1, I’m facing the wall fairly square and the bolt holders should be at about 3:00 and 9:00. As you can see… their battery stopped!
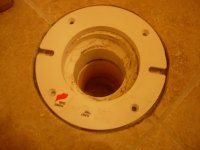
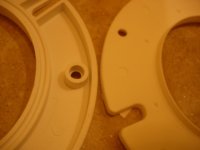
Pics 2 & 3 also show how the holes are filled with concrete.
I was told I need to get an extender and that’s fine. It’s shown in pic 4. I was specifically told I’d need to get TWO extenders so the flange is raised above the floor and able to set into the toilet. Though that’s fine & dandy when I put ONE of them on the floor, part of it (maybe ½ of it is essentially flush with the floor and the other 1/2 of it is slightly ABOVE the plane of the floor tile. Meaning in part, perhaps the flange isn’t perfectly level, the floor isn’t perfectly level or some combo of both.
I WANT to get a flange that allows some adjustability for the attachment bolts but the only style I found at HD have the discrete slots for the bolts to slide in.
In picture 5 are pics of each type I bought. I now have FOUR of the extenders, two of each type. The one on the right is slightly thinner than the one on the left and the one on the left seems to have a better area to seal (the channel just inside the opening).
Ok, so that’s the basic issue as I see it (oh and if it helps, I think I got a #10 wax ring… never did I know that they make different wax rings.
Ok…my question is basically what is the best way to mount these extenders?
I was thinking of putting 4 holes & concrete screws in the BASE unit, silicone an extender on top of it and drill through IT’S 4 holes (through it’s 4 holes but creating 4 MORE holes in the one underneath, not using the first flanges existing holes since they'd already have screws in them) so I could screw it down also, but on a rotated angle from the first. Meaning, I COULD line the screw holes up but since the bolt receivers are NOT square to the walls I have to rotate it SOMEWHERE to align the toilet.
I would then rotate the second extender (and silicone it) so the receiver holes are square to the wall and drill through IT’S four holes so in total I’d have 16 concrete screws going around this thing… 4 on each ‘level’ with each level rotated a bit from the prior level.
Somehow I got to thinking this is making a mountain out of a molehill and thought I’d put it to my brethren at TBN as to the best way to mount the new toilet.
WHY on earth they didn’t make the initial flange square to the wall is beyond me.
Any thoughts on the best way to attach these flanges so I can put the toilet in?
(any thoughts ARE appreciated)
When the floor was first poured they made it flush with the toilet flange. Now that we’ve added tile the flange is roughly ¼” to maybe 3/8” of an inch below the floor.
In addition to that, the tabs used to insert the bolts are WAY off from being square to the wall. From the view of the picture #1, I’m facing the wall fairly square and the bolt holders should be at about 3:00 and 9:00. As you can see… their battery stopped!
Pics 2 & 3 also show how the holes are filled with concrete.
I was told I need to get an extender and that’s fine. It’s shown in pic 4. I was specifically told I’d need to get TWO extenders so the flange is raised above the floor and able to set into the toilet. Though that’s fine & dandy when I put ONE of them on the floor, part of it (maybe ½ of it is essentially flush with the floor and the other 1/2 of it is slightly ABOVE the plane of the floor tile. Meaning in part, perhaps the flange isn’t perfectly level, the floor isn’t perfectly level or some combo of both.
I WANT to get a flange that allows some adjustability for the attachment bolts but the only style I found at HD have the discrete slots for the bolts to slide in.
In picture 5 are pics of each type I bought. I now have FOUR of the extenders, two of each type. The one on the right is slightly thinner than the one on the left and the one on the left seems to have a better area to seal (the channel just inside the opening).
Ok, so that’s the basic issue as I see it (oh and if it helps, I think I got a #10 wax ring… never did I know that they make different wax rings.
Ok…my question is basically what is the best way to mount these extenders?
I was thinking of putting 4 holes & concrete screws in the BASE unit, silicone an extender on top of it and drill through IT’S 4 holes (through it’s 4 holes but creating 4 MORE holes in the one underneath, not using the first flanges existing holes since they'd already have screws in them) so I could screw it down also, but on a rotated angle from the first. Meaning, I COULD line the screw holes up but since the bolt receivers are NOT square to the walls I have to rotate it SOMEWHERE to align the toilet.
I would then rotate the second extender (and silicone it) so the receiver holes are square to the wall and drill through IT’S four holes so in total I’d have 16 concrete screws going around this thing… 4 on each ‘level’ with each level rotated a bit from the prior level.
Somehow I got to thinking this is making a mountain out of a molehill and thought I’d put it to my brethren at TBN as to the best way to mount the new toilet.
WHY on earth they didn’t make the initial flange square to the wall is beyond me.
Any thoughts on the best way to attach these flanges so I can put the toilet in?
(any thoughts ARE appreciated)