I am wanting to have a pig picking this year as a going away party for a few folks that I teach with who are moving out of our district. I have never cooked a whole hog myself, but I am a quick learner and pretty detail oriented. Besides, as long as I keep a keg nearby, I am sure to have lots of help with the project.
Who has built their own pig roasting pit and cooked their own hogs? Any ideas, plans, recipes, suggestions, or free cases of beer would be accepted.:licking:
thanks, all!
We did a pig roast for the 4th of July this year and there are many things you have to take into consideration. First thing is no drinking until the pig is nearly done cooking. Put together a task list. We ordered the pig and requested a 80 to 100 pound pig. What we got was a pig that dressed out at 120 pounds. We had 75 people show up for the roast and we had more than enough pork to feed over 100 people. Once you pick up your pig make sure that you have plenty of ice and a place to put the pig and totally cover it with ice. We used a 5 foot bathtub and plastic lined it and then used a whole bunch of ice. Biggest fear is the pork going bad before you even start cooking it.
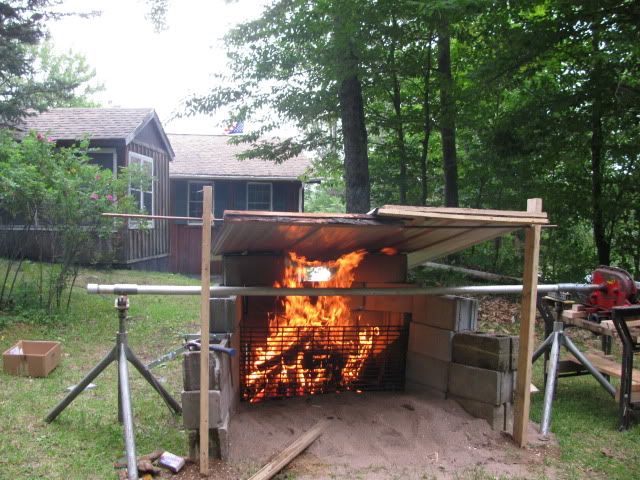
Here is a picture of the pit we built and the test fire we started to see how things would be. It is constructed of cinder blocks and then we had metal roofing to put on top to keep the heat in on the pig. Turned out we had to replace the roofing metal as it had a coating on it that was melting and falling into the fire. Quick rush out to home depot and we had galvanized metal roofing for the top cover.
Inside the pit we had a metal grate that was placed about two feet from the back and totally across the the blocks. The plan was to put the charcoal behind the grate so the heat would raise up and provide the cooking heat to the pig.
Once we found out that the heat would certainly be hot enough we went on
worked on the rotator setup. This included two tripod stands that would hold the 11/4 aluminum pipe that would be used to hold the pit. And made the stand that would hold the motor drive unit. This is a farm wagon unload unit that we picked up from a local guy that just had it hanging around. It is a gear reduction motor unit that had plenty of power to turn the pig constantly during the cooking. This ran off from 120 VAC.
This all took place the week before the pig roast, but we felt we were ready for the task. All we had to worry about was picking up the pig, hoping it did not rain, have enough block ice and ice cubes to cover and keep the pig chilled, have enough guys showing up in the morning of the roast to help put the pig on the pipe and wrap it with chicken type wire so it would not fall off during the cooking process.
The morning of the roast we were up[ and working on the preparing of the pig at 5 AM. There was five men there to get the pig connected to the pipe and then wrap it with wire. We found out that the pig was too long to fit into the pit area, so we had to move the blocks out some and finally I decided to cut off the rear legs (feet) so it would fit and be able to rotate with out the feet hitting the blocks.
You can see the flames from the charcoal in the rear of the pit. The pig is actually in front of the grate so we had zero problems with flames of the grease droppings. We also had a thermometer watching the internal temperature of the pit and we were able to maintain 350 degrees F during the cooking. The cooking started at 6 AM and we took the pig off at around 2:30 Pm so it was in the heat for around 81/2 hours. We did a hot cook because I was afraid of contamination of the meat.
There is a drip pan beneath the pig. We put that in there because of one guy that kept saying we should catch the drippings and based the pig. We to shut him up I put a pan down, we never did base the pig!
And if everything goes okay you will end up with a nicely cooked pig off from the pipe, apple in mouth and it is ready to cut up. We had a professional cook on our staff and he directed the cutting with the one other person there to do cutting following directions from the chef.
This picture shows the tools for cutting up the meat. We also have a oil cloth table covering. It will be messy so be sure to have towels and paper towels around. You have to keep the area clean and no one should be permitted to walk up and start picking at the pig. Keep hands away. Have plastic gloves available for the people handling the cutting up and moving the meat to pans.
Just about this time it is safe to have a few beers, thank everyone that worked hard to bring this off and if you are like we were you will sneak off and take a short sleep...
Some interesting sites:
3 Guys from Miami roast a pig! How we build hog roasters.
Spit-Roasting
Build Your Own Pig Roaster | Barbecue is good for us.
IV. Items that make the cook's life easier:
Meat Thermometer to ensure 170?コ Internal Temperature
" Burn Barrel" container to start coals in
Container of water for possible heat source flare-up.
Sturdy table for the "catch-all" items and final carving
Knife or cleaver for chopping
Chopping block
Paper Towels
Plenty of aluminum foil
2 pair of thick rubber gloves for handling pork - This is a 2 person job!
Apron
Container for sauce - allow 2 quarts of sauce per 75 pounds of pork.
Chicken wire for tying pig to rotisserie spit.
Extension cord with UL approval for outdoor use, grounded 3 prong plug
Pliers for tightening wire during cooking process
V. PREPPING THE PIG & STUFFING INFORMATION:
Prepare the pig by washing it inside and out, giving particular attention to the ears, snout and feet. Place a block of wood between the jaws and thoroughly salt the inside of the cavity. If you wish to stuff the pig, now is the time to do it. Stuff the pig's cavity with whole Italian sausage links and whole, cleaned fryer chickens, bread stuffing, sauerkraut or whatever you feel like putting in there. Sew the cavity opening with butcher's string to keep the stuffing in place during the cooking process.
(we had the meat place clean the pig, and it was in excellent shape when we got it}
Place a support bar clamp (dog bone) on the spit and tighten.
(We made our clamps out of 11/2” pipe clamps and then welded spikes onto the clamps. These were pushed into the pig chest and rear end)
Place a skewer on the spit and tighten
Run the spit through the center of the pig, running the skewer into the pig.
Place the second skewer on the spit and secure tightly against the pig.
Place the support bar through the bottom of the dog bone clamp.
Place the second dog bone clamp over the spit and support bar and secure
Tie pig's feet to the bottom support bar.
Carefully anchor all parts of the carcass to the spit by balancing and securing it with wires or chicken wire. This will require 2 strong people!
Since the back and loin area cook most rapidly, the pig must be secured in such a way that it will not flop about and break as it approaches doneness. Tie the legs to the support bar and cover the tail and ears with foil to prevent charring. The rate of cooking can be adjusted somewhat by varying the fire - hotter in the ham and shoulder and medium in the loin.
VI. PREPARING THE FIRE:
The fire (charcoal briquettes) should not be directly below the spit. We suggest 30 lbs. of charcoal to start. Do not use the self starting type of charcoal. Arrange the charcoal the length of the pig in two rows, about 12 - 15 inches apart. Either position a drip pan or lay a mound of sand directly under the pig to catch the grease dripping from the pig. Fat dripping in to the fire can cause a burst of flame that could char the outside of the pig. You will need to add approximately 10 pounds of charcoal per hour of cooking time. It will help if you have a separate barrel or can to start the charcoal in so you are only adding lit charcoals to the pit.
(we ended up using 16 bags of charcoal during the cooking process so plan on buying enough so you don’t run out)
That is about it. sorry for getting so involved. Have fun with it! If you would like more information on our success and failures just let me know. We had so much fun we are already planning the pig roast for this years 4th of July!
Wayne