Suggestions for Siding On Old Shed

   / Suggestions for Siding On Old Shed #1  

BSVLY

Silver Member
Joined
Sep 2, 2006
Messages
220
Location
Desert Southwest
Tractor
Kioti CK30 HST
shed.jpg


We have bought a property and this old shed is in bad shape. For a while I was thinking whomever built it was a real dummy; since it was built with all the framing boards sideways instead of on-end and also it was stapled together like kitchen cabinet framing. It has a very robust floor of 2X8's and is supported by huge lumber skids. Odd. The 1/8" plywood skins are so weathered that they are delaminating and there are a couple holes in the sides too. The plywood door is shot and the hasp fasteners have pulled right out of the wood.

Then I figured this odd shaped shed out. It was a shipping crate for a radar unit. The info was stenciled onto the back of the crate and is barely visable now. It was a shipping container holding a huge piece of equipment for an FAA radar site. The previous owner had snagged it surplus, obviously, and used it as a welding shed I was told. No wonder it was not built to code nor to last. It was designed to be disposable.

We want to save it now & use it as a wood storage shed. We will keep BBQ stuff , hardwood logs and cedar fencing boards etc. in there.

One suggestion by a neighbor to make it last was to use roofing shingle material to cover the sides cheaply. Just get some shingles and a roofing nailer? never worked with roofing materials before. Another said try that paintable fiberboard house siding. BTW-It has no windows.

Anyone have an idea on a good way to skin this box to extend the life without spending a bundle? We don't want it to look bad ; yet we don't need it to look like a fancy store bought shed either. Just want to extend the utility a few years & have it be water tight.

Sorry-that's the only pic I have at the moment.Those are Poles from an unfinished Pole Barn behind it. I posted on that P-Barn a while back.

Thanks for any suggestions on skinning the crate..
Rich
 
   / Suggestions for Siding On Old Shed #2  
Shingle the top and if the walls are not too far gone a good coat of oil-base paint might do it.
 
   / Suggestions for Siding On Old Shed #3  
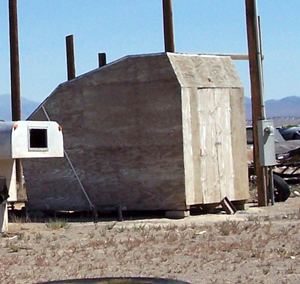
OK, you said you just want it to be weathertite for as little money as possible and you're not to worried about how it looks. Time is also money, so we don't want to make it too complicated.

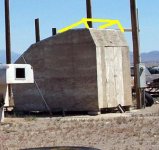
First, I'd get a roll of house wrap, and wrap it all the way around the sides of the building. It's probaby not tall enough to make it on the peaks, so don't worry about it, Just be sure to get a good overlap of at least a foot with two feet being better. Staple it on with a roofing stapler. Then cut a piece off that is several feet wider on either side than what you have left to cover at the peak. Overlap this over the first layer by several feet and drape it over the roof. Staple it all down on the sides and onto the roof. It should be done so that water running down the side will go all the way down the wall without getting under the house wrap.

You should have some of the house wrap going up onto the roof all the way around. That should also be stapled to the roof before you do anything else. There should be no loose pieces that are not stapled down.

At the door, cut a big "X" and fold the ends into the building along the door jams. To do it right, the door should have been removed, but I sort of think there is no real door fram, just a hole cut into the wall. Wrap the fabrick around and into the building. Staple it down.

To cover the sides and make it last, the cheapest material you will find right now is OSB siding. Some people don't like the way it looks, but that's up to you. More money will give you more options, but this will work and it will last for decades. Nail or screw it on to all your walls all the way up to the roofline.

Now you need to flash the edge of the roof where it meats the walls. There are several types of flashing to choose from, but the cheapest and simpliest is just a simple "L" shaped flashing. Put it on over the top edge of the OSB and attache it to the roof with Galvanized nails or tacks. The idea is that water will not be able to get behind the OSB or even on top of it. Water will come into contact with the flashing and then run down the outside of the OSB.

Overlap your corners with the lowest parts going on first. You always want to overlap with the highest points going on top of the lowest ones.

The cheapest and easiest roof is gonna be asphalt shingles over tar paper. The cheapest stuff will work fine for this. Unroll the tar papar and staple it down from the lowest point first. Cut the ends off to be even with the flashing after you staple it down. Then overlap it a the lines on the paper. Do this until you get to the peak. Then do the other side until you get to the peak. At the peak, overlap both sides and staple it down.

Rembember that the tar paper is what keeps the water out. It must have total coverage and it must overlap itself so that water will run downhill and off of the building.

To protect the tar paper, you put on the shingles. First row is done backwards at the very bottom. Turn the shingle so the tabs are faceing up and the top, straight edge is at the edge of the roof and overlaping your flashing just a bit. Nail this one down on the lines on the shingle. Always nail on the lines. Three nails per shingle is good. You don't need a nail gun for this as it's such a small job. The next run will go right over the top of that backwards one, but now the tabs are facking downwards. Overlap your seams and nail it down on the lines. Work your way up to the peak, then do the other side the same way.

To do the peak, you need to cut your shingles at the tabs. Look at the shingle and see the space between the tabs. Cut there to the back of the shingle to make each tab it's own shingle. DO NOT cut off the tabs, but make sure you cut the entire shingle into three smaller shingles. This is if you bought three tab shingles.

Start at one end and fold the shingle over the peak so the tap end is facing out. Overlap each tab and work your way to the center of the peak. Stop and do the same thing from the other side. At the middle, just overlap both ends to tie them together.

It will take awhile for the sun to relax the shingles and let them lay flat. Don't worry if they are sticking up. When they get hot, they will lay falt and actualy melt into each other.

Caulk all the sideing edges and paint.

What is the door like? To protect it a little, you can nail a strip of the "L" flashing over it to get water comeing down the wall away from the door and the top edge of the wood. You can also put a piece of flashing on the top edge of the door to protect and keep it dry too.

Do the door the same as the walls, or replace it all together. I'd have to see better pictures of it to know anything more specific.

Have fun,
Eddie
 
   / Suggestions for Siding On Old Shed #4  
roll roofing should work just fine if the ply will hold the nails. use the plastic washer nails and overlap the roof onto the sides. do it on a warm sunny day.
 
   / Suggestions for Siding On Old Shed
  • Thread Starter
#5  
Thanks for the replies fellows.

weldingisfun - It is too far gone for paint. The picture shows the best side, The opposite side is buckled and is heaved-up and has some holes.

Eddie-Wow-Thanks for the lesson on roofing. I just may go that route. The roof does not even have a peak! It was a crate-so the top of the "box" is flat. Worse yet- it has bowed downwards a bit in the middle from snow loads. The previous owner had put some tar paper up there and there are signs of snow standing up there and leaking through. A sheet of poly was originally put over the box's top before the ply roof was attached. Evidently the top leaked and the poly trapped some water as it is stretched down into a trough shape where it puddled and dried. So far it has not been a wet winter. Just real cold (-10F).

You guessed it. The door isn't even framed. It must have been just cut into the front of the box (or the back of the crate for all I know) and then the cut-out used as a door by adding some hinges. Pretty crude. I'll at least hang another Plywood door on it and some good hardware.

randy41 - I'll look into that rool roofing & the nails with washers.

Thanks Again

Rich
 
   / Suggestions for Siding On Old Shed #6  
License plates?

mark
 
   / Suggestions for Siding On Old Shed #7  
Rich,

Sorry, I did't realize that the peak was actually a flat spot. You need to get rid of that if you want water to run off your roof and not spend a ton of money of flat roofing materials.

I attached your picture with a few lines to show this, but if it was mine, I'd build a small peak on top of the flat area with some 2x4's and OSB. It wuldn't cost very much, but it will solve the water issue of a flat roof.

Good luck,
Eddie
 

Attachments

  • shed.jpg
    shed.jpg
    33.9 KB · Views: 241
   / Suggestions for Siding On Old Shed
  • Thread Starter
#8  
Thanks Eddie. That tweak on the peak should be an easy one. Got to do that!
Rich
 
   / Suggestions for Siding On Old Shed #9  
Rich. Sounds like you are just a step or so ahead of me. I am having a person come to my place with a one man sawmill. Finally got some of my logs pulled in for sawing. When you say wood storage what you could do is: Follow Eddies advice on the roof pitch. A few bucks now will solve a lot of heart ache latter. Second, could you face it South and replace some of the roof with clear fiberglass/plexiglass and some vents and /or fans and make a solar kiln? Just a thought. I need somewhere to store and dry my lumber after I get it cut. Would love to have a shed but will have to let it air dry covered outside for sometime. Just an idea.
 
Last edited:
 
Top