My pole barn...a solo affair

   / My pole barn...a solo affair
  • Thread Starter
#141  
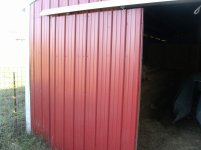
I'd hang the frame then add siding, unless you have help. (other than the dog)
Hanging the frame will be enough of a chore without the extra weight.
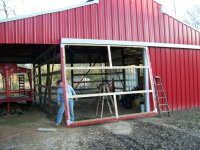
Erik,
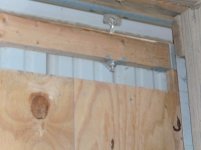
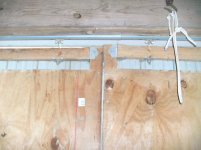
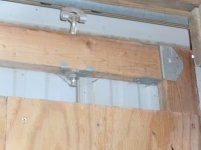
You might have a point as the top of the door frame will be up under the sliding rail flashing and have to lift it up so the hangar bolts will slide into their holes. I might just secure the suspended door frame with straps while I sheet it.
hugs, Brandi
 
   / My pole barn...a solo affair
  • Thread Starter
#142  
Brandi,

I built mine on the ground. Two 6'x10' to cover a 10'x10' opening. 2x4 frame with cross braces. 1/4" plywood on the inside for stiffness. I installed the 26 ga. tin before installing the door.

It was all me and two other "good sized" men could do to lift the doors into the tracks.

It was much easier to get the door square building it on the ground.

If I were to build another one, I would wait about installing the tin until I had the door hung. You do need to go ahead and install the 1/4" plywood on the inside of the frame to keep it from racking when you lift it.

Chris

Firefighter9208,
I didn't think about plywood. Did you sheet the whole door or just corner gussets with plywood? The wire bracing I will use will be liter and will not accumulate creep crawlers in the corners.
hugs, Brandi
 
   / My pole barn...a solo affair
  • Thread Starter
#143  
Brandi, my advice would be to build the frame on the ground and hang it before sheathing because of weight. Even with some help it will be heavy. What I would do though is when you have the frame on the ground and can square it up properly, tack on some temporary diagonal supports on the inside of the door. Once hung you can add your finish material on the outside face to lock it square and remove the inside temporary bracing.

MarkV

MarkV,
Thanks for the input. I hope the wires and splice plates and angle braces will hold the "squareness" until I sheet it with tin.
hugs, Brandi
 
   / My pole barn...a solo affair #144  
I did my 12x11' (Sliding door) with Wire tension turnbuckles to adjust square.

I added the rollers to the top and slid it onto the channel then squared it up, then sheeted it. Worked great and there was NO way I could ever have done it alone with anything more attached to the door. I didn't have a tractor at the time and I'm not sure it would help in any case as it was tricky enough to get the rollers into the channel.

Next time I do it, I'll probably hang the top with rollers into the channel, then build it while hanging, using the Wire Tensioning to square it. But as I didn't try that method I'm not sure if it would or would not work. Sure would have been easier though weight wise, if it were to work.

My building method.... trial and error..... :D
 
   / My pole barn...a solo affair #145  
Firefighter9208,
I didn't think about plywood. Did you sheet the whole door or just corner gussets with plywood? The wire bracing I will use will be liter and will not accumulate creep crawlers in the corners.
hugs, Brandi

Brandi,

I built my doors the way a local company that builds pole barns and chicken houses builds their sliding doors.

1. Lay 2x4's flat on the ground. You don't want the door real thick, so you'll be looking at the flat "wide" side of the 2x4.

2. I bought metal corner braces. You'll see in the pictures.

3. I put a 2x4 around the outside and one every 2' on center top to bottom (Across the door). That was you had something to screw the tin and plywood to.

4. Sheath the whole inside of the door with 1/2" or 1/4" plywood, but leave a gap at the top to get to the adjusting hardware.

5. If you'll have help ( 1 person) and use The Big Red Beast to hang the doors, I would go ahead and put the outside tin on the doors before installing them.

Here are the pics:
 

Attachments

  • abby garret barn door 013.jpg
    abby garret barn door 013.jpg
    388.7 KB · Views: 1,279
  • abby garret barn door 011.jpg
    abby garret barn door 011.jpg
    417.9 KB · Views: 747
  • abby garret barn door 015.jpg
    abby garret barn door 015.jpg
    482.4 KB · Views: 857
  • abby garret barn door 014.jpg
    abby garret barn door 014.jpg
    370.9 KB · Views: 1,139
   / My pole barn...a solo affair
  • Thread Starter
#146  
I did my 12x11' (Sliding door) with Wire tension turnbuckles to adjust square.

I added the rollers to the top and slid it onto the channel then squared it up, then sheeted it. Worked great and there was NO way I could ever have done it alone with anything more attached to the door. I didn't have a tractor at the time and I'm not sure it would help in any case as it was tricky enough to get the rollers into the channel.

Next time I do it, I'll probably hang the top with rollers into the channel, then build it while hanging, using the Wire Tensioning to square it. But as I didn't try that method I'm not sure if it would or would not work. Sure would have been easier though weight wise, if it were to work.

My building method.... trial and error..... :D

FxdGrMind,
Thanks! :) I have been planning to hang the top board and go from there to get accurate measurements. I am not sure which way I will go after that, but it will be clear to me on that day.;) Probably a little of doing it both ways.:rolleyes: If that makes any sense.:D
hugs, Brandi
 
   / My pole barn...a solo affair
  • Thread Starter
#147  
Brandi,

I built my doors the way a local company that builds pole barns and chicken houses builds their sliding doors.

1. Lay 2x4's flat on the ground. You don't want the door real thick, so you'll be looking at the flat "wide" side of the 2x4.

2. I bought metal corner braces. You'll see in the pictures.

3. I put a 2x4 around the outside and one every 2' on center top to bottom (Across the door). That was you had something to screw the tin and plywood to.

4. Sheath the whole inside of the door with 1/2" or 1/4" plywood, but leave a gap at the top to get to the adjusting hardware.

5. If you'll have help ( 1 person) and use The Big Red Beast to hang the doors, I would go ahead and put the outside tin on the doors before installing them.

Here are the pics:

Firefighter9208,
Thanks.:) That is basically how I had it built in my mind.;) However, I need to buy some 2x4s to put in the middle for screwing tin to. I didn't think of that.:eek: My frame will be 2x6s. I do want to find the corner braces like you installed. Also, my barn is red with white trim like yours! I am gonna get some white 3 foot squares of tin and make the door a red and white checker board.:D:cool: I also have red trim from Mueller to go on the end boards and bottom board.
hugs, Brandi
 
   / My pole barn...a solo affair #148  
Brandi,

I bought the brackets at home depot. Shouldn't be too hard to find.

Chris
 
Last edited:
   / My pole barn...a solo affair
  • Thread Starter
#149  
Brandi,

I bought the brackets at home depot. Shouldn't be too hard to find.

Chris

Ok. Thanks. That will make the frame easier to build then the way I was going to brace it and maybe cheaper! I know right were to go at Lowes. I try not to do Home Depot.
hugs, Brandi
 
   / My pole barn...a solo affair
  • Thread Starter
#150  
Luke and I hung the frame of the barn door last Saturday. It was easier than I thought. I hung it to get dimensions for brackets under the door to roll on when opening and closing. I will hang metal after final hanging of the door. Look close and you will see the "X" bracing wire that really works to put the frame square.
It has almost had no work on it the last two years while taking care Mom and Dad and their estate, but now I have some cash to finish it. It was two years ago, February, I started the siding. So now the door with it's checkboard siding will be finished soon!
hugs, Brandi
 

Attachments

  • 2-27-10 Brandi with hung barn door.jpg
    2-27-10 Brandi with hung barn door.jpg
    153.2 KB · Views: 678
 
Top