Landscape Rake Build

   / Landscape Rake Build #231  
J_J said:
Larry,

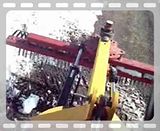
Is that cylinder on the top of your 3 Point frame a double acting cylinder?, if it is , then you have down pressure. If it is a single acting cylinder, you could swap it out for a double acting cylinder, and have down pressure for the rake and any other implement you have.
Hi JJ,
Larry's top link is a double acting cylinder.
In order for it to create down pressure, it would need to be extended so that all the upward movement of his upper lift arms is eliminated. Otherwise his implement would still rise upwards until they hit the end of their upward travel. The other thing is the angle the rake would sit since it's captured by the lift pins, pivoting at that point and would angle down making the rake tine angle very aggressive, so I don't know about that. In his case, since he has a long boom, it might get pretty close to doing that? Have you tried that Larry to see how close the upper lift arms come to bottoming out in the up travel? I use my side links fully extended to reach that point to spread the upper and lower lift apart as much as possible. Then if you extended the top link ...??

Anyway, wow Larry, fantastic results with your rake too.
That video says it all.
That rake works extremely great, much better than Loretta's. Not only in consideration of all the multi features it has, but also from it's size and weight. It really get in there and digs. You have made one heck of a useful tool there.
I'll bet you are super pleased.
 
   / Landscape Rake Build
  • Thread Starter
#232  
Hi Rob,

Thanks for the nice compliments and explaining all that mechanical techno babble stuff. And yes, I am super pleased with how nice it turned out.

As far as down pressure goes - I suppose I could extend the tilt a.k.a. (lift link) cylinders to there max in conjunction with extending the top link to get some down pressure that way, however I see no reason to do that as the 454 pounds of weight the rake has are already enough down pressure as it is. (the video clearly shows lots of material being raked off the surface). IF I need to go any deeper than the tines will go naturally under their own weight. I would rather hook up my 360* rotating scraper / grader blade, or for that matter fire up my Komatsu bulldozer and knock out the job, then use the rake to cover my dozer tracks. Besides that, the lift arms on my tractor are not designed for down pressure. I think it best for me not to test their limits by doing something they were not designed for. I seem to remember someone breaking a lift arm doing something they were not supposed to, but he fixed it better than new, so I guess it wasn't all that bad after all. Anyway thanks for posting on page 23 of this thread, I can't believe it, page 23 :confused: What a marathon build this thing turned out to be, it sparked quite a discussion on a few topics, and I learned allot, especially about powder coating, plus invented a new redneck powder coating technique that may one day become acceptable standard practice, well for me anyway.

Larry
 
   / Landscape Rake Build #233  
Should not be a problem unless you loan your tools to friends....:D
One solution would be a simple spring loaded pin/roller right at the dead point which would prevent the boom settling there, a spring would make it go one way or the other at a breakover point. Just a thought. Awesome fab skills.

GuglioLS said:
Hi J.J. -
OK got it, in other words; Bottom dead center of the cylinder stroke when it's being rotated to change direction. At that point, the angle of the tines is so great it could not be used to rake in that position. As demonstrated in the video, when rotating the tines as long as I change direction on the valve fast enough, the inertia / momentum rotates the tine assembly past that bottom dead center point. I got it "stuck" there a few times practicing until I got the timing down, all I had to do was give it a little nudge (by hand) past the bottom dead center point to get it "un-stuck". One time when it was "stuck" at that bottom dead center point, I had kept cycling the cylinder at full hydraulic power and nothing broke. The rotate cylinder is 2" diameter, the system hydraulic pressure relief valve is set to 2300 psi, if my calculations are correct, that's 7,222 PSI of pushing force available from the cylinder which is peanuts compared to the beefy construction, I think it will be OK.

Larry
 
   / Landscape Rake Build
  • Thread Starter
#234  
scrout said:
Should not be a problem unless you loan your tools to friends....:D .
Scrout,
Ain't that the truth. Since I never loan my tool's out, it's not a problem. Maybe that's why I still have friends?

scrout said:
One solution would be a simple spring loaded pin/roller right at the dead point which would prevent the boom settling there, a spring would make it go one way or the other at a breakover point. Just a thought. Awesome fab skills.

Interesting idea, want to draw that up for me? I think you may have seen the video's where the blade is repeatedly reversed without a hitch? Just so long as I have the timing right when operating the valve, it reverses smoothly.
Thanks for the fab skills compliment.
Larry
 
   / Landscape Rake Build #235  
GuglioLS said:
Ain't that the truth. Since I never loan my tool's out, it's not a problem. Maybe that's why I still have friends?

Very true, Larry !!

I had big trouble with my brother last year, he's so much different than i am, but i like him anyways... Thats why i decided to not get involved in business or money with him anymore... We didnt get any trouble since then ;)
 
   / Landscape Rake Build #236  
I know I'm coming in a bit late on this thread having just found this forum of bad influences (meant in a good way of course ;) ).

I used to powder coat for kodak before I was laid off back in '99 and my brother and his buddy made their own system to get a glass smooth finish on bike frames.

They made a box with a false bottom that was some material that had microscopic holes. Not sure what it was but they bought it in Buffalo,NY in the early '90s so it's not new tech.

They would suspend the frame from a hook on an eyebolt. Then put a welder ground on the part of the bolt that was outside the box. A metal grid just above the bottom of the box was hooked to the positive side of the welder. The powder was spread around the bottom of the box and it was sealed. When air was blown into the box under the false bottom using a compressor the powder would be blown into a cloud. Then the welder was turned on and as the powder passed by the grid it gained a positive charge and was attracted to the grounded metal frame. By varying the power and time the thickness of the coating could be controled.

Once coated the frame was hung in a homemade oven that was heated using a salamander. They actually used two old refridgerator boxes that had metal interiors for the oven one upside down on top of the other with the bottoms cut out and hinged for a door. But any insulated metal box would work. For large items a metal tool shed that was insulated might be just the thing.
I'd put a sheetmetal deflector just inside so that the blower on the salamader doesn't disrupt the powder before it begins to flow.

At kodak we had a mono-rail system to move parts from spray booth to oven. Really just two pieced of angle iron bolted together into an inverted T with metal wheels to run on. This would make moving a large part into and out of the oven and allow you to preheat the oven before moving the part in.
I can think of many used for one in a shop to help move large items around while keeping them at a comfortable work height.

One thing nice about powder is that you can blow or brush it out of any holes before curing so you don't have to mill it out later. For small holes use a pipe cleaner for larger holes a bottle brush. Takes a steady hand but easy to do. You can even use an air gun if you have deep holes and a VERY steady hand.
 
   / Landscape Rake Build
  • Thread Starter
#238  
:licking: :thumbsup:

Thanks

Here's a bit of an update.....

It's been almost 2 years since building this 7 foot robo rake. I finally got a chance to shoot and post some video trying it out on a little over a foot of snow that fell few weeks ago. Surprisingly It works as good pushing and plowing snow as it does raking rocks out of dry dirt. It also minimizes tearing up our asphalt milling driveway in the process. Equally important is the ability to change the angle and offset on the fly. Below is a compilation of video taken widening out our dive a few days after the "big one". As you might notice the central corridor of the dive had already been plowed a few days earlier. I need to keep the drive as wide as possible because we keep getting anywhere from 6" to 12" of new snow every week and need to have a place to put it. As I write this it's snowing yet again in the mountains of New Mexico.

This is a video so click on the picture itself to watch.....


Larry
 
   / Landscape Rake Build #239  
Larry,
Very nice landscape rake, I may have to do something similar.
I am about tapped out on the snow for one year, it looks like your area is gonna get hit tonight. I am expecting to see it in the next hour or so in Ruidoso.

Thought I would mention that Pace Iron in south Albuquerque has an excellent setup for powder coating if you need it. I have had them do some large jobs for me and they are great to work with.
 
   / Landscape Rake Build #240  
Good grief boys,...you tryin to ruin your image or what? Geeeze I hate to show my "geographical-plumb-ignorance" here but,...snow in New Mexico?? Heaven sake we always stop for lunch in Albuquerque enroute to Tucson from Canada and enjoyed the beautiful weather there.

Now you are talking snow??? Oh yes I just went back and read it again and I see its up in the New Mexico "Mountains",......ok then I understand. You had me scratchin my head there. Sorry. I love your part of the country but I think I'll avoid the mountains since we come down to get away from the white stuff!

Although on second thought,...that might be kinda nice to get up in the high country to cool off and plow a bit of snow, ..then drive down below and enjoy the nice weather!!! Perhaps I'll envy you after all?

CHEERS!
. . tug
 

Tractor & Equipment Auctions

2016 RoGator RG1100B Self-Propelled Fertilizer Spreader - Slingshot, Raven Display, Leather Seat (A50397)
2016 RoGator...
2025 Swict 72in Bucket Skid Steer Attachment (A49346)
2025 Swict 72in...
ALLISON TRANSMISSION (A48992)
ALLISON...
2019 INTERNATIONAL LT625 TANDEM AXLE SLEEPER (A45679)
2019 INTERNATIONAL...
2016 John Deere TS Gator 4x4 Utility Cart (A49346)
2016 John Deere TS...
2016 Ford Transit Cargo Van (A48081)
2016 Ford Transit...
 
Top