Boss Plow Quick-Attach Adapter

   / Boss Plow Quick-Attach Adapter #11  
How have you been making out with this??

Chris
 
   / Boss Plow Quick-Attach Adapter
  • Thread Starter
#12  
I've had to deal with few distractions these last two weeks, but I managed to put in a couple hours yesterday. I grounded down the welds on the back of the RT3 Push Beam so it was flush with the quick attach plate and started blasting the old rust and paint off. The push beam just barely fits into my little Harbor Freight blasting cabinet.

Here's some mock-up pics. The Yanmar CL600 loader attaches to the far edges of the QA plate, so I'm not anticipating any clearance issues with the angle iron and bolt fasteners that will be on the back side. So far so good!

IMG_1410.jpg IMG_1411.jpg IMG_1412.jpg IMG_1448.jpg
 
   / Boss Plow Quick-Attach Adapter #13  
Wow! Look it fits like a glove. Should be pretty straight forward hookup.

Chris
 
   / Boss Plow Quick-Attach Adapter
  • Thread Starter
#14  
I'm very happy with the fit of the QA plate, got that off Amazon.com for $138.00 shipped to my door. The seller was Titan distributors.

Got a few more hours in this weekend until forward progress was stalled by a bent 3/4" drill bit. I cut the angle iron to size to make the ribs for the back of the plate, and drilled holes through the push beam. FYI, the push beam steel tube is 1/4" inch thick on each side. Add that to the 5/16" QA plate and 3/16" ribs, the 3/4" Grade 8 bolts will be fastening a full inch of steel, not including the washers.

The grade 3/4" grade 8 bolts have a shear strength of 40,000lbs each. I'm tempted to just bolt the push beam on, it would make it easier to paint and take off should I find another bolt-on use for the QA plate.
.
Not using any fancy tools to this point, a harbor freight 4.5" electric grinder with a cut-off wheel made easy work of slicing the 3/16" plate to size. A Skil tabletop drill press was used to drill the holes through the push beam tube.

drill_holes.jpg
 
   / Boss Plow Quick-Attach Adapter
  • Thread Starter
#15  
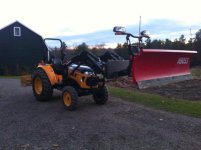
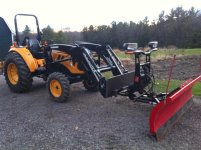
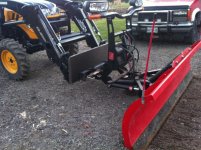
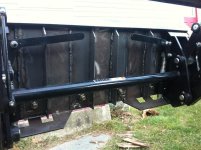
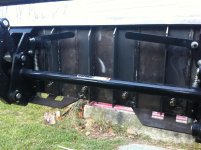
I finished up the welding and drilling today and mounted up the plow manually. By manually I mean I didn't use the electric switch on the plow that operates the lift cylinder to mount the plow onto the push beam, Boss plow owners will know what I'm talking about. The push bar is only bolted on in these pictures, I'm going to leave it like that for now.

It hitched up pretty easy once lined up. I had never hitched the Boss plow without using the electric switch before, but all you need to do is drive in, flip the on/off actuated pin levers, and push the light bar towards the tractor until the spring-loaded pins pop into place. The lift cylinder must always be in float mode when its not being used. Removing the plow from the mount manually was just as easy. It didn't take much effort to push on the light bar to actuate the pins. However, I imagine I can just leave the QA plate attached to the plow once I've retired the truck.

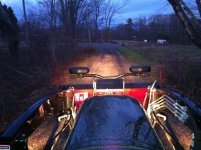
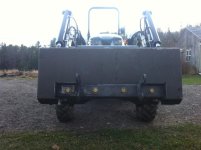
I drove the plow up and down my 400 foot driveway to see how it handled, I'd say it handles better than my half ton GMC, especially in two wheel drive. I did need to be gentle with the loader controls, the plow really sticks out there so you don't want it to shake while lifting and dropping.

Existing tractor lighting seems adequate.

For wiring I'm thinking now I'm just going to wire in the pump solenoid and controls to actuate the right/left cylinders. I don't think I'll add a second battery now, but I'll probably swap out the factory Yanmar battery for an Optima red top or similar.

Onwards to paint and wiring!
 

Attachments

  • IMG_1507.jpg
    IMG_1507.jpg
    92.8 KB · Views: 417
  • IMG_1505.jpg
    IMG_1505.jpg
    59.8 KB · Views: 464
  • IMG_1503.jpg
    IMG_1503.jpg
    85.4 KB · Views: 635
  • IMG_1502.jpg
    IMG_1502.jpg
    104.7 KB · Views: 517
  • IMG_1500.jpg
    IMG_1500.jpg
    85.6 KB · Views: 419
  • IMG_1499.jpg
    IMG_1499.jpg
    83.7 KB · Views: 361
  • IMG_1496.jpg
    IMG_1496.jpg
    61.2 KB · Views: 405
   / Boss Plow Quick-Attach Adapter #16  
Awesome job!! You made it look so simple. It was a great idea to use the skid steer QA. By the way your plow looks to be in great shape. I guess it never had any commercial time just home time. And heck the lighting looks good enough that you might as well remove the lights from the plow.
I acually just purchased a set of wings for my 8' Boss. Ill be doing a couple lots this winter for a friend of mine. The one last thing I need is some rear lighting so Im not running into things. Like I have in the past. :eek::eek::eek:

Chris
 
   / Boss Plow Quick-Attach Adapter
  • Thread Starter
#17  
Getting back to this, yeah the plow is 9 years old and has pretty much only done the 400' gravel driveway and been garage kept. It must have been made during one of the first years for the Rt3/Smart Hitch2 models. I'm glad Boss has stayed pretty consistent with the design, it makes finding parts pretty easy. The plow needs a new hose that got pinched and a little paint touch up and a fluid change, but not much else. I did manage to destroy my original drop stand by not raising it during use before I learned my lesson there. :(

The quick attach parts have been painted, I used gloss black Majic tractor and implement paint from tractor supply, it came out nice and is a pretty good match to the Yanmar gloss black on the loader. I'll use this paint also to touch up the black on the plow. It a takes a little while to dry during early December in Maine, even with paint hardener!

I've got all the electrical parts ordered including the factory connectors to interface with the plow, I think it'll be a clean setup. I think i can get the solenoid and 4 gauge pump wire installed without any permanent modifications under the hood. For controls I'm going to run about 15 feet of 8-conductor 13 gauge speaker wire along the hydraulic lines. The speaker wire has a nice all weather rubber sheath for protection. I think I only need 6 of the wires to operate all the controls (up/down/left/right) with two leftover for lighting if I choose to pursue it. It'll be easy to detach the control wires along with the loader. The two 4 gauge pump wires will come directly from the battery compartment and can be coiled up and stowed on the loader guard when unused during the winter season. Two other 14 gauge wires will be used to activate the plow pump solenoid and power the controller. A 10 amp fuse will be added inline to the controller power. It'll be pretty much just like the truck setup minus the relays for the headlights and directionals.

One thing I really like about Boss is their documentation (attached), its readily available and well written and illustrated. It'll make my efforts to duplicate the wiring a lot easier. :)
 

Attachments

  • boss-install-wiring.pdf
    602.1 KB · Views: 212
  • speaker_wire.jpg
    speaker_wire.jpg
    38 KB · Views: 245
   / Boss Plow Quick-Attach Adapter
  • Thread Starter
#18  
Quick update, I finished the wiring tonight and the plow controller stick and all the functions work! This includes the smart-hitch2 switch that hydraulically connects the plow to the push beam. The float function works too! No wiring modifications were made on the plow side.

Here's what was needed for wiring:
6 plow control wires between the control stick and the 13 pin plug (up, down, left-in, left-out, right-in, right-out)
2 solenoid control wires (one from the control stick and the other from the smart-hitch2 switch through the 13 pin plug)
+/- for the control stick
a solenoid and heavier gauge +/- cable through the solenoid to the plow (for running the pump). I used a short 4 gauge to the solenoid and the power out to the plow is 6 gauge.

Unfortunately it'll be a couple days before I can play with it, but I'll definitely be plowing snow around the yard with my tractor this weekend! :)
 
   / Boss Plow Quick-Attach Adapter #19  
Awesome! I really want to do something like this. However I only have a BX so I think i need to be careful about how much weight i have sticking out in front with only a single (mid) bucket cylinder. I think I will end up looking for a used ATV plow to keep the weight down. Really nice job with the QA plate. Can i ask a stupid question tho? Where does one find steel plate to buy? I can only find some angle iron, channel iron and some square tubing. I am planning on going to a local scrap yard this week to do some 'picking'. But if I wanted to buy some plate... where would I find some nice steel like you have on yours? Or did you buy the QA plate and just weld an existing bracket onto it?
 
 
Top