Jim... I might be just the guy to help you as I have been where you are and now.............
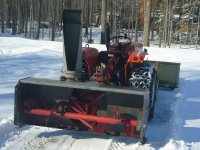
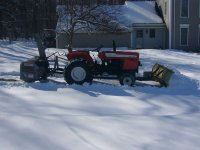
I've got a 60 inch back up style Inland SA-60 blower I picked up used that blew the snow disappointing too. It's a well built unit and I really would prefer not to spend a bunch $$$$ on a newer and lighter construction blower. So I did a lot of reading and some fiddling too. Well, a lot more of both than I care to admit. And the time spent speculating, considering, re-considering and so on and so forth. LOL As received, it was pretty scored up inside the fan housing and the fan pretty grounged up. Needless say prior owner was a horses *** and put probably several tons of gravel through it. So, I probably had about 5-6ft throw distance on the inside and maybe 13ft throw distance at the furthest point. This is as you suppose experimenting with varied deflector angles but always with the tractor spun up at full 540PTO rpm. I got busy removing all the rust first. In the blower housing, in the fan housing, and on the fan too. Seemed to make a small difference but not too much. Keeping in mind its hard to tell sometimes where you're at and where you been cause I don't have unlimited amounts of snow to play with here. You clean up what you got, you see how it works, you make mods and wait for more snow to try out your mods. Or course, temperatures and snow consistencies they do not stay the same from one to the next so you have to do your best to estimate. I then painted the whole inside of the blower with the tractor supply graphite slip paint. This solved my problem completely... now blowing all snow and slush too several hundred feet!!! Ha ha ha. Kidding with you. No, I wish that was the case cause due to my driveway layout config I have to get the snow way out due to the steep slope on the uphill side and the house on the downhill side. [note to thems paying attention here... do build your driveway on the downhill side so you can blow the snow off it downhill and it will not come back at melt time fyi ++, and thereby you will not need to blow the snow hundreds of feet to move it out your way but I've digressed = I did not build the house fwiw LOL]
Anyways. The slip paint did improve the performance slightly. And really only slightly. I was probably getting 8-10ft closest and maybe 15-16ft furthest out. Snow conditions depending. More reading. More thinking. I read about Clarence's impeller kit. Decided to make my own impeller kit with thin angle iron. Considering all sorts of uglyness scenarios should there be "play" in the mechanism and the fan tip extenders hitting down. I discovered, to my dismay, that my impeller housing is not "round". That's right. The top past the outlet chute is tighter than the 90 degrees directly prior to chute location read from bottom to 90 degrees higher. So I was aggravated. I had the option of modifying the fan housing [opening it up] to accomodate my fan tip extensions at the maximum length, or, I could install fan extenders only long enough to "clear" the tight area at the top of the fan housing. Grrrrrrr. I chose the latter and was surprised again to discover that not only was my fan housing not round, it was also not square - if you will??? - from front to back. Huh??? That's right folks. So I did the best I could with the fan extensions leaving about 1/16th inch space at the top for clearance. Fine right? Well, as you rotate the fan around to the point just prior to throw point the fan extensions were then not square to that surface, creating a sort of effect where the back of the fan blade tip was say 3/16th clearance and the front [toward tractor] was say 1/16th clearance! A mess? Yes.
I took this out and tried it on cold fluff snow. Well, the results spoke for themselves. Even with the crooked interface at the final throwpoint entering the chute I literally doubled my throwing distance. I was seeing the snow out at the furthest point in the 31-33ft range paced off.
Again, back I went to fiddling. I was not happy with that crooked interface of fan to fan housing. So, I removed the fan and again modified the fan tip extenders to as close as possible allowing a hair for mechanical clearance say 1/16th inch front to back and square to the fan housing which at that point before the chute is actually square. I then had my fan hitting my fan housing at the top tight point. So I took out the trusty cutting wheel and started modifying the upper housing at the pinch point. Did you ever try to bend formed steel by making cuts and pounding? Trust me, it takes more cuts[by number and length too] than you intended before you will finally get the "clearance" you desire. Which I did on all counts fwiw. LOL I ended up measuring exactly where the fan runs in the fan housing both front and back and making parallel cuts on both sides. Then made a perpendicular cut at the top chute side so that I could pound/bend the housing out away the necessary distance to accommodate my fan tip extenders. I just bent it out far enough and left it there. Figured go try it and see. Hoping for better naturally. I bought the blower to move the snow out and away... not to **** around. Which it seems that's all I've done since getting the **** thing. So right off the bat, warmed up the tractor, set blower on ground, engaged PTO at low rpm and started winding it up. Boom!! Kidding again. Anyways, it coulda worked out that way had I not throttled it down cause the fan housing metal I bent up was now oscillating up and down and was nipping noisily at my fan blade extenders. Ouch, no good there. Shut it all down as the wise man he don't ever work on any energized PTO anything do he?? Found a suitible tool to push in there firmly held in place underneath the chute mount to hold the metal flap back. The plan would be to fix this permanent should the mod work. This will work for now to keep the fan clear.
Went out and tried it on some old snow we had laying around. Not much snow, maybe 4-5 inches which had been around for some days on the yard and had settled if you will. Snow terms only those familiar with snow and clearing it might understand. LOL Well, the blower is now throwing the snow even better out to about 35-37ft outside distance [furthest point measured by pacing off.. my boots exactly a foot long fwiw] at PTO rpm or slightly higher throttled up.
So, I should be happy right? Agreed. But I am not. What I have you can see in the attached video I took. A blizzard is happening all around this blower. Even with no wind, I am getting covered with this powder snow. You can see it in the video. It swirls around especially at the start of your run but ongoing. May as well wear a helmet and I know some do. Its aggravating, because it covers up my instruments, makes the steering wheel slippery and makes for a mess after I'm done cleaning up the tractor/blower/plow. fwiw My conclusion, is that like everything else about this old time [suspect early to mid 70's but Inland blowers are long since gone so if someone knows please confirm???] blower, the chute is a poor design. It's wide at the bottom to overlay the square fan housing discharge. Yet, when overlaying it, they did not put the round chute mount far enough to the outside to completely cover the square fan housing discharge. Which means there are overlays of the round chute housing at the corners of the square fan housing. Common sense tells you this can't improve flow ?? The chute itself is also wide here and as per the picture takes round to a squarish final discharge point. Hardly the smoothest or most streamlined design. I can see on the chute inner body itself where all the gravel hits it, courtesy of the prior A$$hat owners antics there is visible pitting. The chute comes up at an angle instead of straight. The snow comes up, hauling ***** into there, hits the chute about 4-5 or so inches up from the blower body, then follows the contour of the angled chute itself to the top discharge where it is then greeted by the deflector which too, itself, is not a smooth transition but mounted on a hinge behind so it sits say about 3/4" back from the chute itself so instead of deflecting the snow smoothly it gives it one last "hit" if you will in the direction you suppose you want it to go. All this, I assume, is leading me to "wear" a lot of snow. And I am not happy. LOL
I have now put in a thin piece of plastic in the discharge chute which extends from the base where it pivots up to about 8 inches shy of the deflector interface. Its wedged in there good and I mocked it up with clamps on the top underneath the deflector to hold it in place. I know, red neck central. LOL My hope is that this, by removing much of the open space transition in the bottom of the chute and making the transition of the discharge smoother and slippery"er" will maximize the snows velocity as the fan throws it into the chute. Of course this is thin like 32nd of an inch plastic sheet and may well explode the first time I try to use it [ I hope not]. At the deflector, I removed it completely from its mount on top the chute, slid it forward and fastened it in place with more clamps. Experimented a little bit with deflector angle and found I could achieve the same angle as experimental best before by moving the bar adjuster 1 more click down in that position. Now there is a smooth transition from chute to chute deflector.
Why all of this nonsense? Good question. I just wanna blow the **** snow far and minimize the blizzard effect. Geeze! Round and round we go how much time I've wasted with this nobody really knows. And now I'm here waiting for more snow to see if my latest diddlings actually improved anything.
Below is the youtube link to my prior performance described. This is with the fan extenders, housing modified and old graphite paint from the prior year which means some rust coming through and I smoothed it as best as possible with scotchbrite. These do not show any chute improvements but you for **** sure can see the swirl effect I'm dealing with fyi. Unfortunately, I don't know exactly what fixed my blower since I progressed in steps. You might find that just the fan kit would get it done for you but I suspect if you have rusty going on you may wish to delve further. I think if I was you I would be inclined to try Rustlok paint from West Marine instead of graphite slip paint. Put it on right over the rust or with minimal prep cause it needs to have something to hold on to IME. I think it would stick, be durable and provide slip too but you want 3 coatings of this Rustlok to keep the rust away proper and follow the instructions to the letter including exact cure times which in the cold is about 2.5 hours between coats. I would be curious how well that works. Mines already painted up [just did it fresh again to be sure on housing and chute too fwiw] with graphite slip paint so no way Rustlok is sticking to that short of sandblasting it which I am not getting into......... LOL
Simplicity 9523 Allis 5020 Inland SA-60 Snowblower Modified - YouTube