PetersenRockFarm
Bronze Member
Hi All,
Glad to post something to benefit others as you all have been very helpful to me in past few years! I finally dug deeper in to getting an upgrade to my OEM seat in my 2017 Kioti NX6010. Bottom line is the fine folks at tractor seats dot com took the time to discuss measurements and potential fit and it worked. They recommended the Uni Pro™ - KM 1060 Seat & Air Suspension along with KM Grammer Retractable Seat Belt Kit. Pricey but my back and comfort is well worth it.
Unfortunately I only got a few pics. But will write up a few significant notes here hoping to help others
- remove OEM seat. Take the two mounting brackets off the base, keep along with the 4 bolts that secure it into the floor of tractor.
- For ease of maneuvering the new seat, I removed the base from the seat itself. The whole unit is quite heavy. There are 4 bolts, one at each corner, top of bolt is allen wrench (sorry don't know size), bottom is 13mm PEM nut, I had to use breaker pipe on allen wrench to get these loose, blue threadlocker was holding them in tight! Two PEM nuts stayed attached to frame, two came off but were still usable for reassembly. BTW the skirt around base removes easily with plastic pressure pins to access the nut and when you drop nut to find it
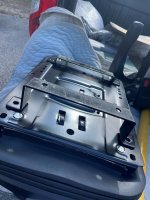
- The OEM brackets under the seat need to be 'splayed out' about a 1/4" total in order for the holes to line up 'width-wise'. I did this by placing in a vise and tapping with sledge hammer - it didn't take much effort and I was able to bend enough without damaging overall function required. I could flatten it to get most of shape back correctly without impacting integrity of bracket.
- There are enough holes in base unit to line up front to rear without drilling new holes.
- Attach seat belt to each side before placing base in to tractor and tightening down. Attach tight enough so they can pivot slightly to maneuver in place when getting base in to place.
- Wiring: there are two wires; one for power and one for pressure seat switch. Since I did not have corresponding connector for power; I cut off the connector; and added a few feet of wire to the existing wire; added an in line fuse on power/red side, and connected a 12v cigarette lighter plug so I could plug in to power at side of cab in cigarette plug. This is by NO means ideal or proper.... not good practice, I know that...please no comments on my choice here...it's what I did for temp install until I can connect properly to keyed power. Pressure sensor wires - up to you how you do that. No comment. It worked... I'll rewire later.
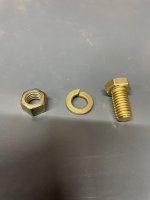
- ok, this part was tough, but easy if you have welder or a friend with welder - attaching OEM bracket to base; I used 4 nuts, split washer & bolts, 3/8-16 x 3/4 Hex Cap Screw bolts (gold). The FRONT left and right were easy to access the OEM bracket holes and insert/tighten nut & bolts to base. Put the FRONT bracket on LOOSELY at floor of tractor and at base of new seat. Then go to rear and tighten those in. The bracket holes had to be rounded out with a 3/8" metal drill to open them up a tad for the 3/8" bolts.
- With the front and rear OEM brackets, rear bracket having bolts tack welded in; place base unit upside down and dry fit the brackets to base. Mark the holes on side of base so when placing in cab you get the rear bolts in the right holes in base
The rear, well not so easy... there is practically no room to get fingers in to hold nut or bolt, never mind a wrench! First, mount the OEM bracket tightly to the base of tractor. Then move to attaching base to bracket... I tried taping nut and washer to wrench...nope, going up vs. down with bolt, nope... finally I settled on Tack Welding the bolts to the OEM bracket so that the threads were facing UP through the bracket/bolt; head underneath bracket facing towards floor of tractor - worked like a charm to hold them in place (after bolting bracket to floor of tractor tightly) - and again, very helpful to mark the side of the base where the bolts would line up to holes in base - this helps a lot when placing the base back in and on top of the bolts, it's easy to drop the base in to the wrong holes since there is a row of them on each side (ask me how I know after placing then tightening in and realizing the front now didn't line up - be easier if the base didn't weigh so much!)
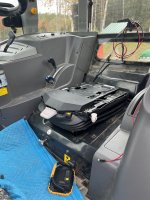
- after getting base in and front bracket tightened to the floor, and to the base, using same bolts/nut/split washer as rear, 3/8-16 x 3/4 then on to placing seat on the base.
- It helps to have skirt removed in the four corners where allen bolts attached through to the 13 mm PEM nuts. Takes a little tractor yoga (or a small framed friend - I'm 6'1" 230 lbs - not fun lol) for those rear bolts. attach tightly...
- tear off plastic on seat and plug in to lighter socket (again, no comments on my temp wiring choice please) fill with air...
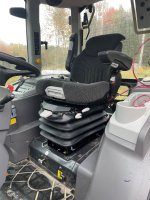
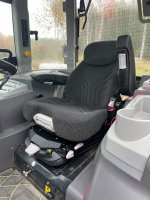
It is a bit higher than OEM, feels absolutely fantastic, the OEM seatbelt would poke hard in to my thigh, no more, the new seat belt does not poke you! the 'ride' is incredible...hopefully no more back aches for 2 days after moving snow for 3 days straight this winter.... at 6'1" tall, not sure how I would feel if I were much taller...head getting close to ceiling but def manageable.
Bottom line, it took 2 half days to install, one if you had these notes and a welder... it fits, it's awesome.
thanks,
Erik
Glad to post something to benefit others as you all have been very helpful to me in past few years! I finally dug deeper in to getting an upgrade to my OEM seat in my 2017 Kioti NX6010. Bottom line is the fine folks at tractor seats dot com took the time to discuss measurements and potential fit and it worked. They recommended the Uni Pro™ - KM 1060 Seat & Air Suspension along with KM Grammer Retractable Seat Belt Kit. Pricey but my back and comfort is well worth it.
Unfortunately I only got a few pics. But will write up a few significant notes here hoping to help others
- remove OEM seat. Take the two mounting brackets off the base, keep along with the 4 bolts that secure it into the floor of tractor.
- For ease of maneuvering the new seat, I removed the base from the seat itself. The whole unit is quite heavy. There are 4 bolts, one at each corner, top of bolt is allen wrench (sorry don't know size), bottom is 13mm PEM nut, I had to use breaker pipe on allen wrench to get these loose, blue threadlocker was holding them in tight! Two PEM nuts stayed attached to frame, two came off but were still usable for reassembly. BTW the skirt around base removes easily with plastic pressure pins to access the nut and when you drop nut to find it
- The OEM brackets under the seat need to be 'splayed out' about a 1/4" total in order for the holes to line up 'width-wise'. I did this by placing in a vise and tapping with sledge hammer - it didn't take much effort and I was able to bend enough without damaging overall function required. I could flatten it to get most of shape back correctly without impacting integrity of bracket.
- There are enough holes in base unit to line up front to rear without drilling new holes.
- Attach seat belt to each side before placing base in to tractor and tightening down. Attach tight enough so they can pivot slightly to maneuver in place when getting base in to place.
- Wiring: there are two wires; one for power and one for pressure seat switch. Since I did not have corresponding connector for power; I cut off the connector; and added a few feet of wire to the existing wire; added an in line fuse on power/red side, and connected a 12v cigarette lighter plug so I could plug in to power at side of cab in cigarette plug. This is by NO means ideal or proper.... not good practice, I know that...please no comments on my choice here...it's what I did for temp install until I can connect properly to keyed power. Pressure sensor wires - up to you how you do that. No comment. It worked... I'll rewire later.
- ok, this part was tough, but easy if you have welder or a friend with welder - attaching OEM bracket to base; I used 4 nuts, split washer & bolts, 3/8-16 x 3/4 Hex Cap Screw bolts (gold). The FRONT left and right were easy to access the OEM bracket holes and insert/tighten nut & bolts to base. Put the FRONT bracket on LOOSELY at floor of tractor and at base of new seat. Then go to rear and tighten those in. The bracket holes had to be rounded out with a 3/8" metal drill to open them up a tad for the 3/8" bolts.
- With the front and rear OEM brackets, rear bracket having bolts tack welded in; place base unit upside down and dry fit the brackets to base. Mark the holes on side of base so when placing in cab you get the rear bolts in the right holes in base
The rear, well not so easy... there is practically no room to get fingers in to hold nut or bolt, never mind a wrench! First, mount the OEM bracket tightly to the base of tractor. Then move to attaching base to bracket... I tried taping nut and washer to wrench...nope, going up vs. down with bolt, nope... finally I settled on Tack Welding the bolts to the OEM bracket so that the threads were facing UP through the bracket/bolt; head underneath bracket facing towards floor of tractor - worked like a charm to hold them in place (after bolting bracket to floor of tractor tightly) - and again, very helpful to mark the side of the base where the bolts would line up to holes in base - this helps a lot when placing the base back in and on top of the bolts, it's easy to drop the base in to the wrong holes since there is a row of them on each side (ask me how I know after placing then tightening in and realizing the front now didn't line up
- be easier if the base didn't weigh so much!)- after getting base in and front bracket tightened to the floor, and to the base, using same bolts/nut/split washer as rear, 3/8-16 x 3/4 then on to placing seat on the base.
- It helps to have skirt removed in the four corners where allen bolts attached through to the 13 mm PEM nuts. Takes a little tractor yoga (or a small framed friend - I'm 6'1" 230 lbs - not fun lol) for those rear bolts. attach tightly...
- tear off plastic on seat and plug in to lighter socket (again, no comments on my temp wiring choice please) fill with air...
It is a bit higher than OEM, feels absolutely fantastic, the OEM seatbelt would poke hard in to my thigh, no more, the new seat belt does not poke you! the 'ride' is incredible...hopefully no more back aches for 2 days after moving snow for 3 days straight this winter.... at 6'1" tall, not sure how I would feel if I were much taller...head getting close to ceiling but def manageable.
Bottom line, it took 2 half days to install, one if you had these notes and a welder... it fits, it's awesome.
thanks,
Erik
Attachments
-
 bolt.jpg2 MB · Views: 47
 -
 nut bolt washer.jpg1.3 MB · Views: 62
 -
 Pic 1 seat in.jpg2.2 MB · Views: 56
 -
 Pic 2 seat base.jpg2.1 MB · Views: 58
 -
 Pic 3 seat in no air .jpg2.3 MB · Views: 58
 -
 Pic 4 OEM base brackets dry fit to new base.jpg1.8 MB · Views: 54
 -
 Pic 5 Bracket to new base offset.jpg1.9 MB · Views: 56