K58 Tuff torq removal from x 304 2006
To start, I removed the mower deck and wheels. Not sure either was necessary, although I probably made more room to work. I didn't remove the fender, or gas tank, instead all the work was done from below. But might have been easier access with them off. After this first time removal, though, i won't bother with any of those removals the next time i do it, since i have a much better idea of where things are and how they fit
Jacking :
first loosen but don’t remove all 4 long vertical bolts(13mm) that hold the transaxle to the frame, easiest while all 4 wheels on ground . Then , if you plan to remove the wheels, loosen wheel lug nuts(16mm) now.
Jack up the frame from rear, then put two jack stands more forward on each side of frame, then remove jack (you’ll need it to lower the heavy transaxle/ axle carrier combo later)
Start by removing the drive belt, which lifts right off the transaxle once the parking brake is set. Let it rest there.
Then, you have to remove the 3 or 4 control rods/shafts that connect to the transaxle. This was actually the hardest part, dealing with small clips, springs etc.
One control rod is the (1/4in diam) run/neutral freewheeling rod that protrudes out the rear of the tractor. it's held on to the trans by one of those cheap tinnerman flat spring nuts (that are the bane of home repair guys like us) After you remove it , use a pair of pliers to push the rod up out of its hole. I could not pull it out by hand, it’s tight.
This next pic view is from lying on floor, on right side of tractor, looking up and towards the center of tractor :


The above pic is from top, which you won’t be able to see until trans is out
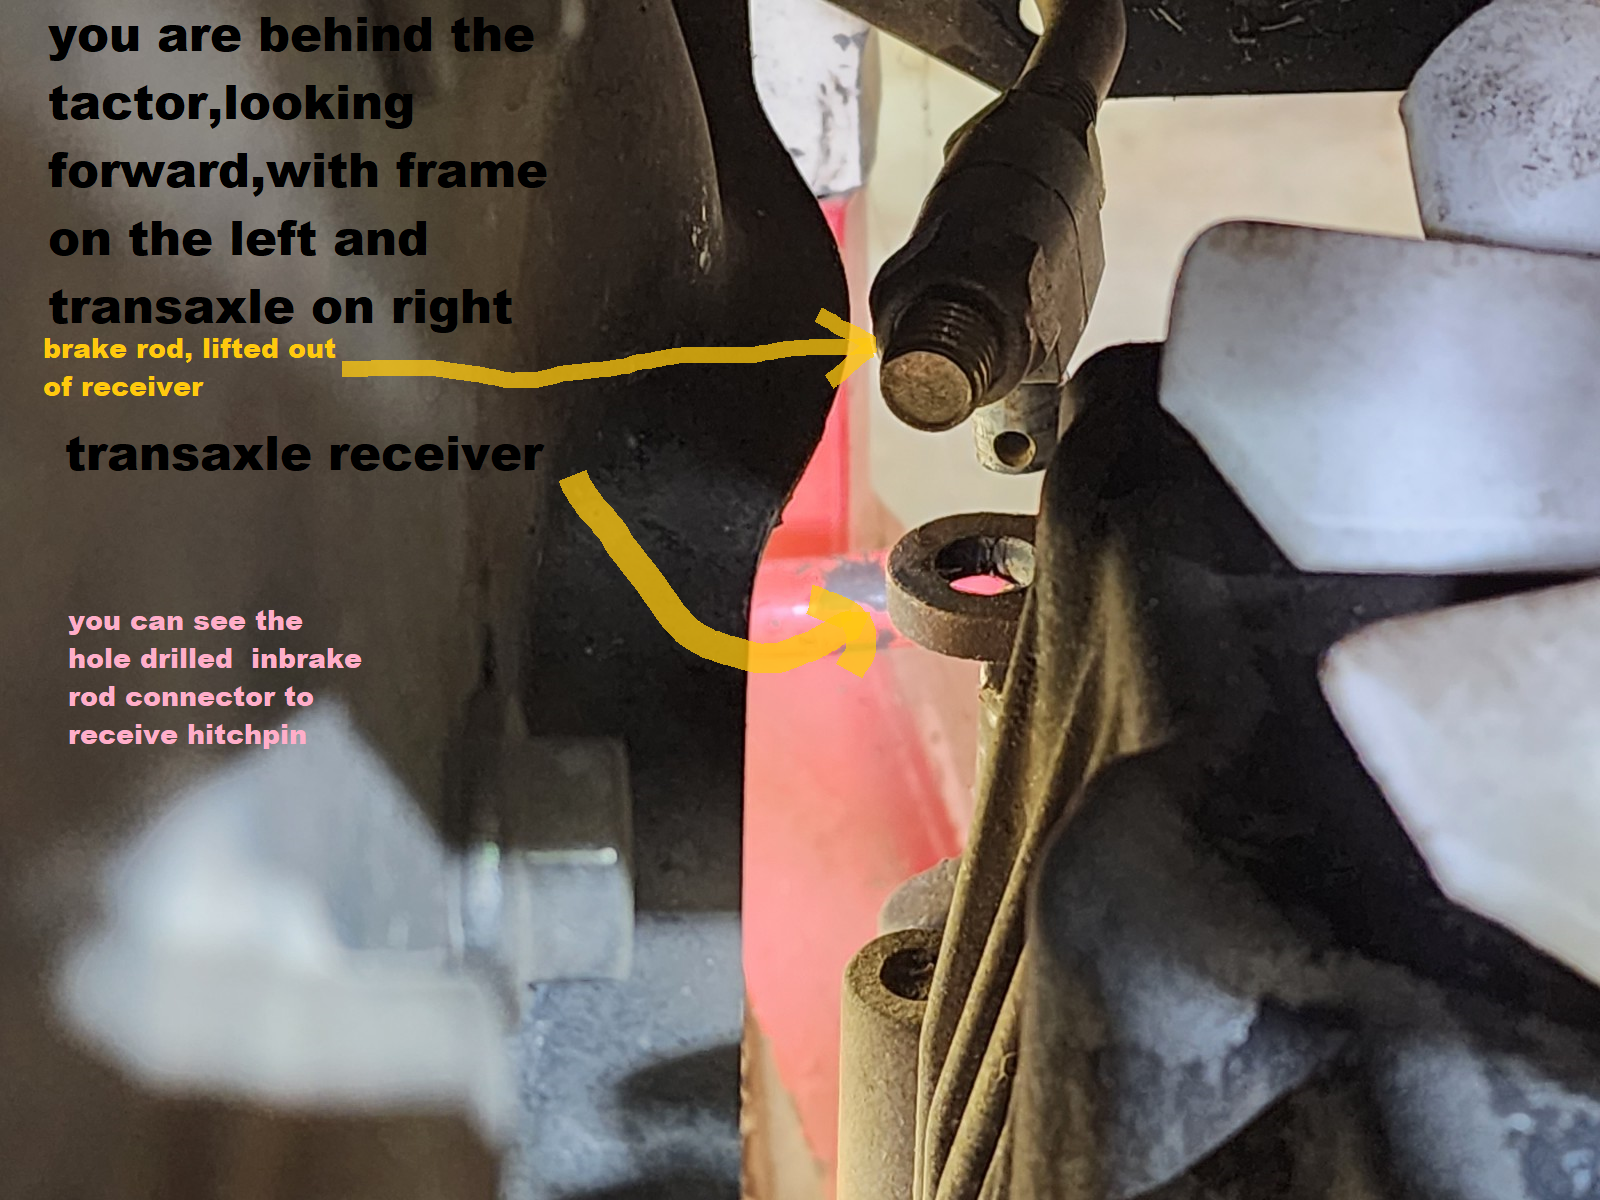
Second: On the left side of the trans is the brake rod which is an easy, obvious disconnection
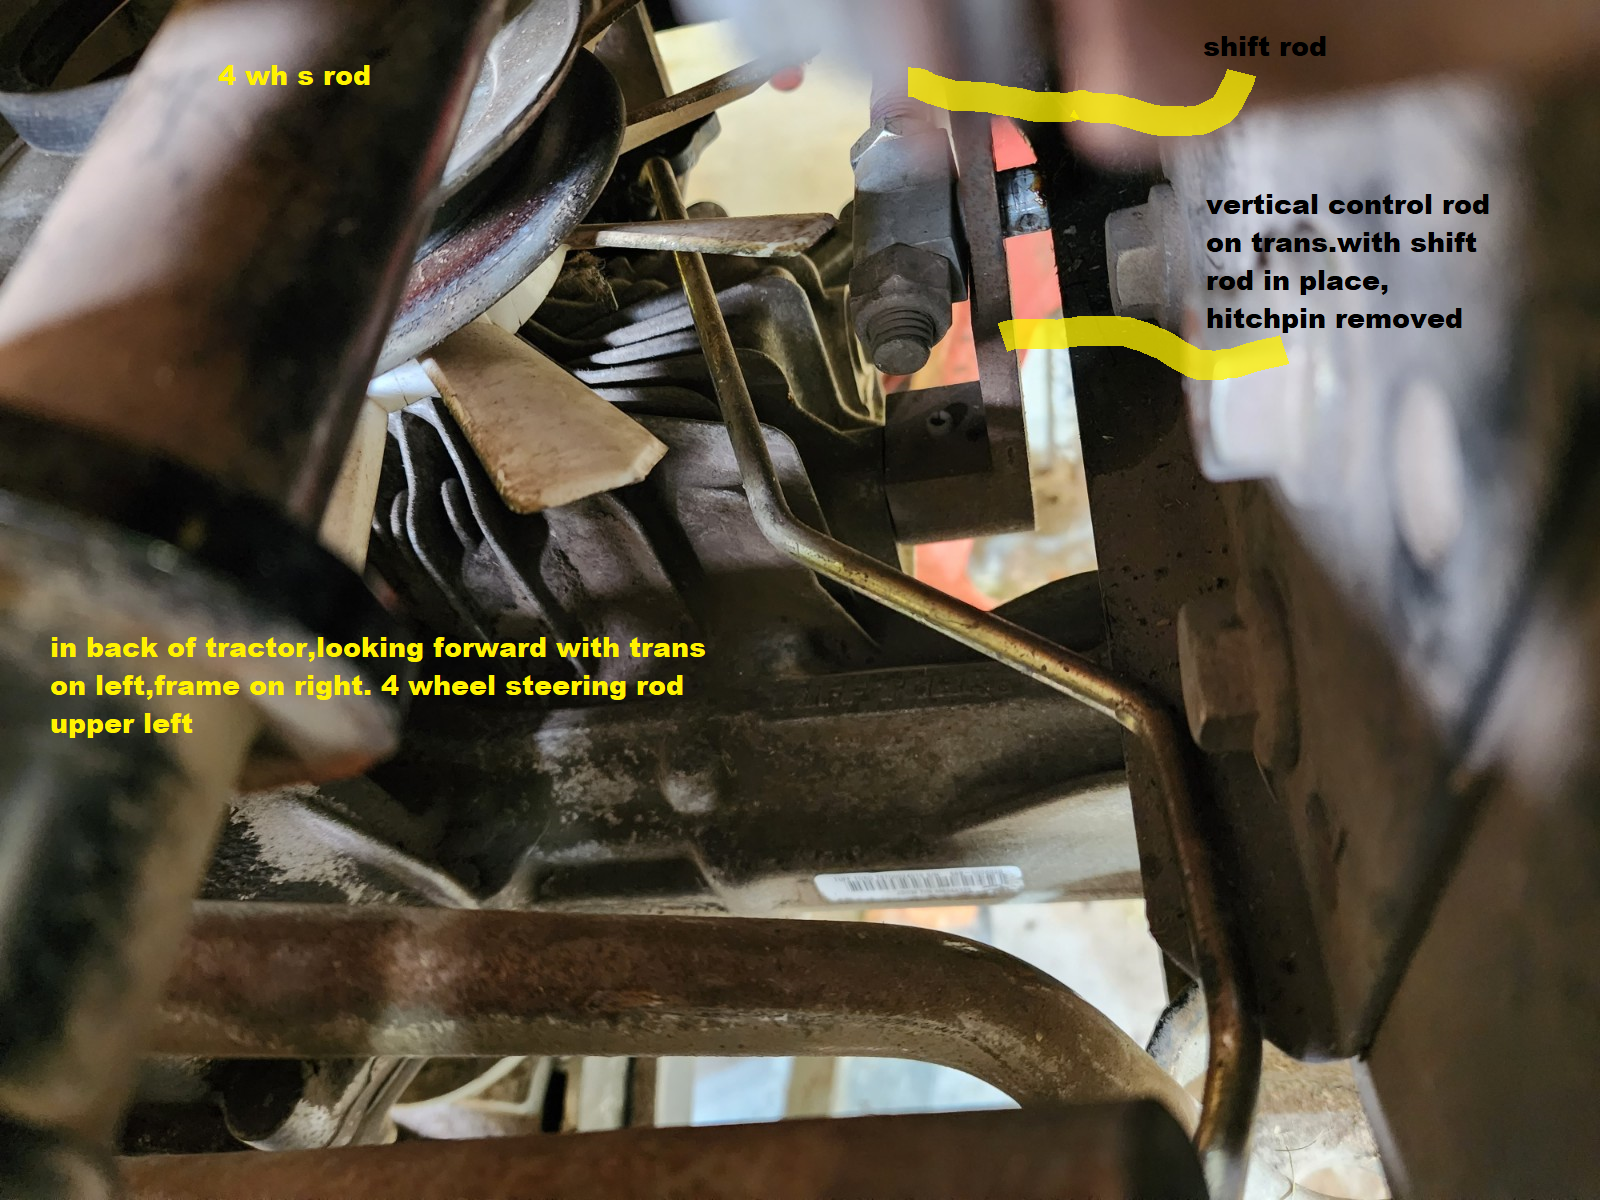
Third and fourth: On the right side, you’ll see a large vertical control rod going up from the trans, w two connections to rods that go forward.
In this pic, you can see the shift rod still installed on the vertical control rod, with its hitch pin already removed and the hole visible
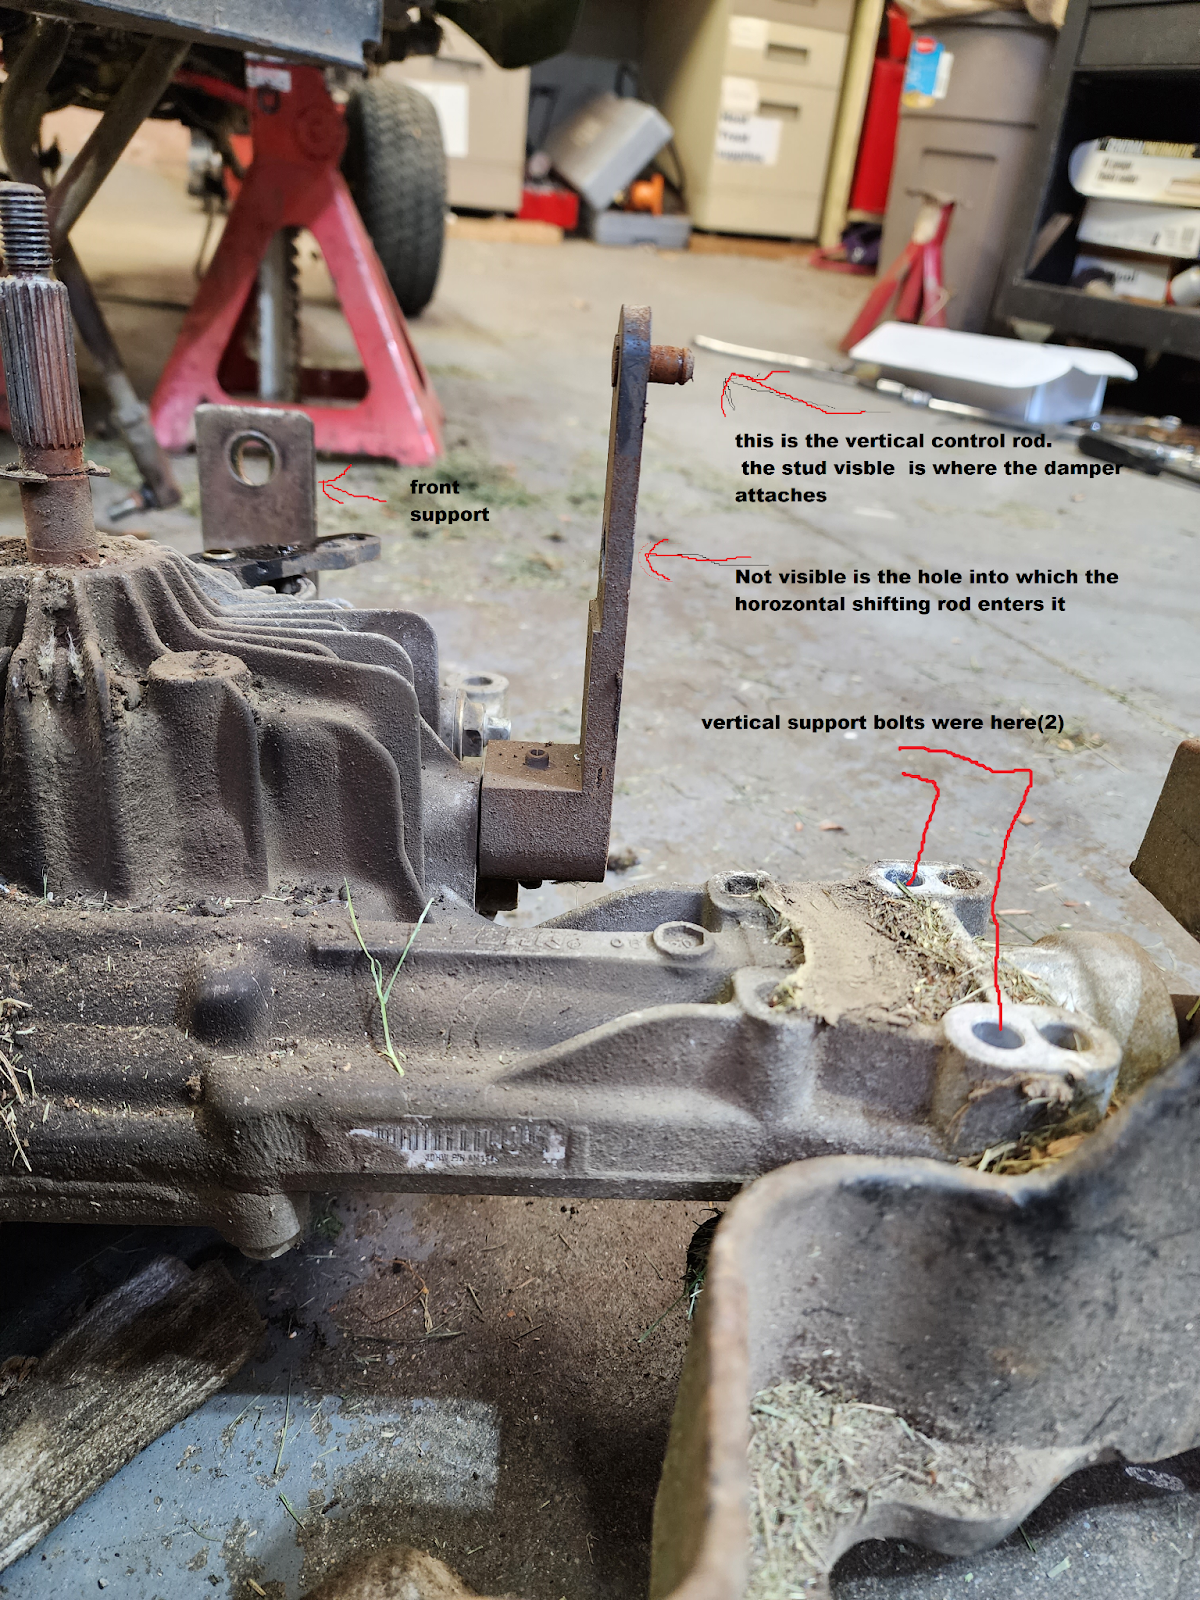
Her is another view of same vertical control rod after trans is out ,and both rods disconnected
The upper connection is a stud for the “ damper” rod, (this might be optional equipment) There's a small clip that holds the damper rod to that stud on the vertical bar, that I could not remove, in spite of the deere manual showing how to .
Instead, to get it out, I removed the bolt holding the forward end of this damper, easily seen about a foot forward, a horizontal stud, going thru a hole on the right side of the frame.
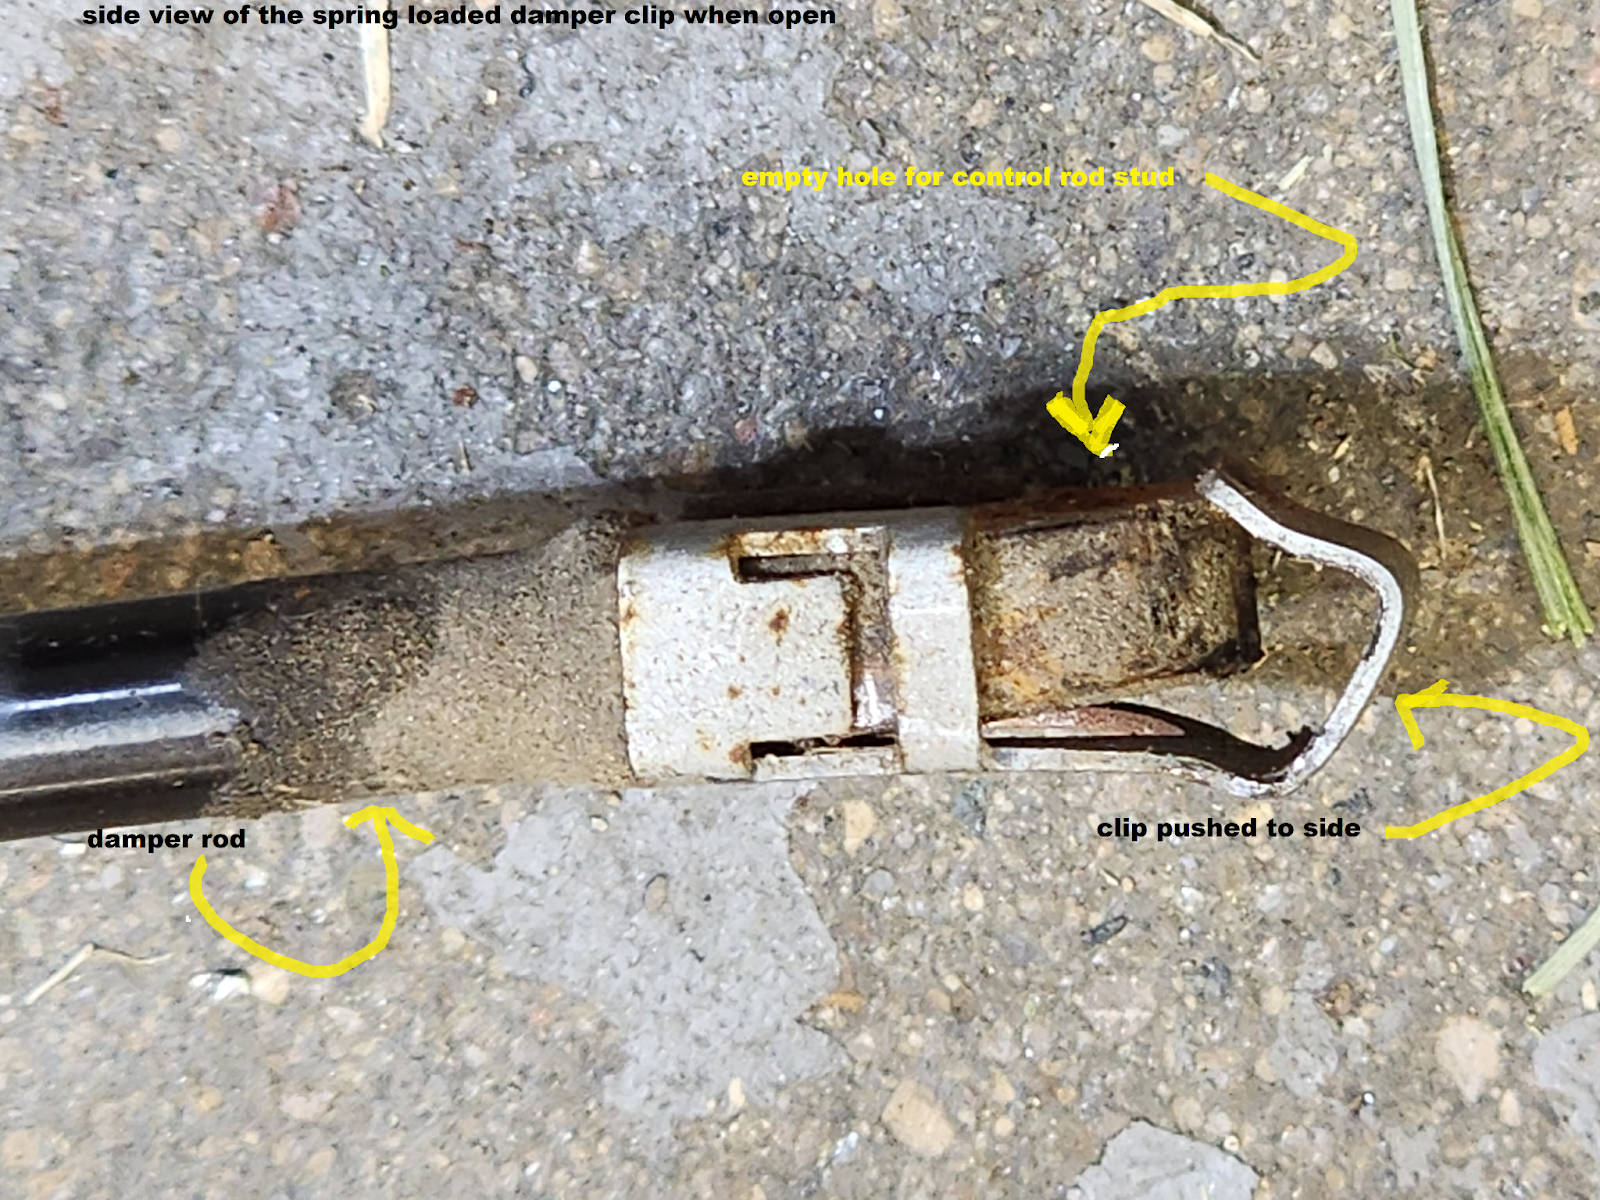
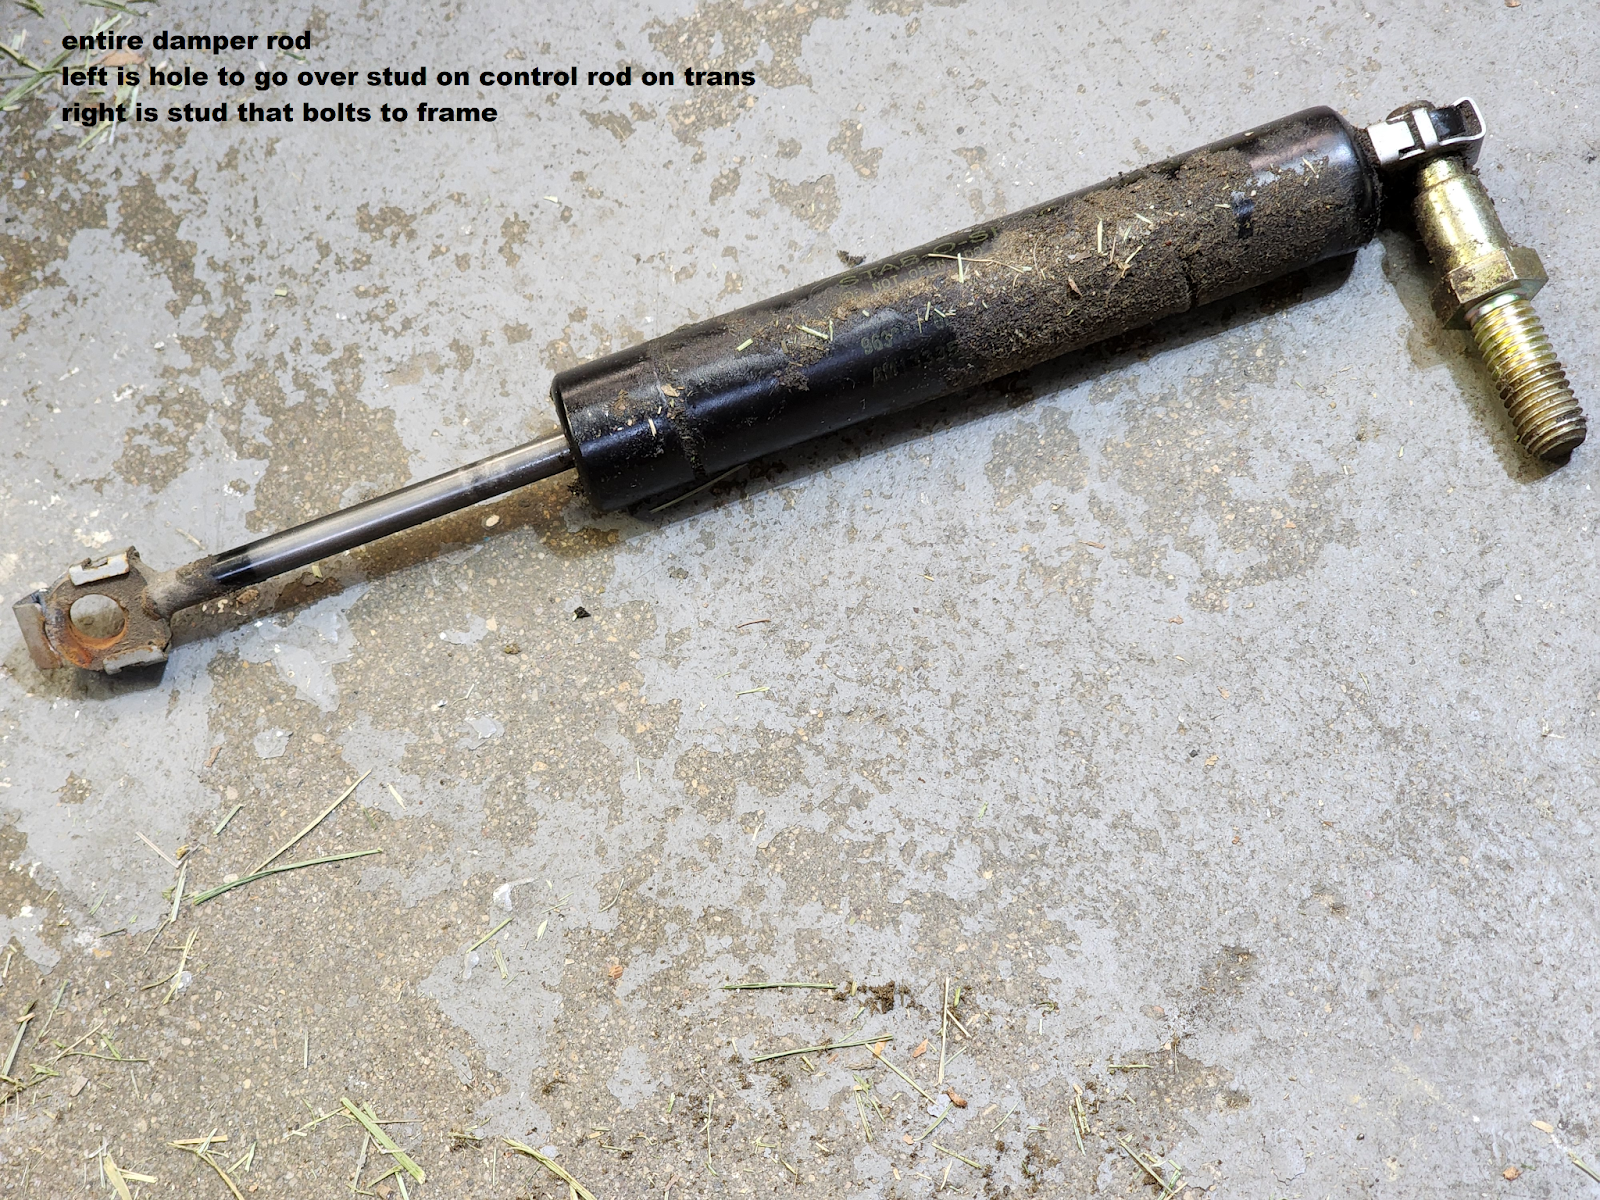
You'll need a 15mm wrench on the inside of the frame to hold the hex on it's stud as you unscrew the visible nut. After the transaxle was removed, I could better see how to disconnect the damper rod clip, see photos. You need a thin screwdriver to partially release the springy clip that fits into a groove on the stud
Fourth :
Lower rod. (the shifting rod) . a pretzel-like Hitch pin holds it in place. Then it can be pushed out of the hole
Put your jack under the trans, then remove the supports:
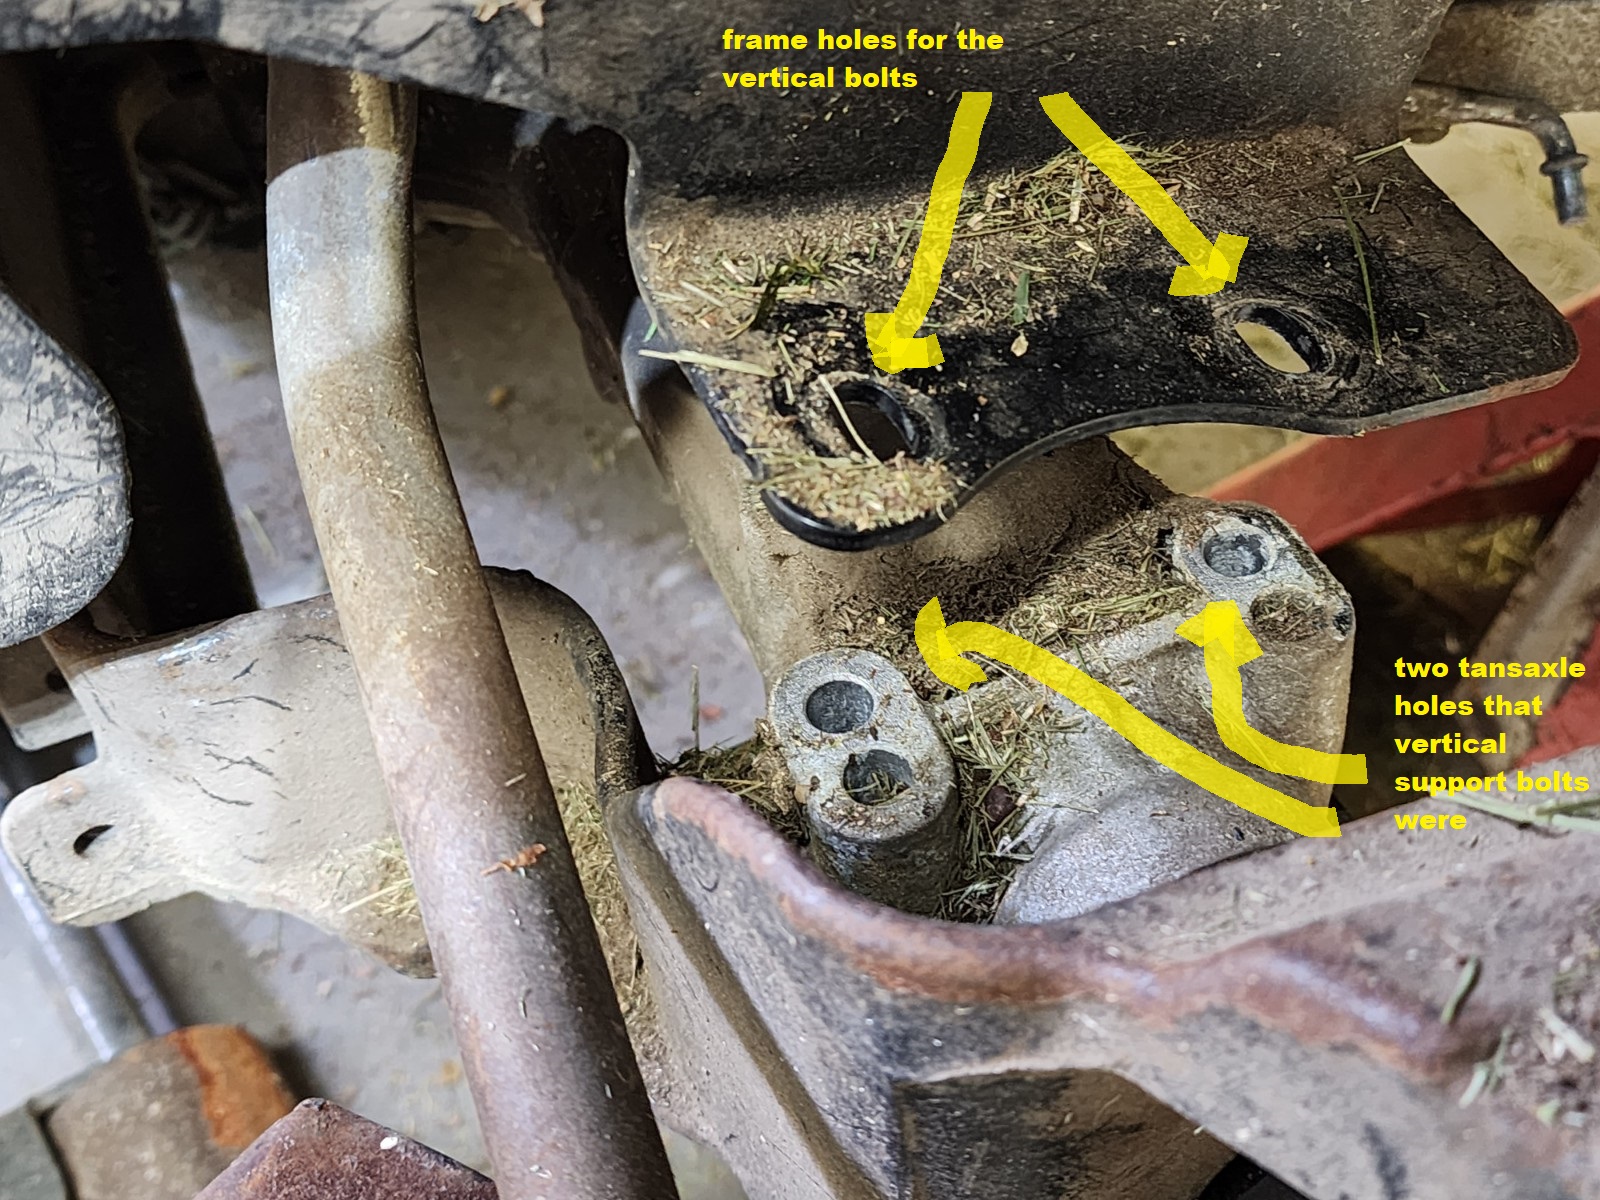
the 4 long bolts that hold the transaxle to the frame, this next pic is after they are removed and trans lowered by a couple of inches
And the one bolt holding the L-shaped front support to the frame
Next pic shows trans and axle carrier combo, on the jack, lowered about two inches, after the 4 long bolts and front support bolt removed. 4ws tie rod visible across bottom, and steering knuckle on lower right . the tie rod shown is only present in 4ws models

For the 4 wheel steering systems, which I have, the rear tie rods are still attached to the steering mechanism which is attached to the frame. You need to remove tie rods(18mm.) to continue lowering the trans (I needed my impact wrench to remove tie rod nuts). Also need a 17 mm wrench to hold top of tie rod to finish unscrewing the nut
The transaxle is now free. It won't be stable on the jack, so be prepared .
It will come down along with the heavy cast iron wheel carrier ( and tie rods if not yet removed , for 4 w steer)
that's the hardest part .
next:
Lift off pulley and fan
draining the fluid:
The flat black drain cover, only accessible after you remove the fan and pulley, is just a very very tight press fit. I used a chisel, you can use something similar to pound it up. Once it’s removed, you'll see the vertical 1 inch diam coin shaped magnet. The amount of steel filings that are adhering tells you how much wear your trans has had since the last cleaning of the magnet. Mine was practically spotless: 17 yrs but only 400 hours,
Next pic of 6x6’s used to hold the upside down trans and carrier above the plastic oil drain pan. It’s heavy enough that i feared it would crush the plastic pan
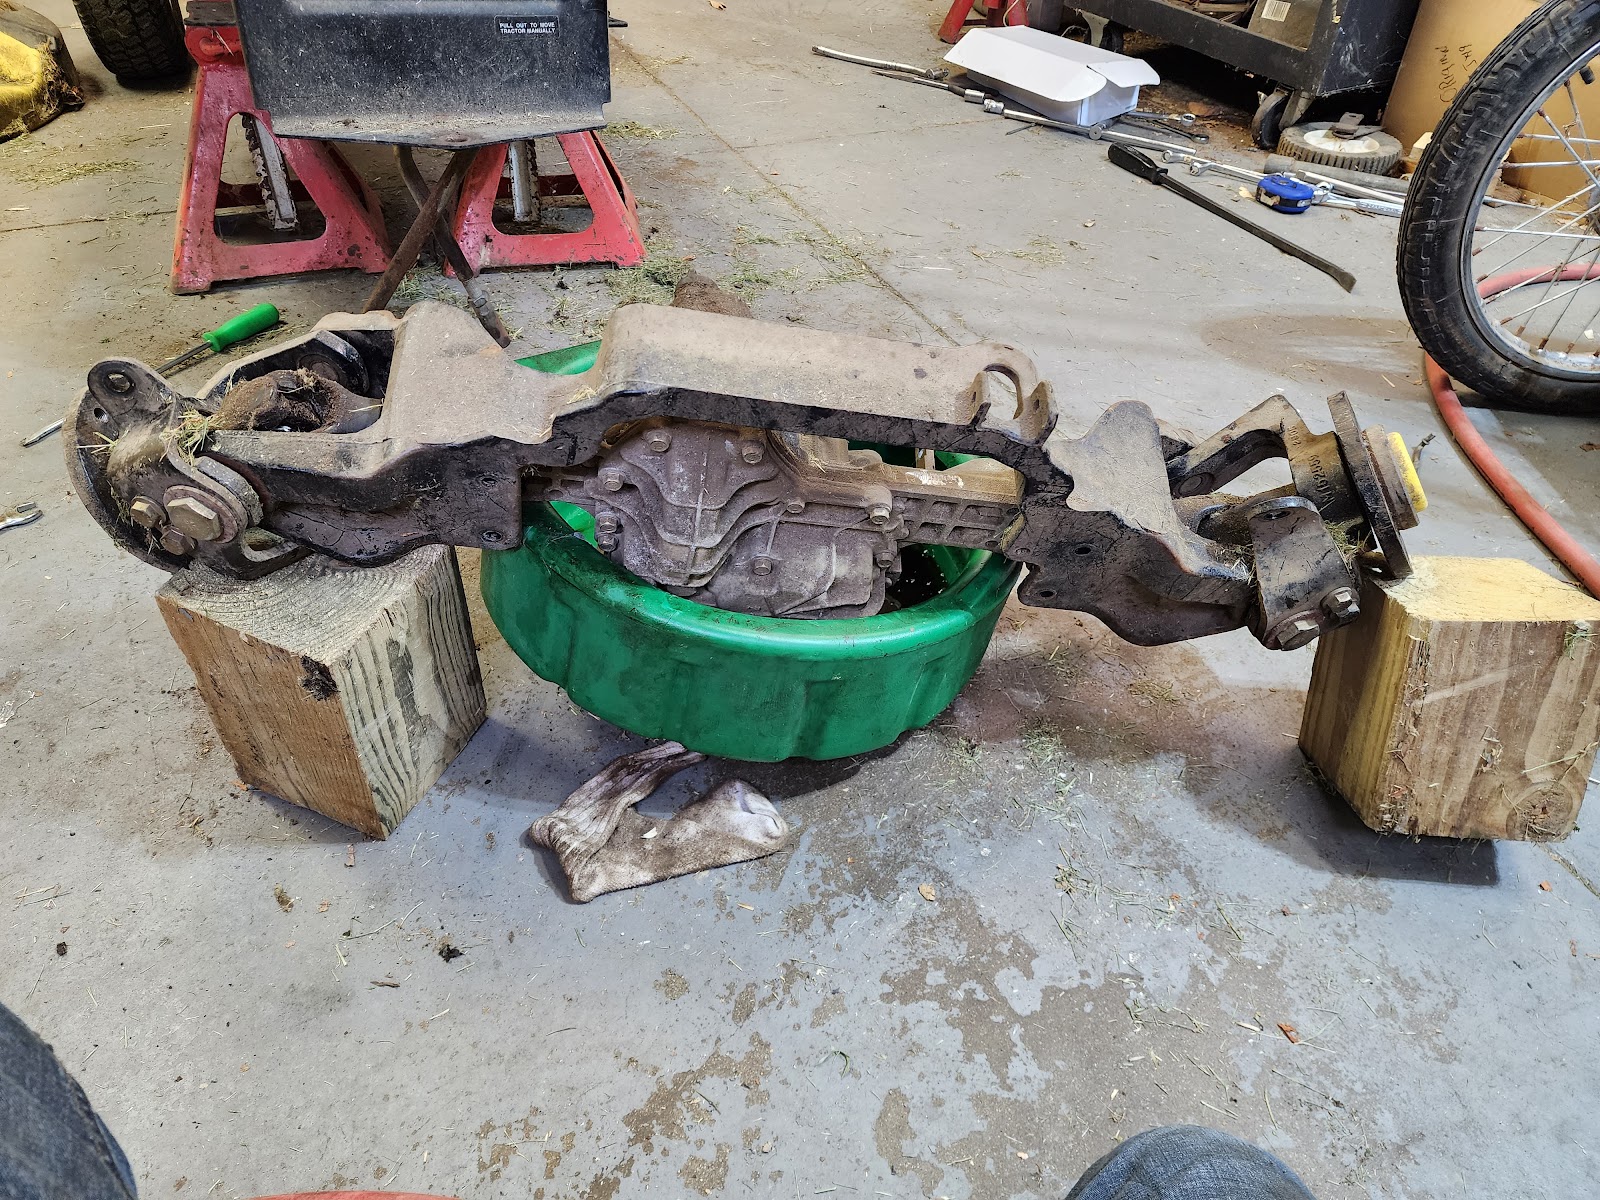
The wheel carrier, and trans are connected as one unit , and are unstable, I placed them on 6x6’s so that they are supported

Above is pic of 6x 6 holding carrier and trans flat, with better placement of the 6x6 than the earlier picture . Note that when the 6x6 are placed farther apart than in the above picture, it’s not stable because they hold the flexible U joint ( 4ws) .
But later I realized the 6x6 raised the trans too high to reinstall, so I replaced with 4x4’s which was correct height for me
Reinstallation
The carrier and trans going back up on your jack remain as unstable as before .
You must avoid hanging up on the various rods that connect to it, and for 4w steer folks like me, also need to be especially careful of the tie rods, which hang up easily. I found it best to use the front L- shape support as the first place to hold the trans and carrier relatively in place while continuing to jack. And also to keep it from falling off the jack. I used a longer bolt to first make the connection between L shape and frame, since i could not get it lined up precisely correctly. Then tightened that to bring the trans into more precise alignment. Later, I changed to the short original bolt.
Then reconnect the 3 or 4 rods:
The brake rod on left won't enter its hole unless you release the parking brake.
There is a bit of interference between the right side shift rod and the white fan blades. They are flexible enough to bend to allow the rod to pass by them as it drops from its higher position down to the hole it is attached to. Just make sure to use your fingers to allow the blades to easily bend around the rod, don't break them. They are relatively fragile,
Damper: I took the whole damper out since I could not get the clip off, but once it was out, I tried it and it appeared to have no damping action at all that I could appreciate , so I did not bother to reinstall. I might or might not buy a new one (i do have jerky starts and stops, also. maybe i should replace it). Depends on how much it costs.
Reinstalling the drive belt: mine had fallen down about an inch from the engine drive pulley, which blocked it from extending back enough to remount on the trans pulley. (reminder: make sure park brake is on, to relieve belt tension). once i got it back in place on the front pulley, it went easily on to the trans pulley
I’ve seen write ups that talk about need to remove air bubbles by shifting back and forth a number of times. I did not do that, but i did rotate the pulley for a minute with a battery-op drill, no bubbles seen, andmine worked imediately after i put it back on the ground
And now you’re done!
To start, I removed the mower deck and wheels. Not sure either was necessary, although I probably made more room to work. I didn't remove the fender, or gas tank, instead all the work was done from below. But might have been easier access with them off. After this first time removal, though, i won't bother with any of those removals the next time i do it, since i have a much better idea of where things are and how they fit
Jacking :
first loosen but don’t remove all 4 long vertical bolts(13mm) that hold the transaxle to the frame, easiest while all 4 wheels on ground . Then , if you plan to remove the wheels, loosen wheel lug nuts(16mm) now.
Jack up the frame from rear, then put two jack stands more forward on each side of frame, then remove jack (you’ll need it to lower the heavy transaxle/ axle carrier combo later)
Start by removing the drive belt, which lifts right off the transaxle once the parking brake is set. Let it rest there.
Then, you have to remove the 3 or 4 control rods/shafts that connect to the transaxle. This was actually the hardest part, dealing with small clips, springs etc.
One control rod is the (1/4in diam) run/neutral freewheeling rod that protrudes out the rear of the tractor. it's held on to the trans by one of those cheap tinnerman flat spring nuts (that are the bane of home repair guys like us) After you remove it , use a pair of pliers to push the rod up out of its hole. I could not pull it out by hand, it’s tight.
This next pic view is from lying on floor, on right side of tractor, looking up and towards the center of tractor :
The above pic is from top, which you won’t be able to see until trans is out
Second: On the left side of the trans is the brake rod which is an easy, obvious disconnection
Third and fourth: On the right side, you’ll see a large vertical control rod going up from the trans, w two connections to rods that go forward.
In this pic, you can see the shift rod still installed on the vertical control rod, with its hitch pin already removed and the hole visible
Her is another view of same vertical control rod after trans is out ,and both rods disconnected
The upper connection is a stud for the “ damper” rod, (this might be optional equipment) There's a small clip that holds the damper rod to that stud on the vertical bar, that I could not remove, in spite of the deere manual showing how to .
Instead, to get it out, I removed the bolt holding the forward end of this damper, easily seen about a foot forward, a horizontal stud, going thru a hole on the right side of the frame.
You'll need a 15mm wrench on the inside of the frame to hold the hex on it's stud as you unscrew the visible nut. After the transaxle was removed, I could better see how to disconnect the damper rod clip, see photos. You need a thin screwdriver to partially release the springy clip that fits into a groove on the stud
Fourth :
Lower rod. (the shifting rod) . a pretzel-like Hitch pin holds it in place. Then it can be pushed out of the hole
Put your jack under the trans, then remove the supports:
the 4 long bolts that hold the transaxle to the frame, this next pic is after they are removed and trans lowered by a couple of inches
And the one bolt holding the L-shaped front support to the frame
Next pic shows trans and axle carrier combo, on the jack, lowered about two inches, after the 4 long bolts and front support bolt removed. 4ws tie rod visible across bottom, and steering knuckle on lower right . the tie rod shown is only present in 4ws models
For the 4 wheel steering systems, which I have, the rear tie rods are still attached to the steering mechanism which is attached to the frame. You need to remove tie rods(18mm.) to continue lowering the trans (I needed my impact wrench to remove tie rod nuts). Also need a 17 mm wrench to hold top of tie rod to finish unscrewing the nut
The transaxle is now free. It won't be stable on the jack, so be prepared .
It will come down along with the heavy cast iron wheel carrier ( and tie rods if not yet removed , for 4 w steer)
that's the hardest part .
next:
Lift off pulley and fan
draining the fluid:
The flat black drain cover, only accessible after you remove the fan and pulley, is just a very very tight press fit. I used a chisel, you can use something similar to pound it up. Once it’s removed, you'll see the vertical 1 inch diam coin shaped magnet. The amount of steel filings that are adhering tells you how much wear your trans has had since the last cleaning of the magnet. Mine was practically spotless: 17 yrs but only 400 hours,
Next pic of 6x6’s used to hold the upside down trans and carrier above the plastic oil drain pan. It’s heavy enough that i feared it would crush the plastic pan
The wheel carrier, and trans are connected as one unit , and are unstable, I placed them on 6x6’s so that they are supported
Above is pic of 6x 6 holding carrier and trans flat, with better placement of the 6x6 than the earlier picture . Note that when the 6x6 are placed farther apart than in the above picture, it’s not stable because they hold the flexible U joint ( 4ws) .
But later I realized the 6x6 raised the trans too high to reinstall, so I replaced with 4x4’s which was correct height for me
Reinstallation
The carrier and trans going back up on your jack remain as unstable as before .
You must avoid hanging up on the various rods that connect to it, and for 4w steer folks like me, also need to be especially careful of the tie rods, which hang up easily. I found it best to use the front L- shape support as the first place to hold the trans and carrier relatively in place while continuing to jack. And also to keep it from falling off the jack. I used a longer bolt to first make the connection between L shape and frame, since i could not get it lined up precisely correctly. Then tightened that to bring the trans into more precise alignment. Later, I changed to the short original bolt.
Then reconnect the 3 or 4 rods:
The brake rod on left won't enter its hole unless you release the parking brake.
There is a bit of interference between the right side shift rod and the white fan blades. They are flexible enough to bend to allow the rod to pass by them as it drops from its higher position down to the hole it is attached to. Just make sure to use your fingers to allow the blades to easily bend around the rod, don't break them. They are relatively fragile,
Damper: I took the whole damper out since I could not get the clip off, but once it was out, I tried it and it appeared to have no damping action at all that I could appreciate , so I did not bother to reinstall. I might or might not buy a new one (i do have jerky starts and stops, also. maybe i should replace it). Depends on how much it costs.
Reinstalling the drive belt: mine had fallen down about an inch from the engine drive pulley, which blocked it from extending back enough to remount on the trans pulley. (reminder: make sure park brake is on, to relieve belt tension). once i got it back in place on the front pulley, it went easily on to the trans pulley
I’ve seen write ups that talk about need to remove air bubbles by shifting back and forth a number of times. I did not do that, but i did rotate the pulley for a minute with a battery-op drill, no bubbles seen, andmine worked imediately after i put it back on the ground
And now you’re done!
