Yeh' I know I should be all finished and ready for snow....I had so many problems.....even with all the help I recieved from all you guy's....I needed to add up all the don'ts and the do's mistakes and refabricate in my mind...and came to a conclusion....
tear it all apart....start over.... plus learn how to weld....with a little wire feed 120 volt 125 amp Lincoln....which states only welds up to 1/4" thickness..which is plenty for anything I'll ever need to weld up......I needed a rest from it all....but got back to it on the weekend....yes guys I have new pic's.....it don't look too pretty....but I think it will work....give me the good and the bad...
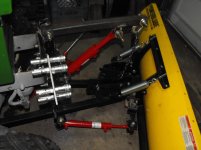
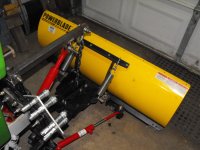
this is an ISEKI greymarket tractor....hard to work on.....and very little room to mount anything....I should maybe of posted this in the ISEKI section....but a tractors a tractor....regardless if it's a brand name.... a full size or a compact....the main thing is I'm still chugging along with this project or whatever it's called..... this is only a mock up to see what's what....
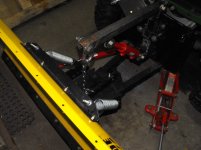
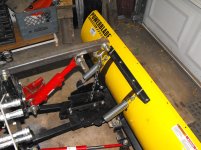
I do intend to round off the sharp corners/edges on the QD aluminium plate and any other piece of metal that has any sharp edges..for my own protection...I managed to grab a 8" stroke ram/cylinder as the one I had was only a 4" stroke....here's a bunch more pic's of where I'm at.......Ampa <>
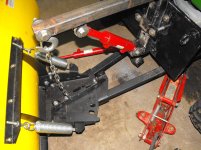
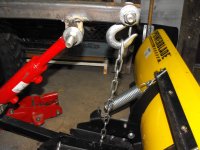
More Pic's....I'm finished all the welding.....now to connect up my hydraulics....I know there are some things that should have been done differently....this was a manual snowblade....I wanted it to work with my tractors hydraulic's....I done a lot of sidewalk clearing last winter.....
so this is why I chose only a 48" blade....last winter my other blade had only a winch for lifting it up and down....for the angle I had to dismount to activate a homemade lever I installed as the cable cable broke that sort of activated the angling......between gettin' off the tractor and many broken cables to repair it was no fun at all....if this new 48" plough works as planned.... it should be a breeze to clear any amount of snow this winter....
I'll keep you guys all informed how I make out....I'll post a bunch more pic's when I get all the hydraulic hoses made up and connected....I had to finish all the fabricating before I start mearsuring for the hydraulic hoses...this should be fun...
is there any easy way to do this?(mearsuring???)...... this whole project wasn't as easy as I planned....but then nothing ever is.....I guess building a cab will have to wait for awhile longer.....
these rented townhouse's have very low ceilings and the garage door frames hang pretty low as well....so I may have to scrap the cab incloser idea all together....anyhow guys enjoy the new pics....thanks and take care.....Ampa <>
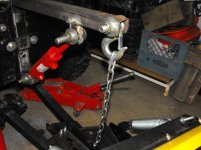
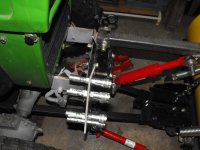
I had no problem I just hacked up the mmm brackets that came with the tractor...redrilled mm holes to line up ....it's solid....if at some time the holes get loose or worn on the "A" frame... I'll just weld on a piece of 1/4" plate drill a large hole and install a couple of stainless steel bushing's for each side...I have tons of used stainless steel bushing material I've saved from old broken machinery I've scrapped through the years...
I'll just have to wait see what happens after this winter is over..... I'll have all summer to work on it....us pentioners aren't really happy unless we have something to keep our minds occupied....
I got plenty of things to do around here to keep me healthy and fit.....about that cylinder.....it can't slip..it's wedged solid with 1/2" shoulder bolts usin' a 1/4" thick bracket for the top piece and the other turned upside down... even hitting it with a sledge hammer won't budge it....don't ! ask me how I know this ...
I did think about weldin' it in place to the "A" frame but havin' the means of sliddin' it back and fourth for the angle adjustment is a bonus I think... I could drill a hole or two through the top bracket and down through the"A" frame... this way I could just redrill if it were out of alignment...we'll wait see what happens when I get the hydraulics connected and workin' to see if I get the full left and right angle.
to try and break away even my sloppy lookin' welds would make a mess of things...anyhow Iplayfarmer... thanks ever so much for your (lookin' good) comment....I did use up a lot of my old scrap 1/8" and 1/4" metal I had layin' about....
I've been saving bed frame angle iron to make a steel work bench....I won't be makin' it heavy duty..as long as it don't catch on fire... had my old wooden bench smokin' up a few times usin' my 120 volt 125 Lincoln wire feed welder.... I did find out that the smoke alarms work...I needed my tractor ready for snow that will soon be here I suppose.... take care....Ampa<>
Seems.....I must have done everything here correctly....so now it's on to the next issue of connectin' up all the hydraulic hose's and fittings......thanks to everyone... I couldn't have done this without all of you who took their time to offer their technical advice and suggestions.....and promise to keep you all posted on the final results....Ampa <> :thumbsup:
Mitsubishi MTE2000D, Dig It 258 Mini Ex, Deere Z930A ZTR
I've been following and looking foreward to seeing some action shots soon. I really admire the fact that you dove right into this project. You needed to weld,so you got a welder and started welding. Don't know much about hydraulics? Hey, you figured some things out. You used a lot of what was available to you...that's always bonus points on my score card! Grey market tractor..bonus points.
Now the crescendo is building.....the final hydraulics and "Houston, we have lift off!" Keep us posted :thumbsup:
Thanks for your interest and sincere comment....my only concern is this...are the hydraulics gonna' work properly ?....are the fitting's gonna' leak !....I've always done my own home plumbing and never had leaks...
but then again household water pressure is no where near hydraulic pressure...believe me I'll be reporting back the good bad and the ugly....and me with 3 very nice nearly brand new digital cameras and my lady does not how to use one...
so the action shots would be nice....but need a pro cameraman on site....anyhow I'll see if I can get someone that can video record ploughin' with my new 48" snowblade...haven't quite added up everything what it has cost me.....top of my head.... rough guess for everything....Hmmmm around $1500.00 cdn. not includin' any of my labor...does this price sound okay to you guys or what? ....take care Ampa <>
Really nice job Ampa. I think you're going to have a lot of fun with it.
If I may make one suggestion, next summer when you have time, I would think about putting a bushing with a grease fitting in the blade pivot to replace the bolt. That bolt is going to be taking all of the stress from the blade and from rotating and over time it will wear not only the bolt but the frame hole around it. Then again, you may never have any problems with it but you've gone to a lot of work and a bushing would only make it stronger.
Just my thoughts (and they aren't usually worth much):laughing:
Although I did have to buy a new metal chop saw...and a new cut off saw....this time around I bought brand name items.....yes these are tools and not included in the quoted cost(price).....if I had left it alone and used an electric winch I would have not had to do so much modification....but no I wanted only
hydraulics..
It will be a difference between night and day...over an electric winch....Uggg I hate those things....anyhow found out how exspensive hydraulics are even if your tractor has hydraulics...I've never seen so many fittings for a simple application such as a plough for up and down... with angle options.....I'm not complainin' I'm just askin' did I pay too much ? or am I ahead...
If it works okay I'll be quite happy....as for the plough angle bolt...I just finished redrilling the front blade where it attaches to each side of the "A" frame they supplied a cheap steel bushin' to fit the "A" frame only... and blade swivel on the bolt thread...dumbest thing I'd ever seen...seems I'll have to do the angle swivel section as well....
don't these factories ever build quality stuff anymore...this complete frame and snowblade so the box read is built here in Canada.... Hmmmm could have fooled me....I thought maybe Tiwan or China...even they can now build better quality items.....anyhow no sense gettin' into this discussion...I bought it and modified it so now I'll try and improve it Thanks guys for the great comments....my first time gettin' involved with something so complicated....I must admit at times I was stumped....I wanted to make it work...and hope it does....take care...Ampa
")
 DSCF5130.jpg1,007 KB · Views: 187
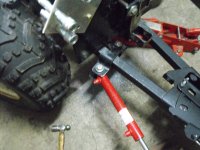 DSCF5131.jpg1,004.4 KB · Views: 141
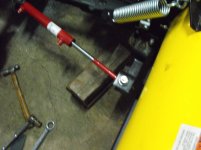 DSCF5132.jpg897.6 KB · Views: 116
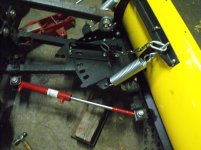 DSCF5133.jpg949.8 KB · Views: 126
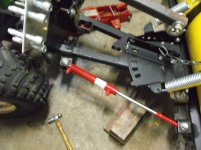 DSCF5134.jpg1,004.6 KB · Views: 144
 DSCF5135.jpg1,005 KB · Views: 128
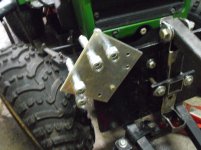 DSCF5137.jpg997.9 KB · Views: 129
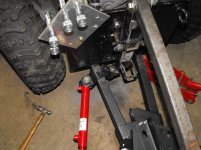 DSCF5141.jpg1,010.5 KB · Views: 110
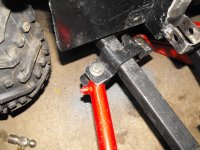 DSCF5142.jpg1,018 KB · Views: 114